Capture
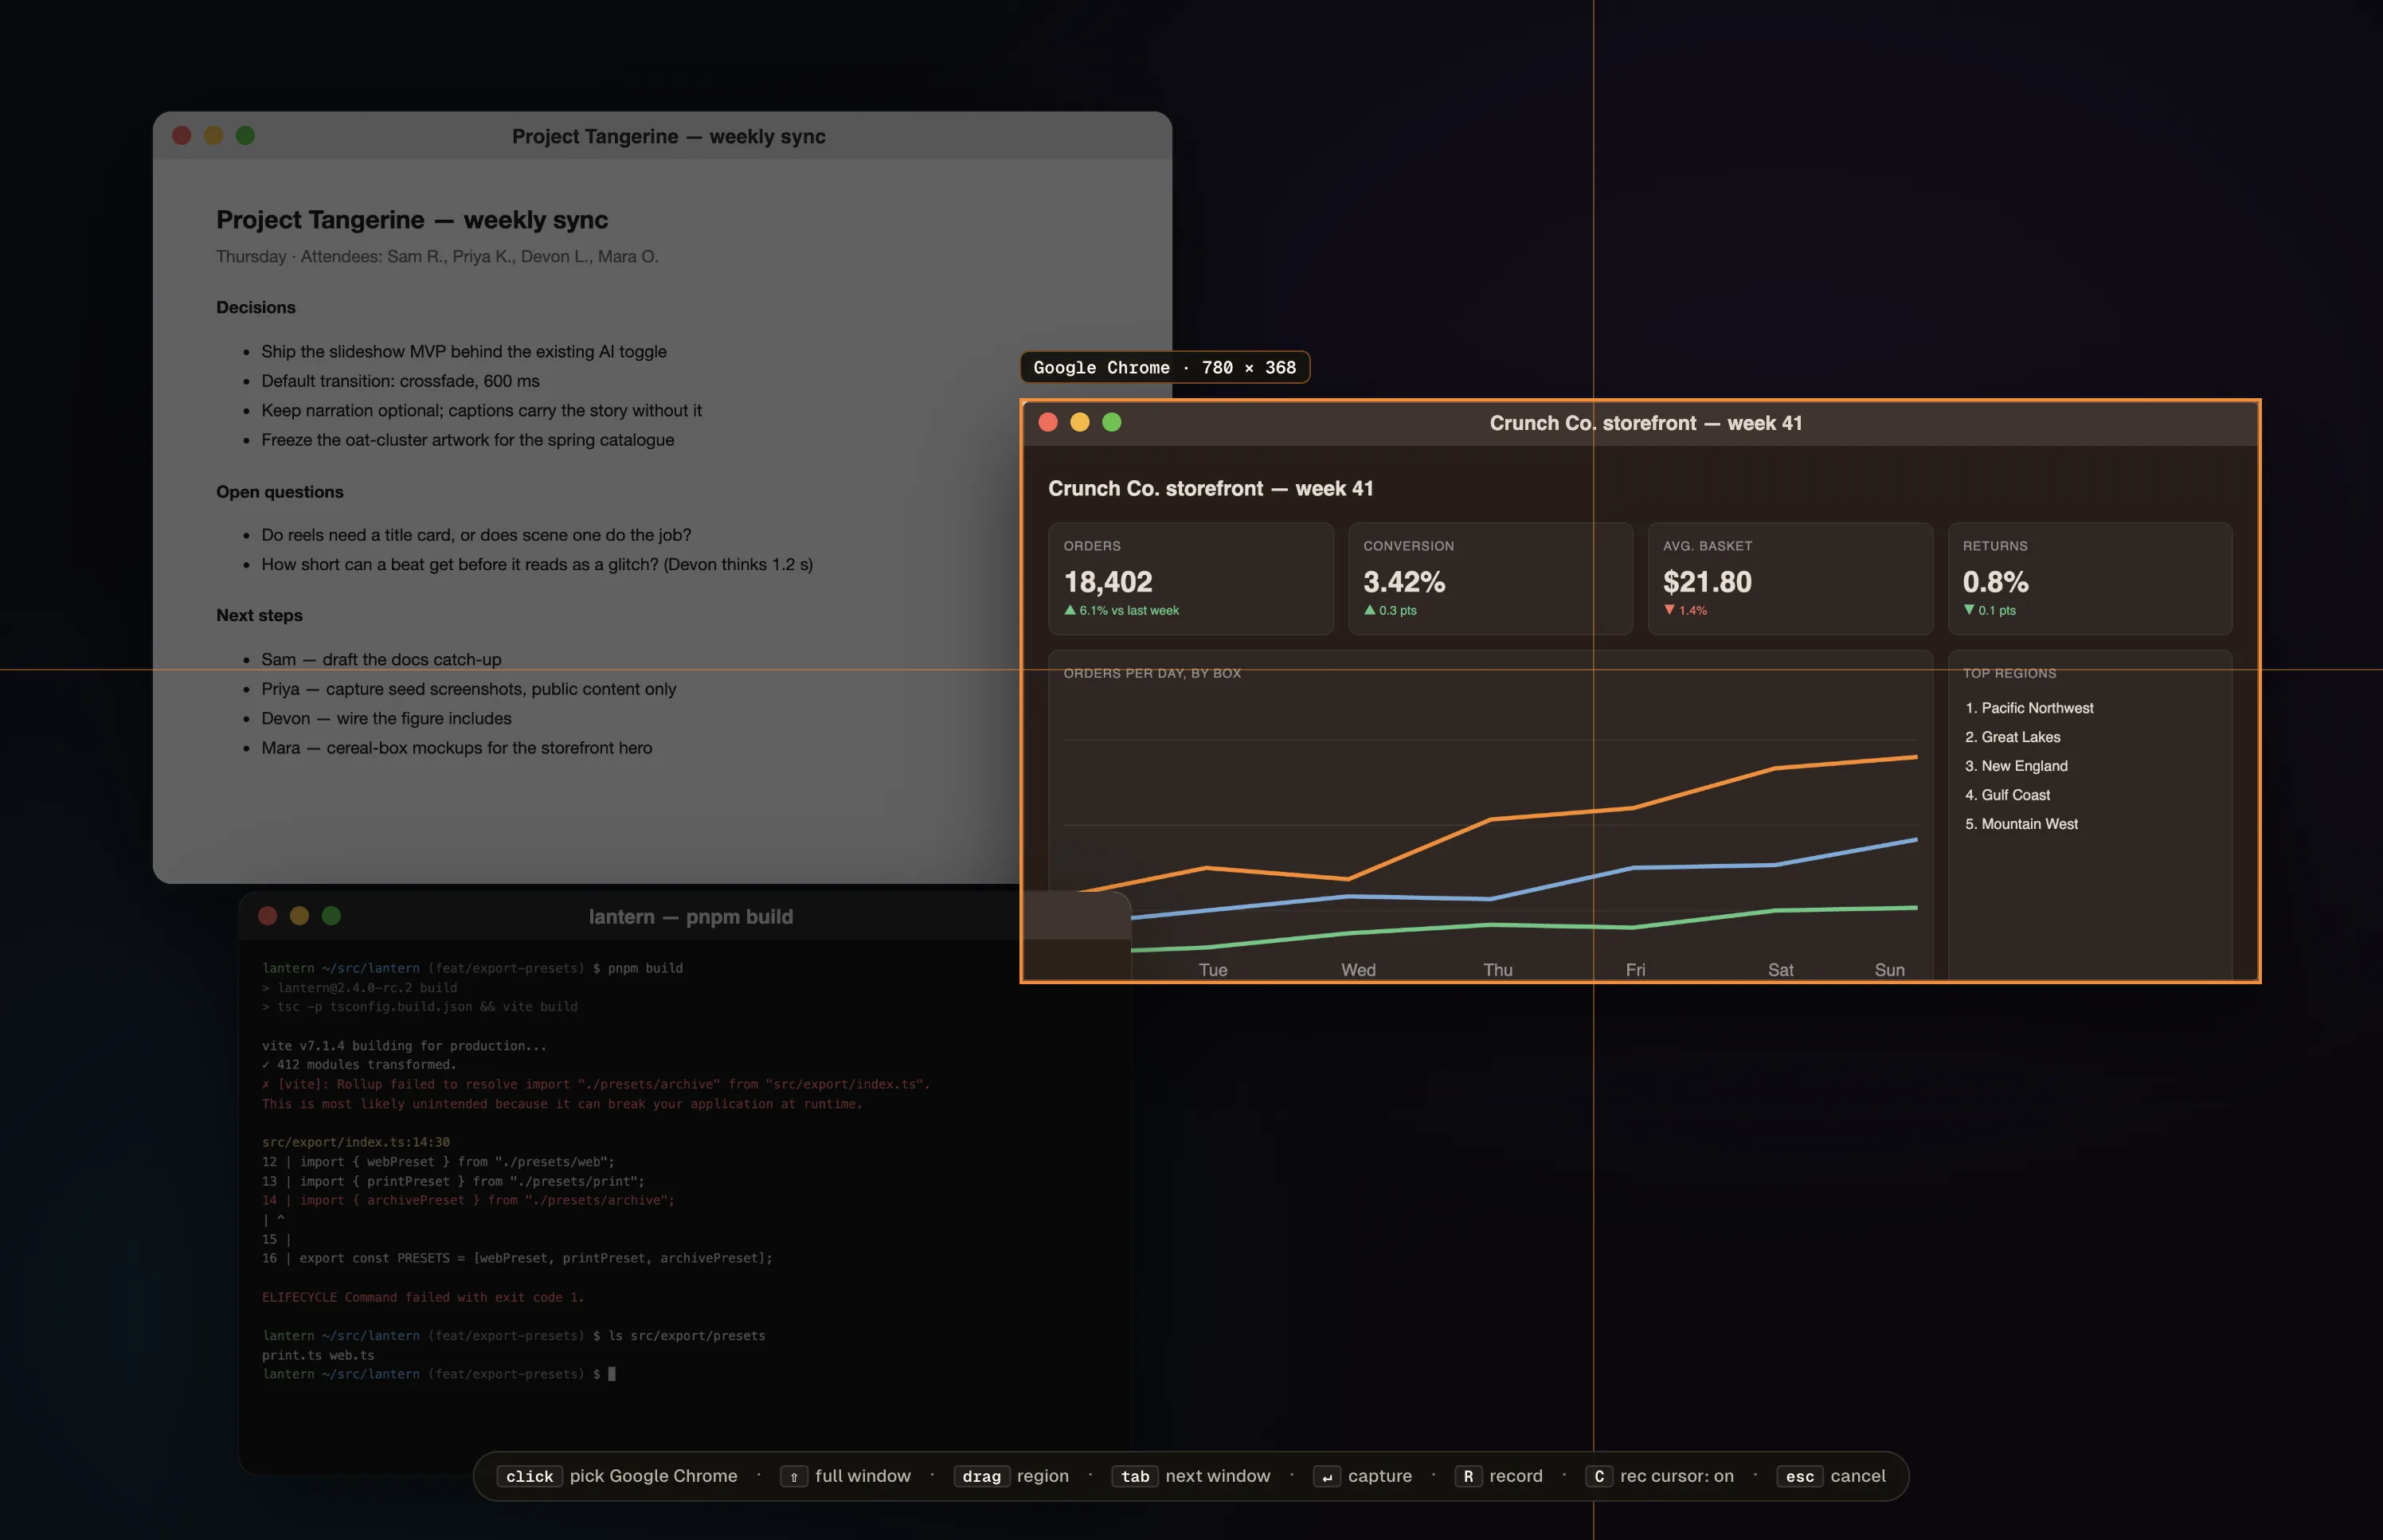
PwrSnap hangs off one shortcut — Quick Capture, Command+Shift+C (Ctrl+Shift+C on Windows). Hit it from any app and the selector freezes the screen under a dim scrim. From there:
- Snap a window — hover it and its edges light up; click to pick it. Click more windows to take several at once, with the gaps between them left transparent.
- Draw a rectangle — drag out any region instead.
- Take the whole display — point at bare desktop, where no window is, and click.
Return takes the snap. With the default After you select setting, R records the same selection as a video instead — the choice comes after the selection, so one shortcut covers stills and video. A float-over toast then appears in the corner with Command+1 / Command+2 / Command+3 ready to copy a Low / Med / High PNG to the clipboard. Paste into Slack and you’re done. That’s the daily-driver flow the whole app is built around.
Quick Capture
Command+Shift+C is PwrSnap’s primary global shortcut, bound by default on both platforms. It opens the selector on whichever display your cursor is on.
Once the selector is up, thin crosshair guide-lines follow your cursor, and a hint bar along the bottom names what every key does next — including the window a click would pick.
- Hover a window to snap to its edges. Hold Shift to take the full window instead of what’s visible of it — the capture comes out as if nothing were stacked on top. Tab cycles to the next window under the cursor when the one you want is buried; Shift+Tab walks back.
- Drag to draw a rectangle. Release and it freezes with eight resize handles, but doesn’t commit yet. Drag a handle to resize, drag the thin bands just inside the edges to move it (or hold Space and drag from anywhere). Arrow keys nudge by 1 pixel; Shift + arrow nudges by 10.
- Changed your mind about the region? Drag again — dragging inside a committed pick sketches a new rectangle in its place.
- Take more than one window. See Several windows at once.
- Return commits. Escape steps back: from a committed pick or a pick set it returns you to aiming; a second press exits. The hint bar always says which one the next press does (back or cancel).
The selector works on a frozen copy of the screen, so apps opening or closing while you aim can’t change what’s under the cursor. It’s intentionally lightweight, so it stays smooth even over Splashtop / Parsec remote-desktop sessions. Holding the hotkey down, or hitting it twice in a hurry, won’t stack up duplicate captures.
You can rebind Quick Capture in Settings → Hotkeys.
Several windows at once
Click a window to pick it, then click more. Each pick gets a numbered badge, a chip in the control bar at the bottom, and an orange outline; the badge at the top-left of the selection counts the windows and gives the size of the box around them. Click a picked window again (or the × on its chip) to drop it.
PwrSnap captures exactly those windows and leaves the gaps between them transparent, so two panels side by side don’t drag the desktop along with them. The selector shows those gaps as a checkerboard. With two or more picked, T — or the Windows / Rectangle switch in the control bar — flips between the transparent gaps and the whole box, background and all.
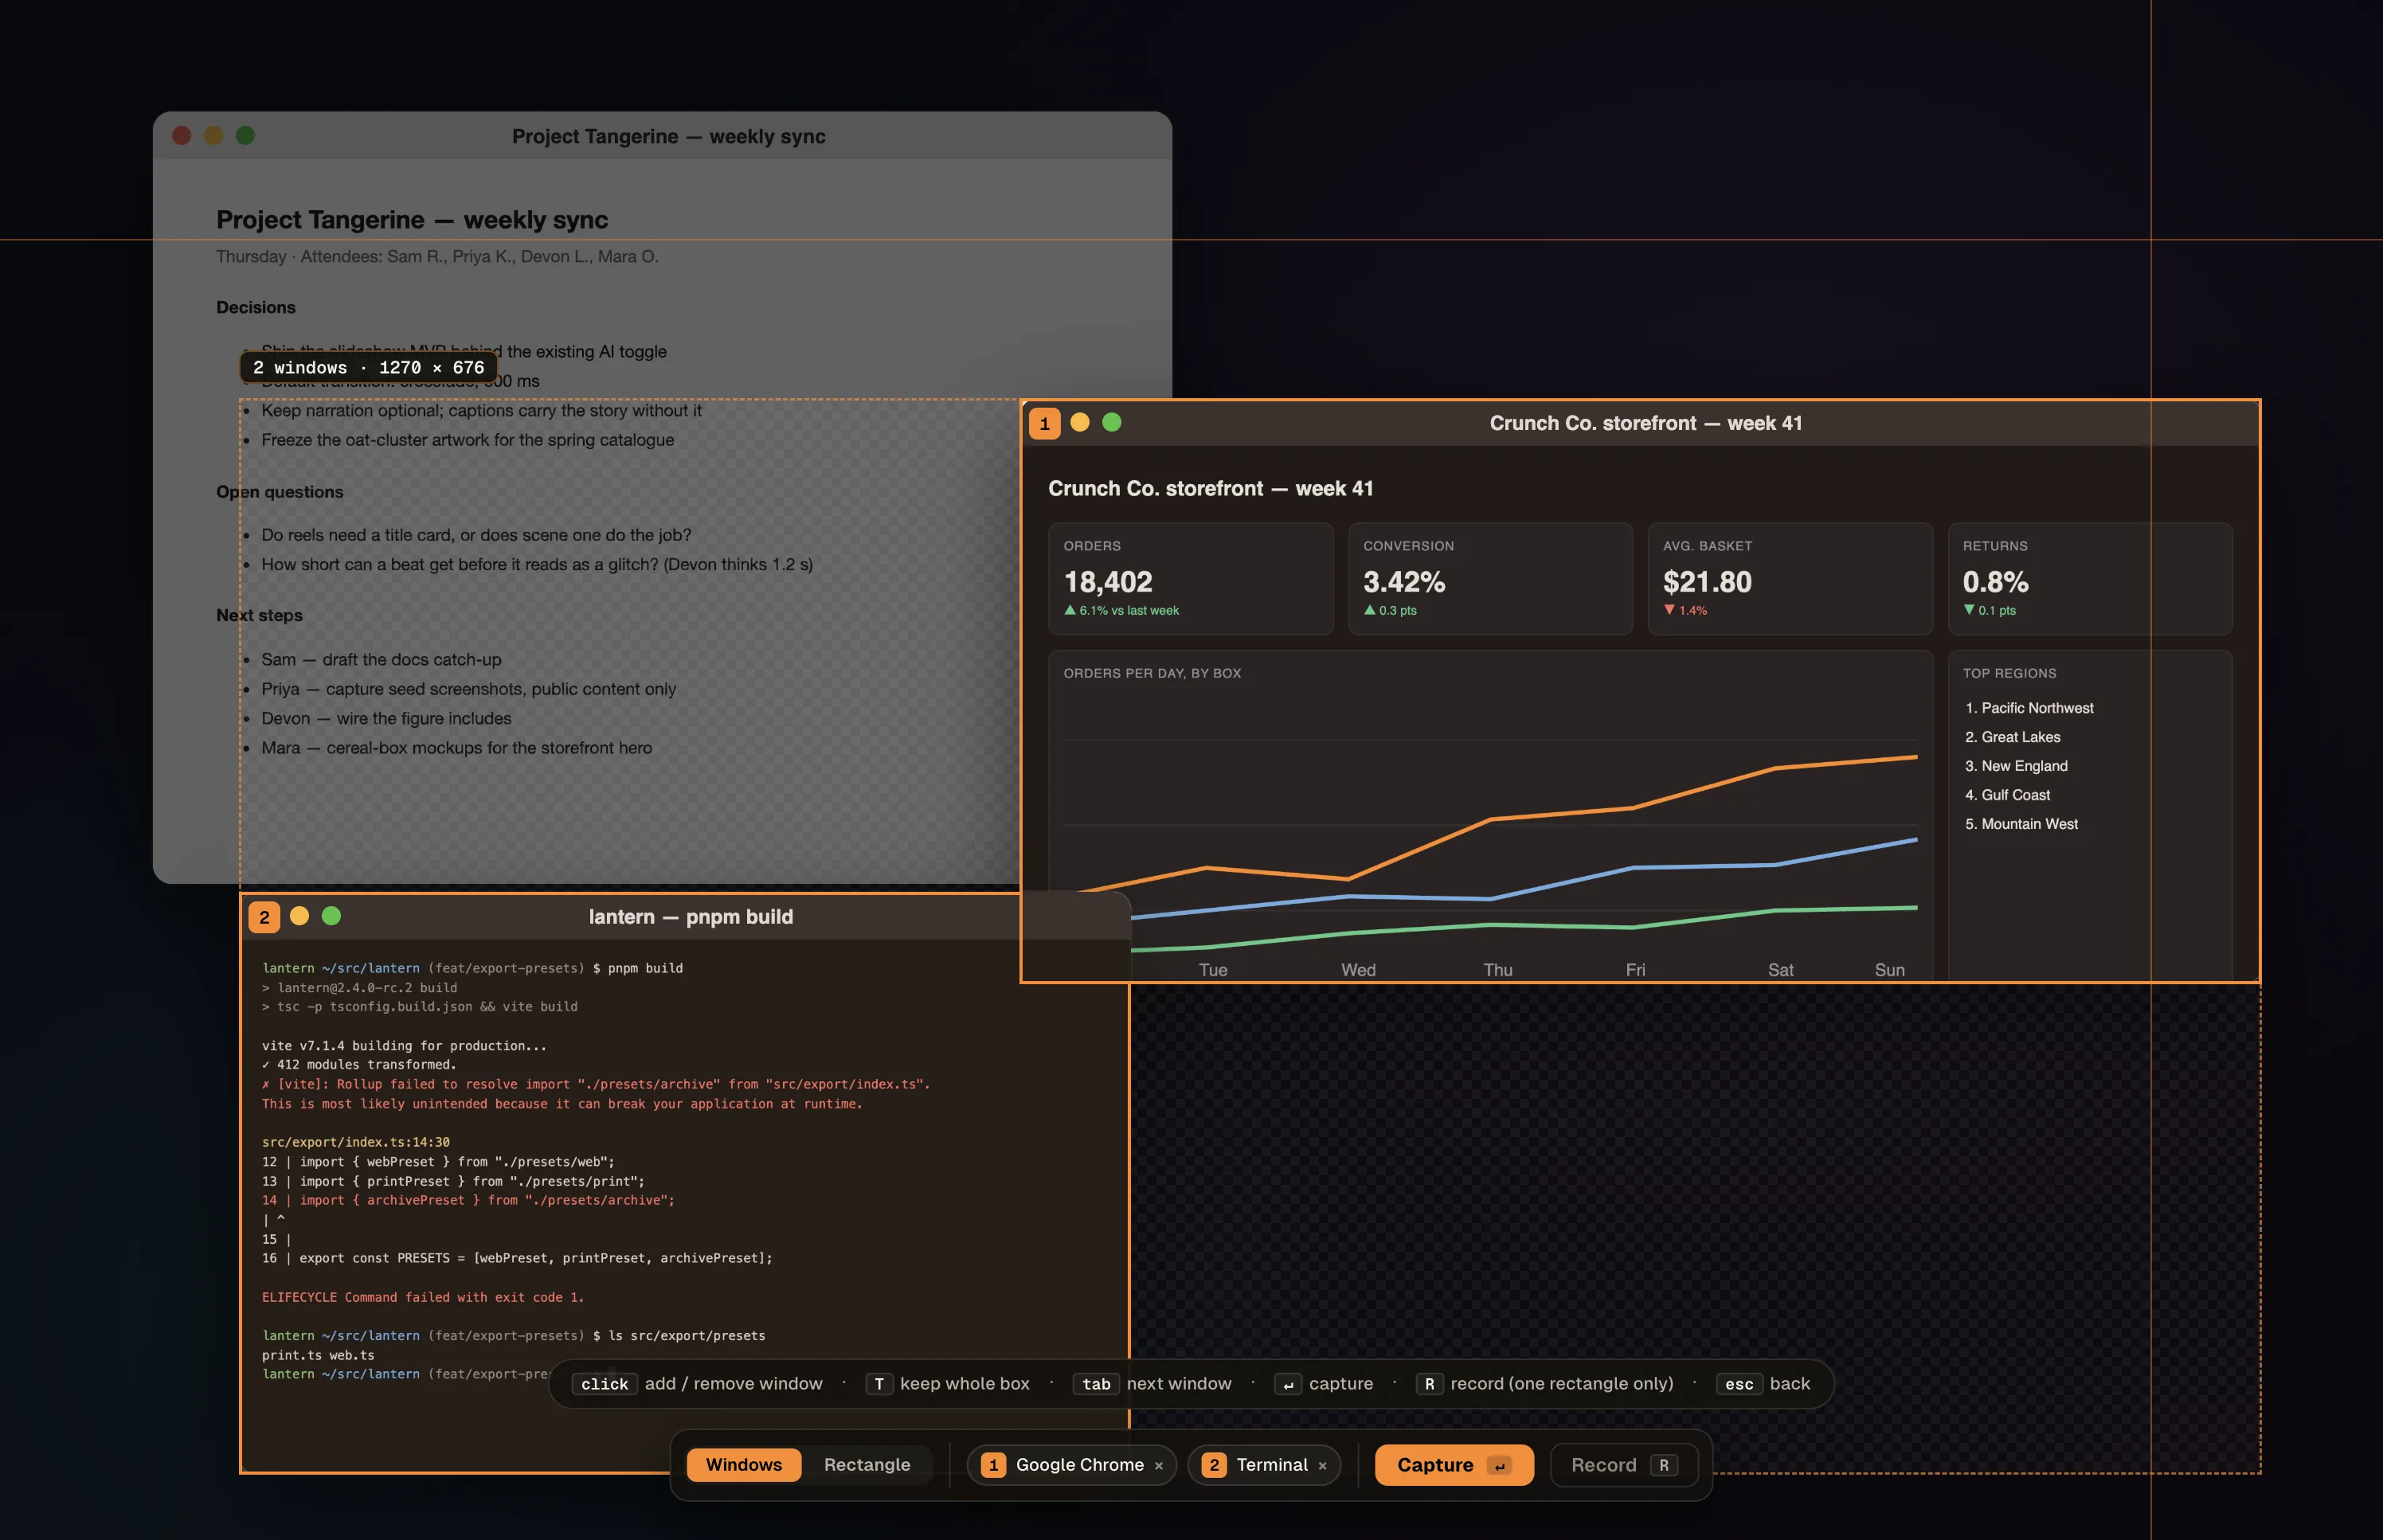
A pick is the window’s area on the frozen screen, so anything overlapping it at that moment is in the capture. Recording needs a single rectangle: with two or more windows picked, the hint bar reads record (one rectangle only) and R does nothing.
Snap or Record
What Return does is a setting: Settings → General → After you select.
| Setting | Return | Other key |
|---|---|---|
| Ask (default) | Snap | R records the same selection |
| Snap | Snap | none — no Record action at all |
| Record | Record | S takes a still |
Wherever recording is on offer, the hint bar also carries the recording toggles: C for whether the cursor is recorded, and on macOS M and A for the microphone and the system audio. Each shows its current state, so you never start a take guessing what’s armed. The Video hotkey always records, whichever setting you pick.
Video
Recording is a first-class capture, not an afterthought. Either press R on a selection in Quick Capture, or use the dedicated Video capture hotkey — Command+Option+C on macOS, unbound on Windows (set one in Settings → Hotkeys). The video selector is the same selector: click a window or drag a region to start. A 3-second countdown runs inside the area, and recording starts when it ends. Escape during the countdown cancels before anything is recorded.
A tangerine frame sits around the area being recorded for the whole take, so there’s never any doubt about what’s in shot — and PwrSnap keeps its own HUD, toasts, and tray popover out of the finished file. (The frame can be turned off under Settings → General → Recording frame.) If something is going to stop the recording before it starts — a missing permission, an unavailable device — you get a plain-language error with the fix rather than a failed take.
While you’re recording, a HUD shows a pulsing red dot and the elapsed time, with three buttons:
- Stop — ends the take and opens the float-over.
- Restart — discards this take and starts over. Asks for a second press first.
- Cancel — throws the recording away. Asks for a second press first.
On macOS the menu bar shows ● REC next to the PwrSnap icon. The tray’s right-click menu leads with ● Recording mm:ss — Stop and Save, plus Restart Recording… and Cancel Recording…, which arm the same confirmation on the HUD — so you can end a take without hunting for it.
When you stop, a video float-over appears with the clip loaded. Hover to autoplay it, and drag the in/out handles on the mini filmstrip to set a trim range — that range is remembered, and every export from anywhere honors it. The full recording stays on disk untouched. For real editing — a waveform, frame stepping, J / K / L shuttle, splits, cuts, and Cut idle — open the capture in the Library’s video viewer.
Getting a clip into a chat is the point. Every video has a 6-card export grid — GIF and MP4, each in Low / Med / High — in the float-over, the tray popover, and the Library. One click copies that rendition to the clipboard; drag the card straight into Slack, Microsoft Teams, Discord, Finder, or Mail to drop the file. The first render of each preset is cached, so the second use is instant, and a long render shows its progress while it works.
Stop a take under about a second and a half and the float-over says so — “Very short. Stop pressed too soon?” — with Discard right next to it.
Video is a headline action everywhere: a Record Video button right under Quick Capture in the tray popover, a Record Video… item in the tray’s right-click menu, and a Record Video button in the Library header — each showing the live shortcut.
Cursor in or out — your call. Two cursor-capture settings (both on by default) decide whether the pointer appears in screenshots and in recordings. C in the selector overrides it for one recording. On screenshots, the captured cursor lands as its own deletable layer, so even a cursor you captured can be removed afterwards.
Audio
Recordings are silent until you ask for sound — two independent tracks, both macOS only:
- System audio — what your Mac is playing: the video you’re demoing, the call you’re on. It rides the Screen Recording grant PwrSnap already has, so there’s no second permission.
- Microphone — your voice over the top, for narration and walkthroughs. macOS asks for access the first time you switch it on.
Set the defaults for new recordings in Settings → General → Recording audio, or change them for a single take in the selector: A toggles system audio, M toggles the microphone. The control bar shows a status chip per source, with a level meter on the mic so you can see it’s live before you start. A source that needs permission says so, with an Allow action right on the chip.
The Library viewer, the exports, and the copies all carry the tracks you recorded. Each video’s MP4 row has its own Mic / System toggles for what goes into an MP4 export — see Library → Video export presets.
On Windows recordings are screen-only, at 30 fps — there are no audio toggles. See what’s different on Windows.
Float-over
After a capture, a float-over toast appears in the bottom-right of the same display with a preview, the dimensions, a retina badge, and the capture’s age. It dismisses itself on a progress bar along the top, and the countdown pauses while you’re doing something with it — hovering, dragging out of it, or editing a title or tag.
Three clipboard shortcuts while it’s up:
- Command+1 — Low (800 px wide)
- Command+2 — Med (1440 px wide)
- Command+3 — High (source resolution)
Each preset is a card showing its dimensions and file size, and each carries a FILE chip — click it to copy the file’s path, or drag it straight into another app to drop the PNG. The toast also takes an editable title, description, and tags, with the AI’s suggestions offered for you to accept or dismiss (see AI). Edit opens the capture in the Library editor; Dismiss closes the toast.
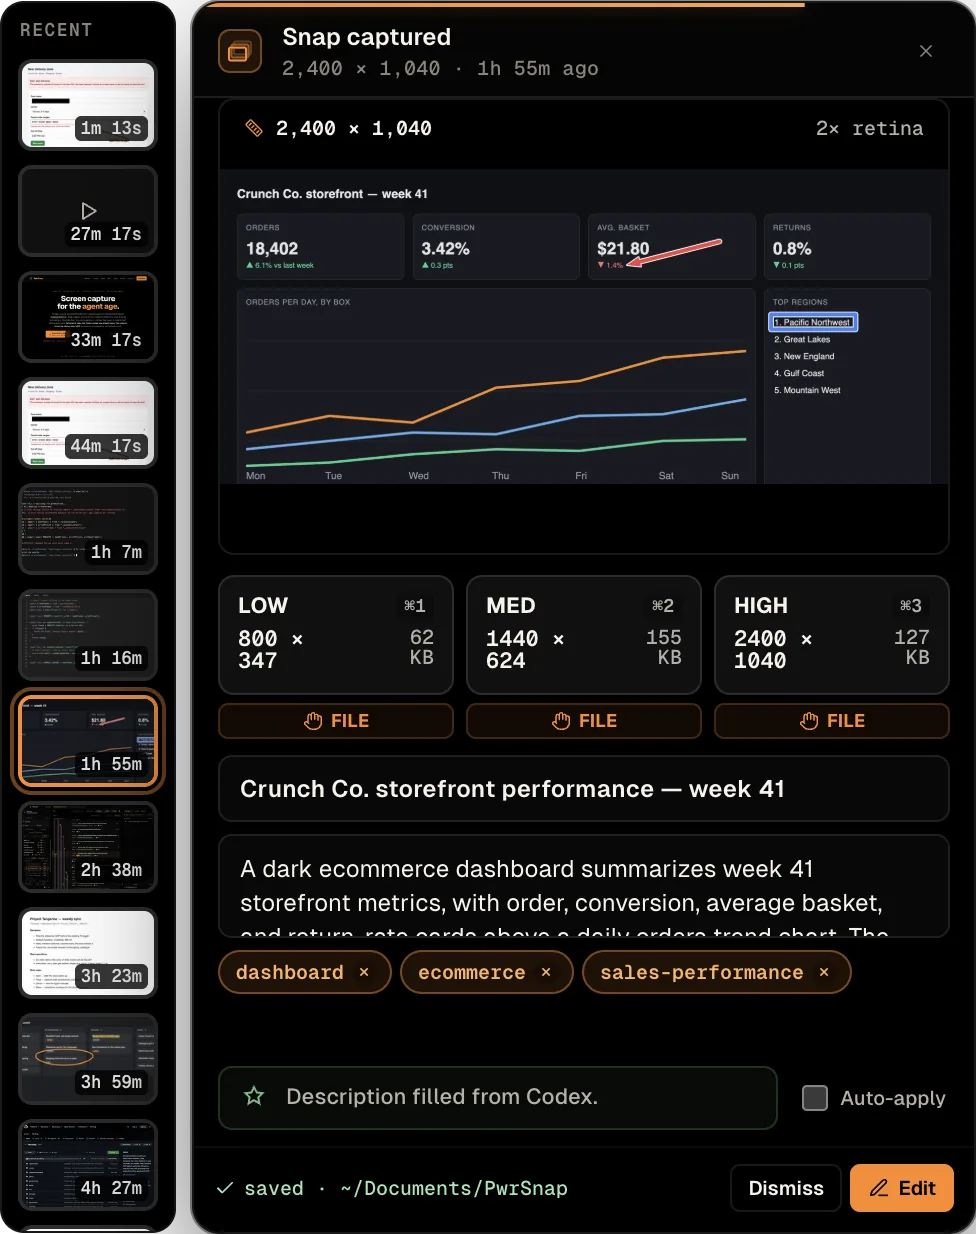
The Recent rail. When the display has room, a column of your most recent captures runs down the toast’s left edge, newest first, each with its age. Click one to load it into the toast — copy it, retitle it, or open it — without going to the Library. Opening a capture from the rail doesn’t reorder anything.
Tucked to the screen edge. A local or slow AI model can take a while per capture. When AI enrichment is going to run, the toast counts down for five seconds; if the model is still working when it ends, the toast tucks into a tab on the screen edge instead of holding the corner. (The Tuck button in the toast’s header does it early.) Several captures can wait there at once — the tabs stack, show whether the model is still reading or has finished, and widen when you point at them. Click a tab to bring that capture back in the toast. With AI off, the toast simply goes away when its countdown ends.
Missed a toast? Command+Option+Shift+F brings the most recent capture back on macOS. On Windows that shortcut is unbound by default; bind it in Settings → Hotkeys, or open the tray popover, which always shows the last capture.
Tray
Click the PwrSnap icon in the menu bar (the notification area on Windows) for the tray popover: Quick Capture and Record Video up top, then the other capture modes, then your last capture with its Low / Med / High copy cards — the same ones as the float-over, Command+1 through Command+3 included.
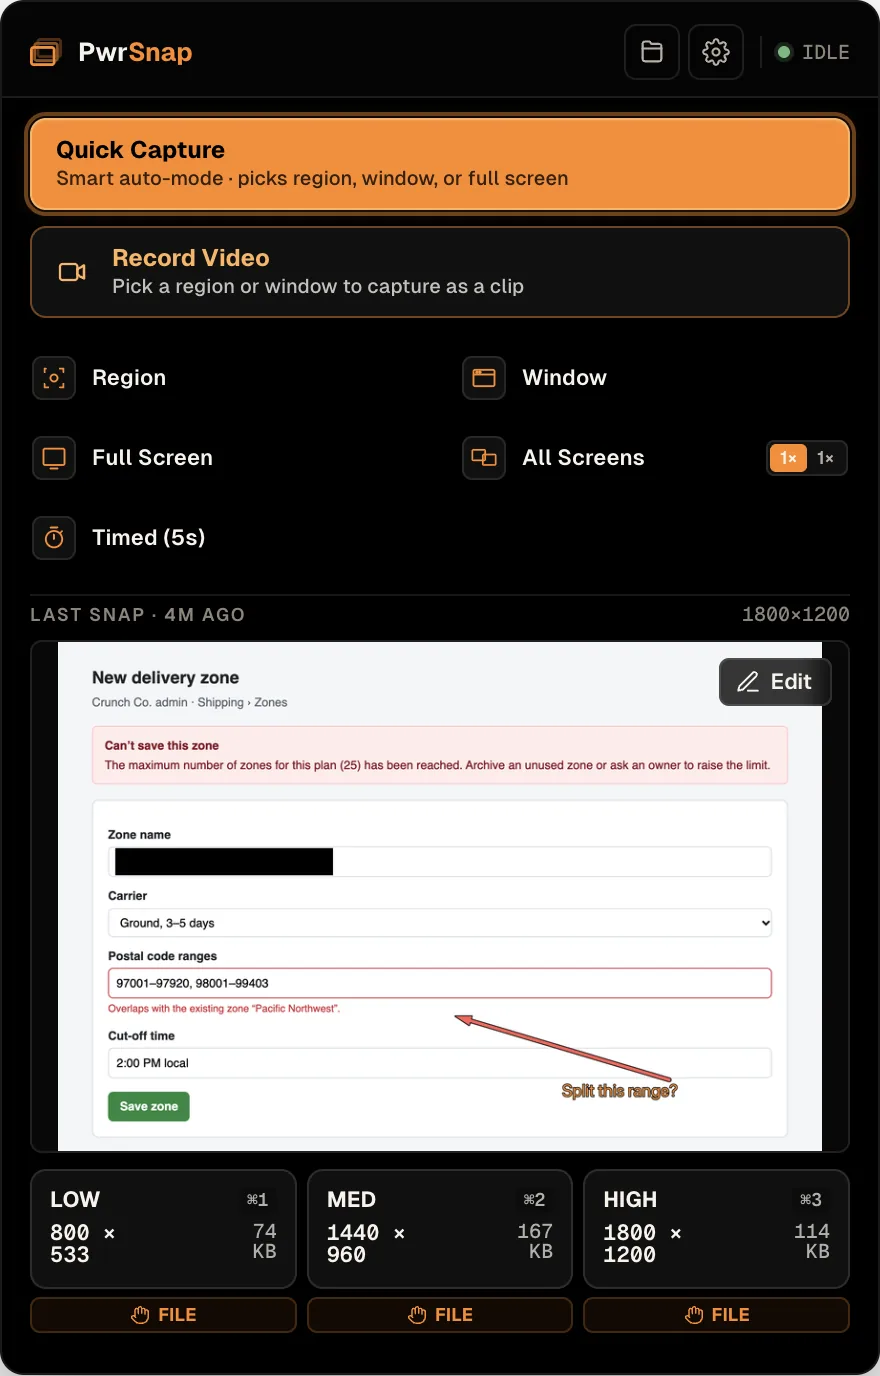
Right-click the icon for a short menu — Quick Capture…, Record Video…, Open Library, Settings…, and Quit PwrSnap — that switches to recording controls while a take is running.
Timed capture
Some things won’t sit still for a keyboard shortcut — an open menu, a tooltip, a hover state collapses the moment you press a key. For those, the tray popover offers Timed (5s): click it, set the screen up the way you need it, and after five seconds the normal Quick Capture selector comes up over it. On macOS the countdown is drawn as text next to the menu-bar icon, not in a window, so an open menu stays open.
The delay is a fixed five seconds. Timed capture comes unbound; give it a hotkey in Settings → Hotkeys if you reach for it a lot.
Full Screen + All Screens
Two whole-screen modes in the tray popover, for when you don’t want to aim at anything:
- Full Screen — captures the entire display the cursor is on. The tray popover and float-over get out of the way first, so they don’t end up in the shot.
- All Screens — captures every connected display, in two flavors
picked from the toggle on its tile (
N×/1×, where N is your display count):- N× — one capture per display, each its own capture in the Library. The default.
- 1× — one stitched image spanning every display. Useful for showing what you actually had laid out across monitors.
Region and Window are in the popover too — Quick Capture restricted to dragging a region, or to picking windows. All four come unbound; bind any of them in Settings → Hotkeys.
Multi-display
The selector opens on whichever display your cursor is on. Adding or removing a monitor mid-session works without a restart.
Source-app detection
At capture time, PwrSnap records which app you were in — its name and its icon — and stores that on the capture. Every card in the grid shows the app icon, and the Library’s left sidebar builds a Source App facet from what it finds, with a live count per app, so “just the Terminal ones” is one click. See Library → sidebar facets.
It also records the title of the window you captured, on both images and videos. The Library shows it alongside the capture, and it’s part of what search matches — so the pull request you snapped is findable by its title even if you never wrote one yourself. The app name is searchable too, and it feeds the readable filename PwrSnap writes on disk.
Source-app detection doesn’t write tags, and it doesn’t send anything anywhere — it’s a property of the capture, recorded locally. If PwrSnap can’t identify the app, the capture just doesn’t get one.
Permissions
PwrSnap asks for permissions when you first need them — no wall of prompts at install:
- Screen Recording (macOS) — required for any capture. A fresh install shows it as Not yet requested in Settings → System Permissions, with a Request access button that raises the real macOS prompt. Your first capture raises the same prompt. Only after an actual denial does PwrSnap point you at System Settings → Privacy & Security.
- Captures folder — captures live in
~/Documents/PwrSnap/so they’re findable in Finder and survive an uninstall, and macOS gates Documents behind its own permission. PwrSnap asks before the capture UI covers the screen. Deny it and PwrSnap falls back to~/PwrSnap/and keeps working; if access is blocked later (a privacy reset, a migration), the Library shows a banner with a way to fix it instead of broken thumbnails. System Permissions has a Check access button for it. - Microphone — only asked for when you turn the mic on, either as the default in Settings → General or with M in the selector. Both audio tracks are off by default, so a normal recording never raises an audio prompt. If macOS refuses, your preference is still saved and Settings offers a route to the permission rather than silently recording nothing.
- System Audio — needs no separate grant: it rides the Screen Recording permission. On Windows, neither audio track is captured.
Nothing PwrSnap captures leaves your machine unless you turn AI on and accept its consent prompt — see AI. With AI off, the only network traffic PwrSnap generates is its update check — a read of the project’s GitHub release feed, shortly after launch and hourly after that. No captures, no metadata, nothing about what you snapped.
Windows
Windows is a supported, signed platform: the tray, the selector (windows, regions, several windows at once), still captures, video recording, the Library and editor, and the full AI surface all work, in a signed x64 installer with auto-update. The default capture shortcut is Ctrl+Shift+C; every other capture hotkey, Video capture included, comes unbound.
Copying an image, a GIF, or an MP4 puts a real, usable file on the Windows clipboard, and MP4 export uses the FFmpeg that ships in the installer — nothing to install separately.
Two real gaps: recordings have no audio, and there’s no Quick
Look-style preview for .pwrsnap files in Explorer. The timed
capture’s countdown isn’t shown either — the selector simply appears
after five seconds. Full details, including how to verify the
installer signature, are on Install → Windows.
Not yet
These are real gaps today:
- Presenter cam — a webcam track with the background removed, layered onto a screen recording.
- Windows audio capture — see Windows.
- Linux — there’s no Linux build to download.