
Library
The Library is the main window — where every capture lives, where you tag and annotate, and where you start reels. A facet sidebar down the left narrows what you’re looking at: All Captures, Today, Trash, by type (Images / Videos / Projects), or by the app you captured from. The whole layout is built around one design rule: opening a capture must never re-order your history.
Grid, Reel, and Focus
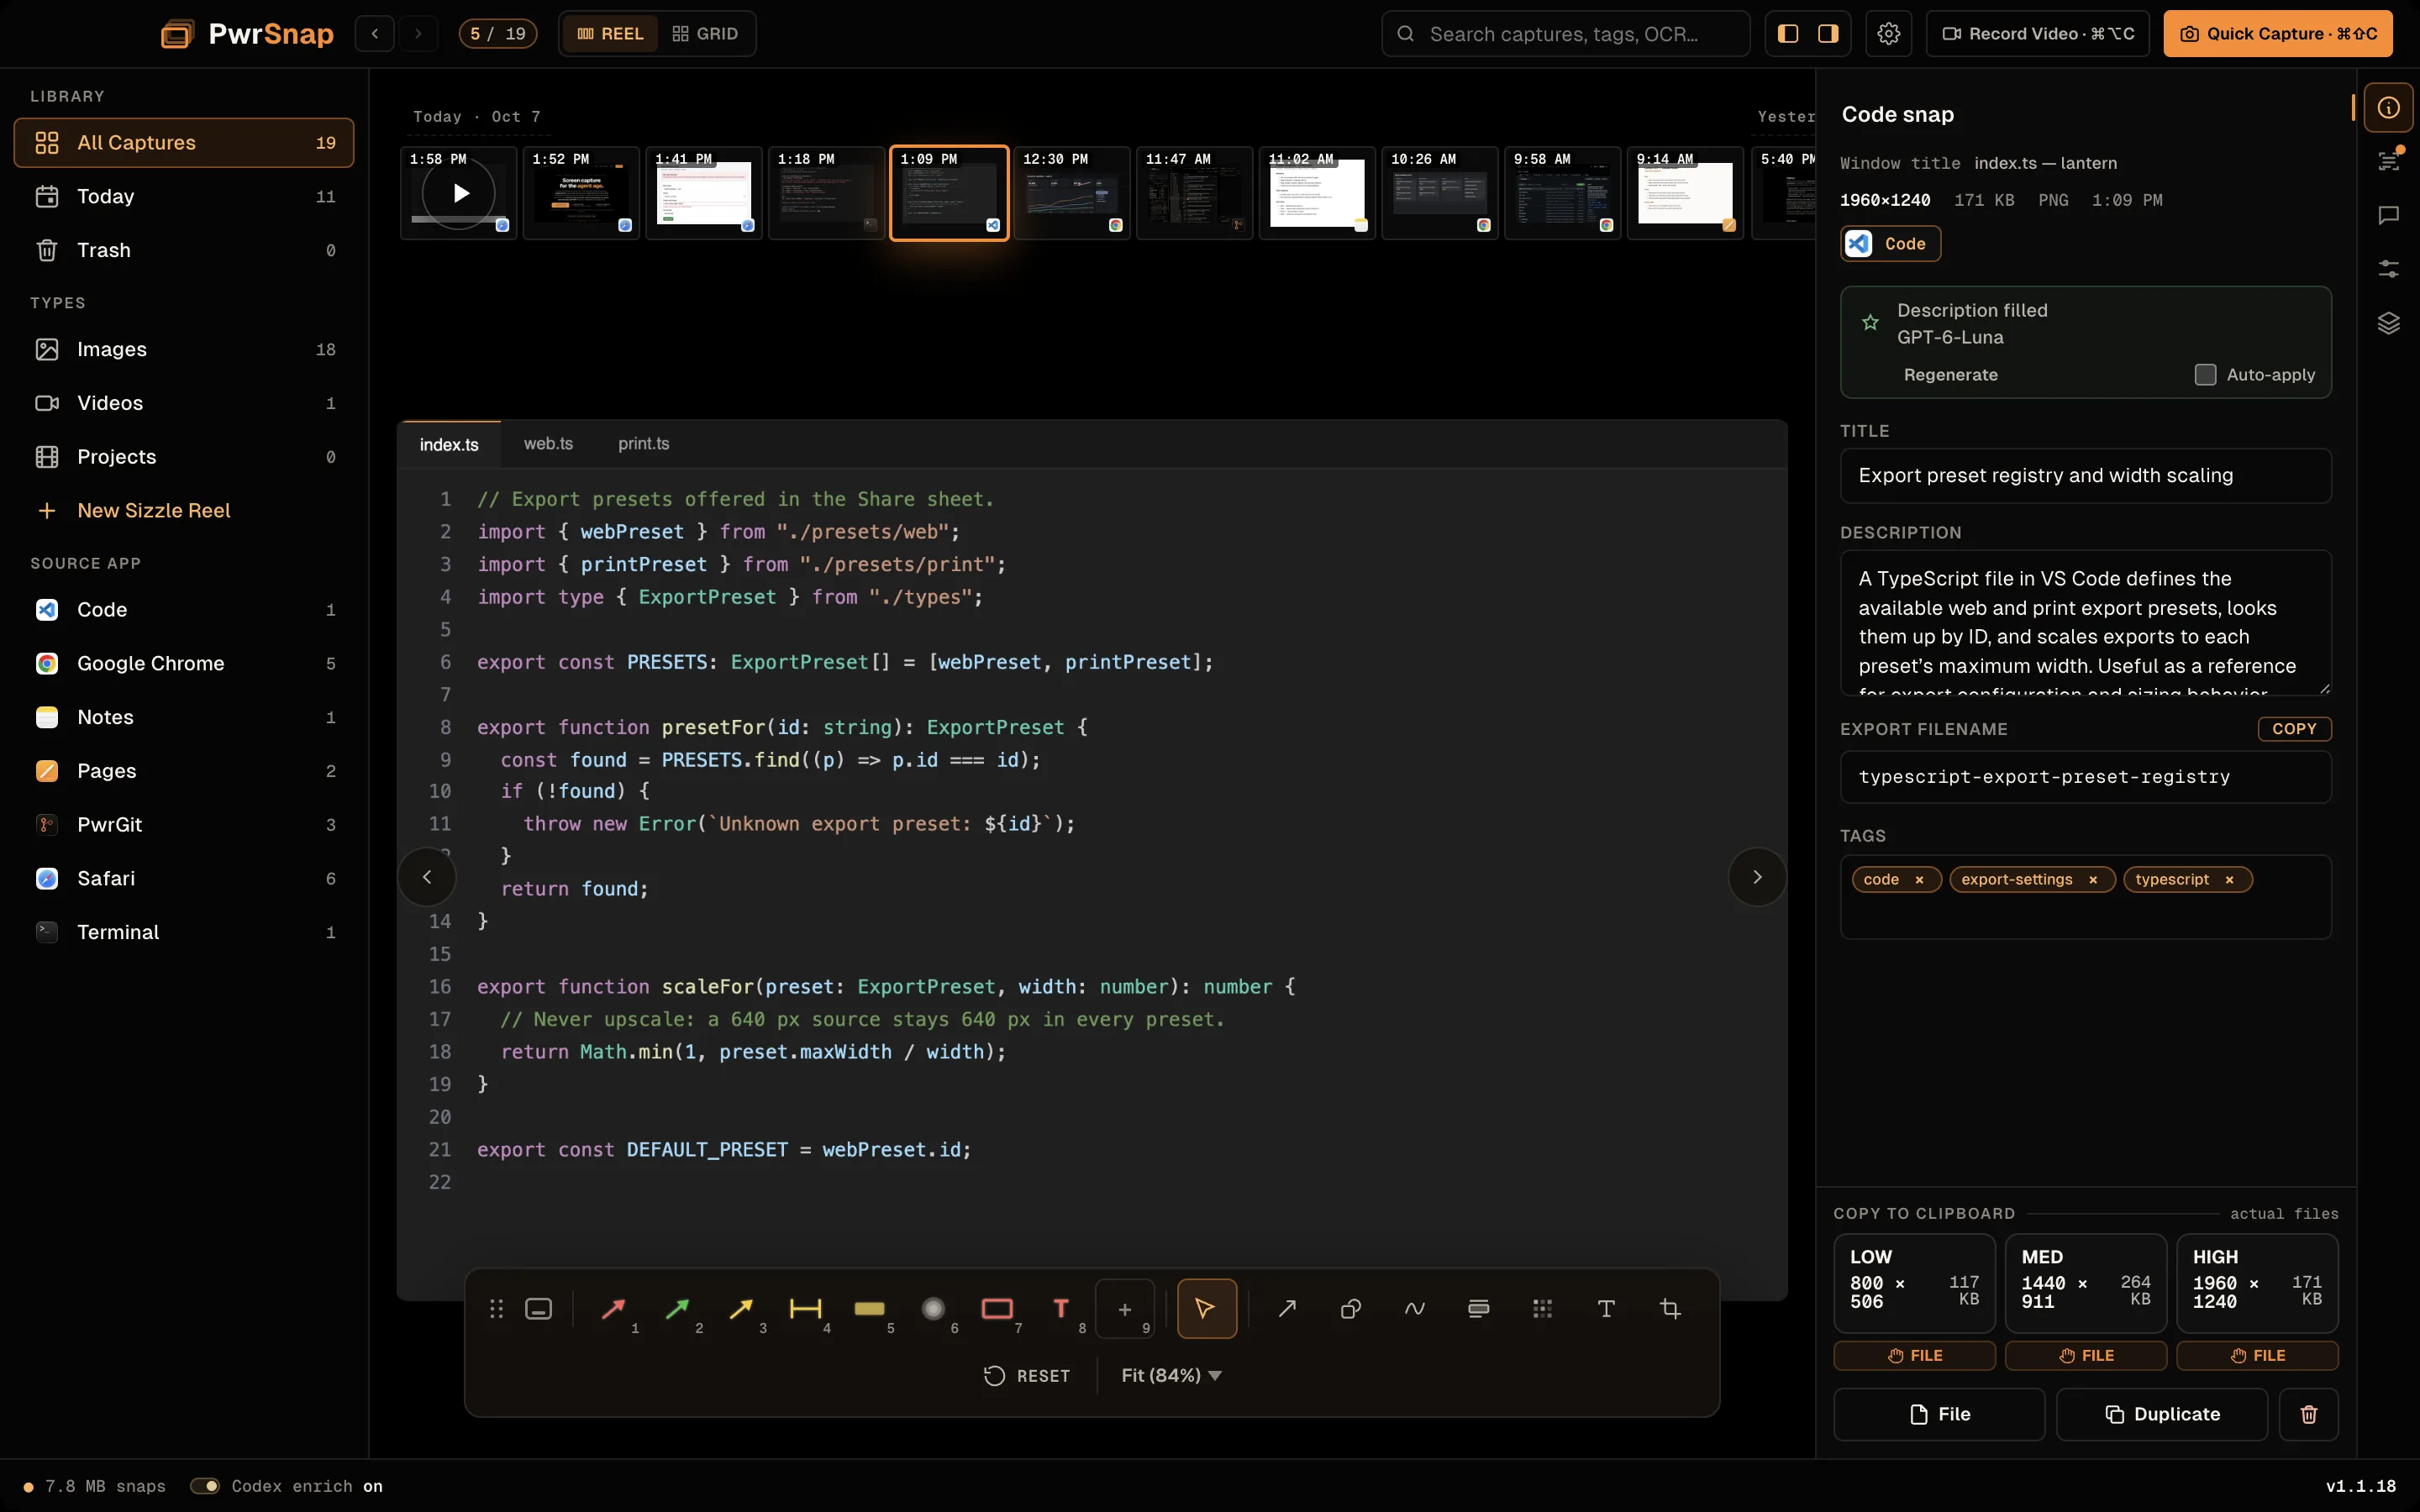
The Library opens on the Grid and stays there until you say otherwise. A Reel / Grid switch in the top bar flips between the two browsing views; Focus is the third state — the editor, opened on top of whichever one you were in.
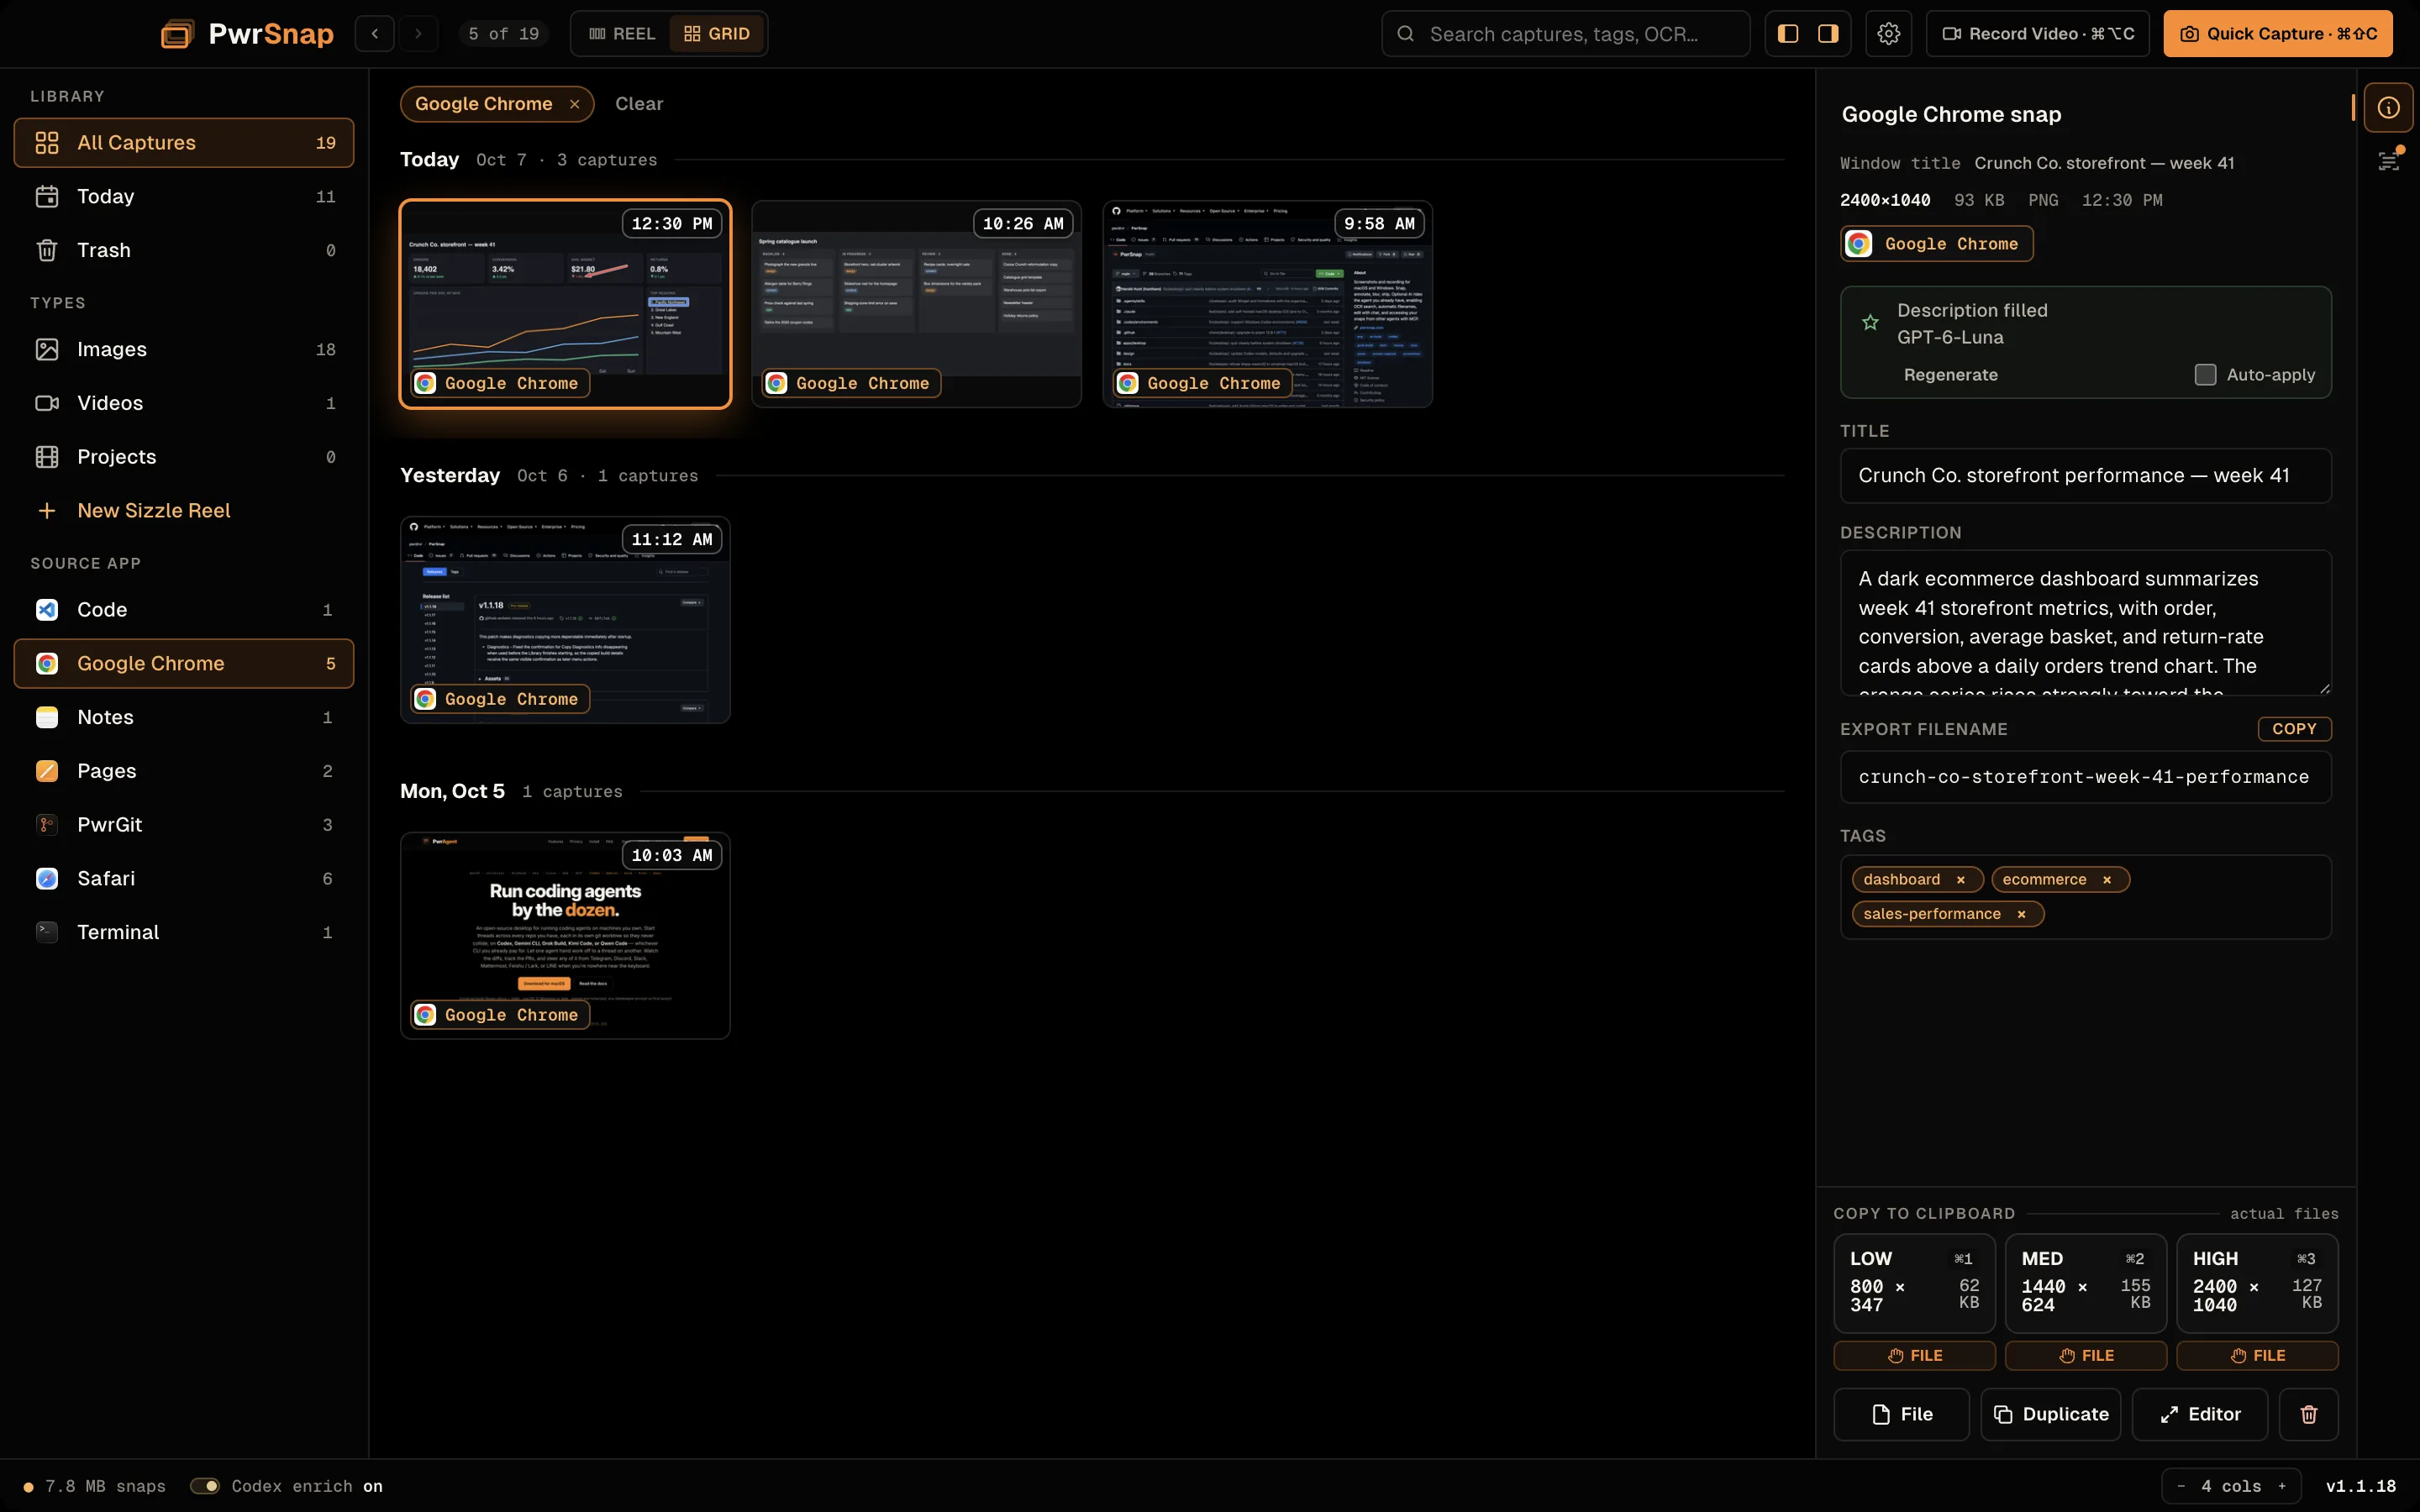
- Grid is the landing view: a day-grouped grid of every capture, newest first within each day, virtualized so tens of thousands of tiles scroll smoothly. It’s the view for scanning a lot at once and for multi-selecting into the Project Asset Cart.
- Reel keeps a horizontal filmstrip of captures across the top, newest first, with the selected capture large on a stage below it. Walk the filmstrip with the arrow keys and click any thumbnail to load it. It’s the view for flipping through history, and your spot never moves.
- Focus is the editor as a full takeover: one capture, the edit toolbar, and the right rail. Escape brings you back to exactly where you were.
Selecting and editing are separate moves. A single click selects — the right rail fills with that capture’s details and the grid doesn’t reflow. To edit, double-click, press Return on the selection, or click Edit on the card’s hover rail. Arrow keys (and Page Up / Page Down) walk the selection through the grid. Project tiles are different: clicking one opens the Sizzle Reels window.
Size the tiles to taste. A − N cols + stepper in the status bar
steps the tile size through a fixed ladder, or pinch-to-zoom right on
the grid. Your chosen size sticks across relaunches and window
resizes.
Each card shows the icon of the app you were in when you captured it. Video captures show a play button and a duration badge, with hover-autoplay, so you can tell at a glance which thumbnails are videos and what’s in them.
The title bar keeps a running count of what you’re looking at:
N captures in the grid, N matches while a search is running,
N in trash, or a 2 / 3 position counter in Focus and Reel.
Back / Forward buttons beside it walk your navigation history the
way a browser does.
Sidebar facets
The left sidebar is three independent axes that stack with AND:
| Section | Rows | How it behaves |
|---|---|---|
| (top) | All Captures · Today · Trash | Pick exactly one — this is your scope |
| Types | Images · Videos · Projects | Multi-select, and invertible |
| Source App | One row per app PwrSnap has seen, with a live count | Multi-select, and invertible |
Within Types and Source App, the modifier you hold decides what a click means:
- Click — only this. Collapses the selection down to the one you clicked. Hovering a source-app row also shows an explicit only pill.
- Command-click (Ctrl-click on Windows) — add or remove one value from a multi-selection, keeping whatever polarity the set already has.
- Option-click — exclude it. “Everything except Chrome” is one gesture.
Whatever’s active shows up as a row of chips above the grid.
Excluded values wear a not badge and read struck-through. Every
chip has its own ×, and Clear at the end of the row drops all of
them at once. The chip row is a Grid-view thing — Reel and Focus hide
it.
In Trash, the Types and Source App facets don’t apply, and the sidebar says so.
Search
The search box in the top bar narrows the grid as you type. It’s a full-text index over what PwrSnap knows about each capture — words, not meaning. It matches:
- the capture title and description
- the OCR text the AI read out of the picture
- the source app name
- the title of the window you captured
- tags you’ve accepted
So you can find a snap by what’s in it. Command+F jumps to the search box and selects what’s there, even from inside another field; Escape clears it, and there’s an × in the box. Matching ignores accents.
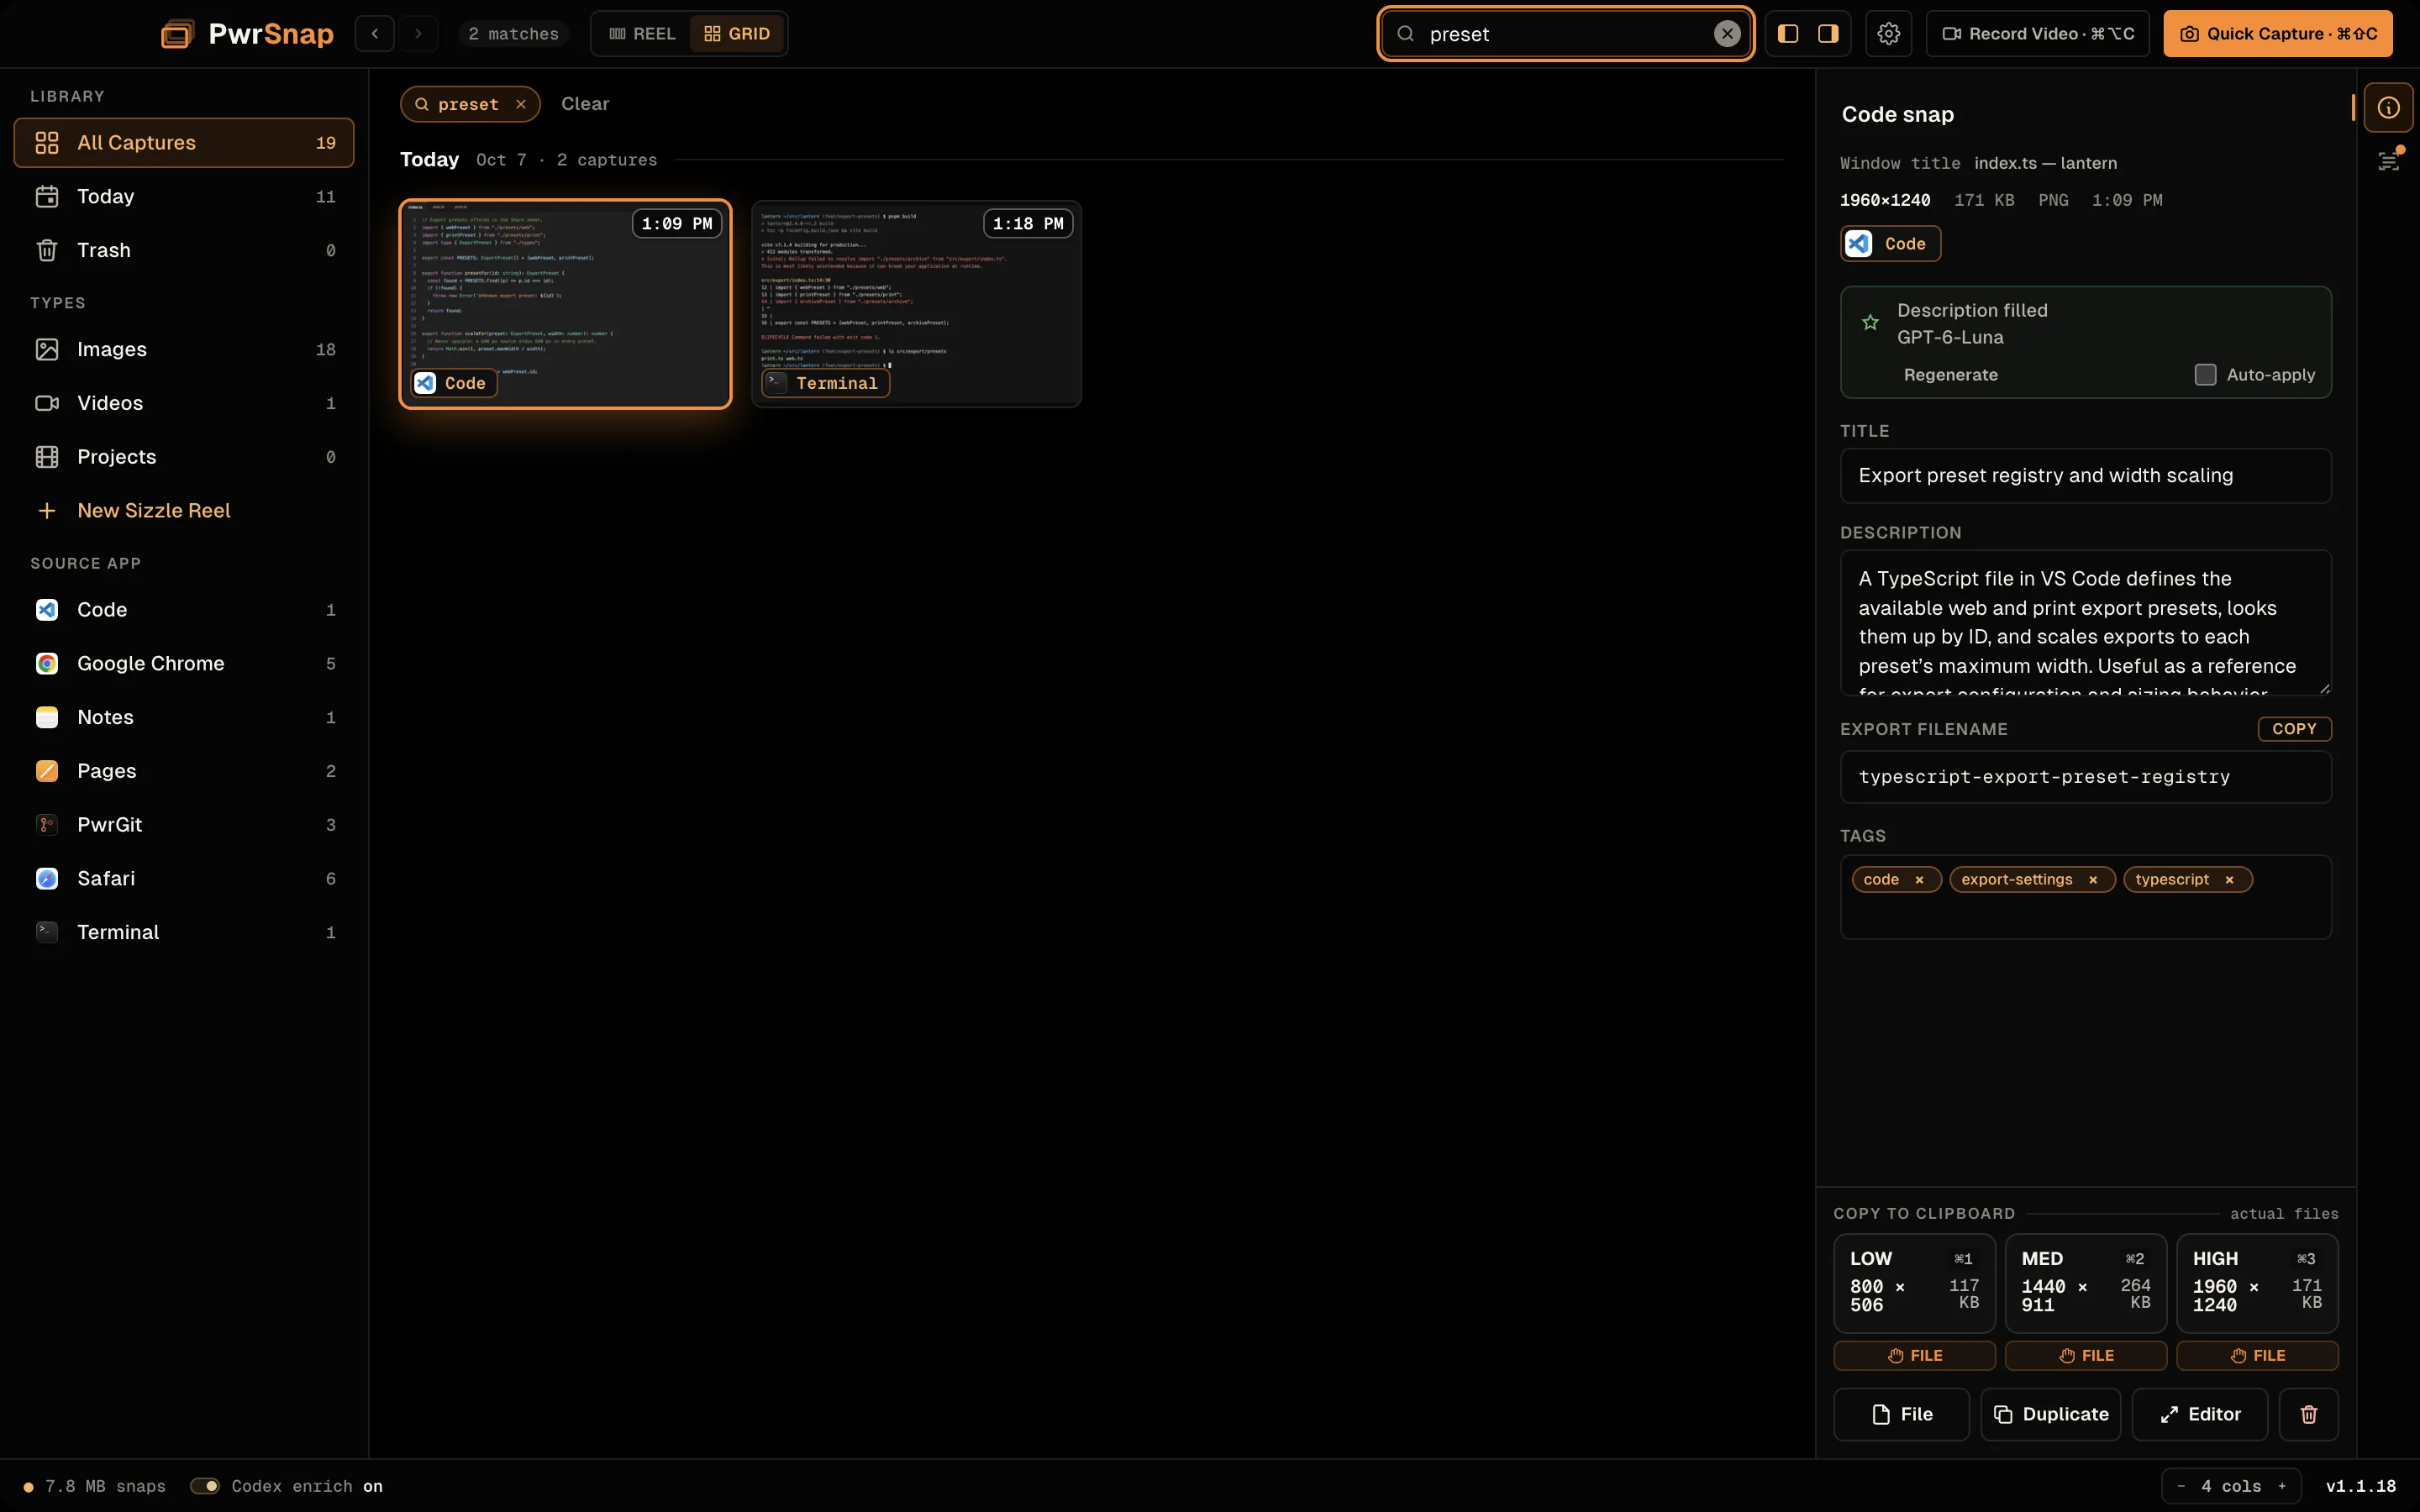
A running search joins the facet chips above the grid as a removable chip of its own, so a thin-looking result set reads as a search and not an empty library. While a search is active the sidebar’s counts follow it, showing how many matches each type and each source app holds.
Search is disabled inside Trash — the box reads “Search unavailable in Trash”.
Project Asset Cart
Hover any capture in the grid and a checkbox appears in its top-left. Check it and the right rail opens with a draft cart — and from then on every tile shows its checkbox, so you’re not hunting for hover targets.
- Check more captures — they append to the cart in the order you check them.
- Drag to reorder, or click an entry to jump to it in the grid. Clear empties the cart without deleting anything.
- Do something with the set, from the cart footer.
Four things you can do with a full cart:
- Create New Sizzle Reel — makes a new project from the cart, each capture a clip, cart order preserved.
- Add to Existing Sizzle… — appends (without duplicates) to a project you already have, picked from a list.
- Export as Zip — Low / Med / High cards. Renders with a progress count you can cancel, and each card is draggable, so you can drop the finished ZIP straight into a chat or a folder.
- Move to Trash — trash the whole cart. Confirmed first, recoverable after, and it undoes as one step.
The cart persists across restarts, so a half-built cart survives a quit.
Inspect + Edit
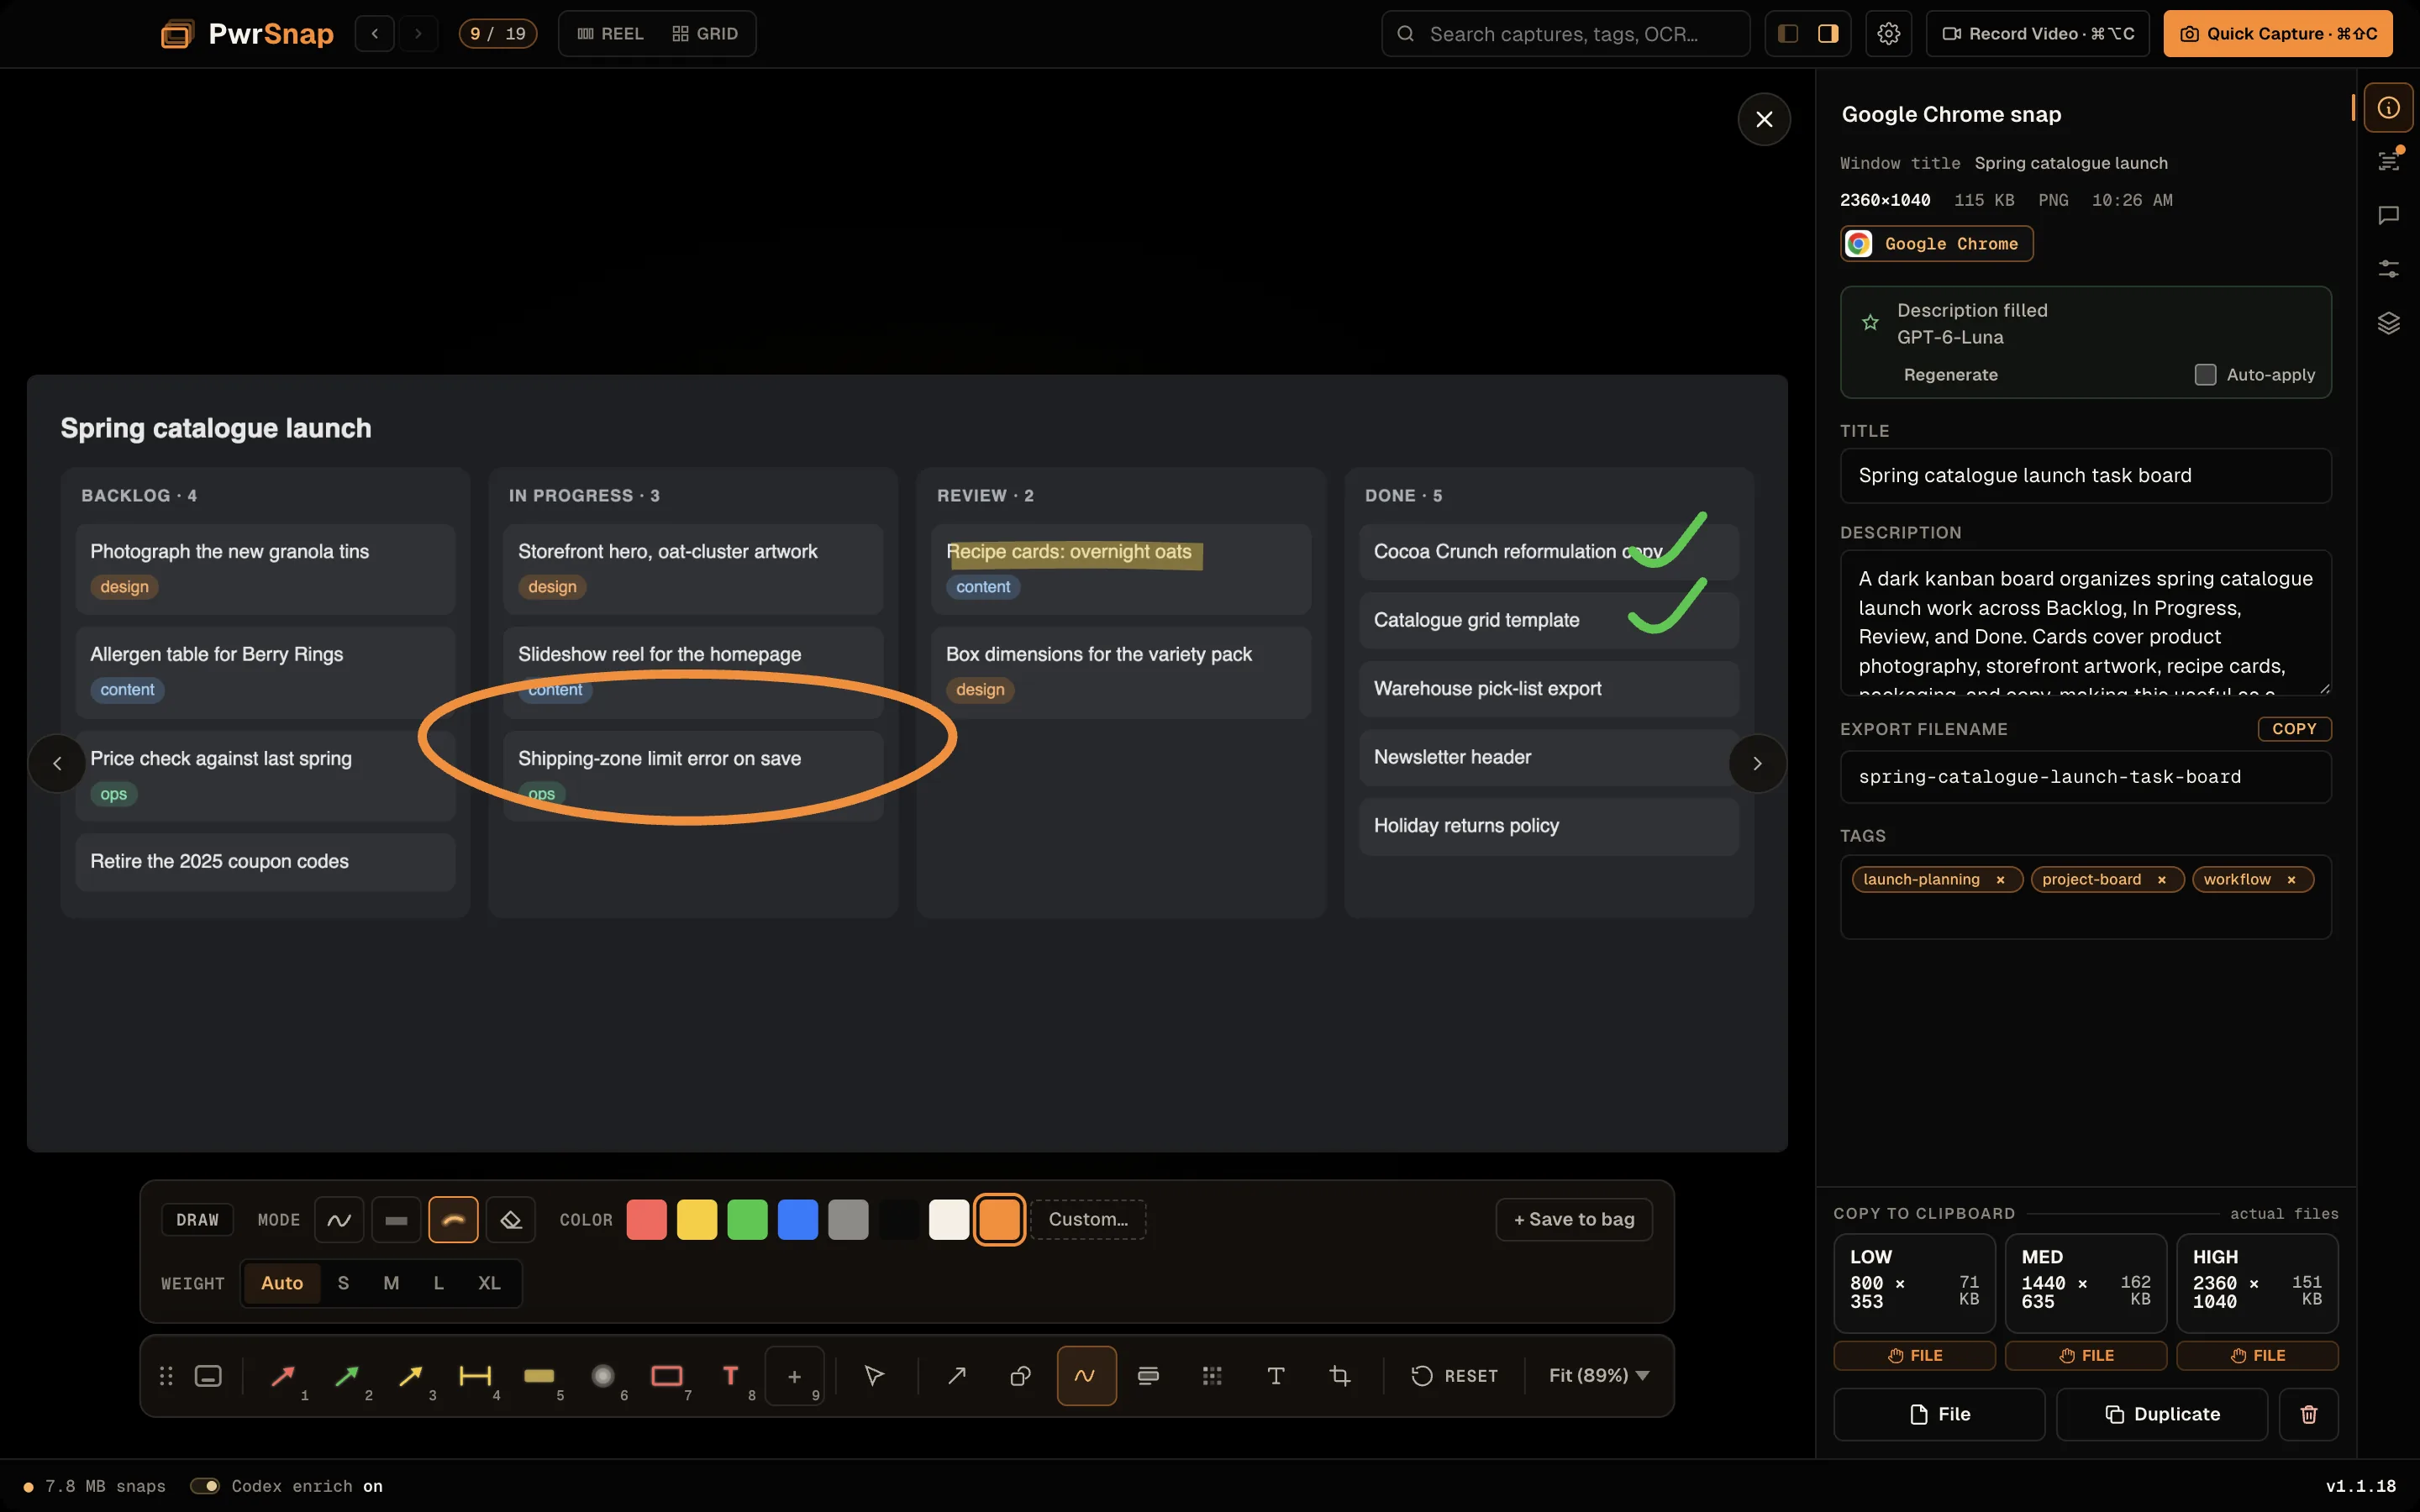
Open a capture for editing (double-click in the grid, or Return on a grid selection) and the editor takes over the stage with the Pointer (V) selected. Pointer is the safe one — clicking the canvas doesn’t accidentally draw. Pick another tool when you actually want to annotate. Escape closes the editor and returns you to browsing, spot preserved.
A few moves worth knowing:
- Zoom: Command+0 fits the capture to the window, and Command+= / Command+- step in and out. The zoom readout at the end of the toolbar (Fit (89%)) opens a menu with Fit, 100%, and a field for any percentage. Trackpad pinch works too.
- Pan: drag any empty part of the canvas.
- Undo / Redo: Command+Z and Command+Shift+Z. A continuous drag is one undo step, not one per pointer event.
- Sticky tool: PwrSnap stays on the tool you just used until you switch. Option-click a tool button to draw a single shape and snap back to Pointer.
- Multi-select: Shift-click overlays, or marquee-drag, to select a group. Arrow keys nudge the group by 1 pixel; Shift + arrow nudges by 10. Move, cut, copy, paste, reorder, and rotate all apply to the whole selection.
- Rotation: a selected overlay gets a rotation handle above its box. The drag behaves like a knob with notches every 45° — ease toward one and it holds; spin fast and it passes through.
- Paste images in: Command+V drops whatever image is on your clipboard into the capture as its own layer — a logo, a second screenshot, anything. Pasted layers keep their transparency, get 8 resize handles when selected (Shift locks aspect), and can be reset to their original size and position. Command+C copies layers back out, into other captures or other apps.
- Layer keys: Command+A selects all layers, Command+D duplicates, Command+] / Command+[ move forward / backward (add Shift for front / back), Delete removes the selection.
- Right-click any layer for Cut, Copy, Paste, Duplicate, Bring to Front, Bring Forward, Send Backward, Send to Back, and Delete (plus Edit Text on a label).
Right sidebar
The right rail is a vertical activity bar. Which tabs are there depends on what’s selected:
- Info — capture details, window title, source app, AI suggestions, title, description, tags, and the export filename (with a Copy button). The default tab.
- OCR — the text the AI read out of the picture.
- Chat — a chat with the AI about this capture that can change it, not just describe it — see AI → Library Chat.
- Cart — the Project Asset Cart when it has items.
- Project — when the capture belongs to a Sizzle Reel project.
- Family — once any capture has been duplicated.
- Properties and Layers — for image captures open in the editor. See Layers.
Tabs are pinnable; unpinned ones open on hover so they don’t eat canvas space. Command+B toggles the left sidebar and Command+Option+B the right one.
Tools
Eight tools, each on a single key:
| Key | Tool | What it does |
|---|---|---|
| V | Pointer | Selects; doesn’t draw. The default. |
| A | Arrow | See Auto sizing. |
| S | Shape | Rectangle, Square, Circle, Oval, Parallelogram. |
| D | Draw | Freehand: Pen, Marker, Airbrush, Eraser. |
| H | Highlight | A translucent marker box over text. |
| B | Blur | Gaussian, Pixelate, or Redact. |
| T | Text | A label, edited in place. |
| C | Crop | Eight handles, rule-of-thirds guides, live size readout. |
A property bar sits above the toolbar and shows the style of the selected layer, or else of the active tool — change it there. Each tool keeps its own color, picked from an 8-swatch palette (red, yellow, green, blue, gray, black, white, and the PwrSnap accent) or Custom… for any hex value.
- Arrow — thickness Auto or S / M / L / XL; five end styles: Filled triangle, Open triangle, Line, Dot, and Bar (marks the end of a range); a Solid, Dashed, or Dotted stem; and Double-ended. With one arrow selected, Add label in the property bar — or Return — opens a text label just past its tail, in the arrow’s color and matching size, caret ready. Once you’ve typed it, the label is an ordinary text layer.
- Shape — five geometries: free-aspect Rectangle, 1:1 Square, 1:1 Circle, free-aspect Oval, and Parallelogram with a skew slider from −45° to +45° (default 15°). Outlined or Filled; an outline can be Solid, Dashed, or Dotted. Rotatable.
- Draw — four modes. Pen is a thin, crisp line for writing and circling. Marker is wide and see-through, for highlighting; overlapping passes darken. Airbrush is a soft-edged line, for a glow or gentle emphasis. Eraser cuts Draw strokes where you drag — arrows, boxes, and text stay — and one eraser drag is one undo step. Strokes drawn in quick succession with the same settings become one layer, while each stroke stays its own undo step. Pressing on an existing annotation with Draw doesn’t select it, so you can write over the top of anything.
- Highlight — a color (yellow by default) and an Opacity slider from 0 to 60% (30% by default).
- Blur — Gaussian (a soft smear), Pixelate (chunky mosaic blocks), or Redact (solid black, for anything that must not be recoverable). Radius is automatic, or set it in pixels.
- Text — font size Auto or S / M / L / XL, weight Regular or Bold. Click a label to select it; click the selected one again to edit. What you see in the editor is what bakes into exports.
- Crop — a viewport, not a cut: annotations keep their position across crop, undo, and reset, so you can always get back to the original capture exactly. Cropping never re-sizes the arrows or text you’ve drawn.
Border keeps an annotation legible over whatever it lands on. A red arrow over a red error banner disappears; a border around it doesn’t. Arrow, Shape, and Text offer Off, Auto — which samples what’s underneath and picks the side that contrasts — and explicit White and Black. Arrows and shapes also take a Striped border, which reads on a busy background where a solid one still blends.
Tool bag
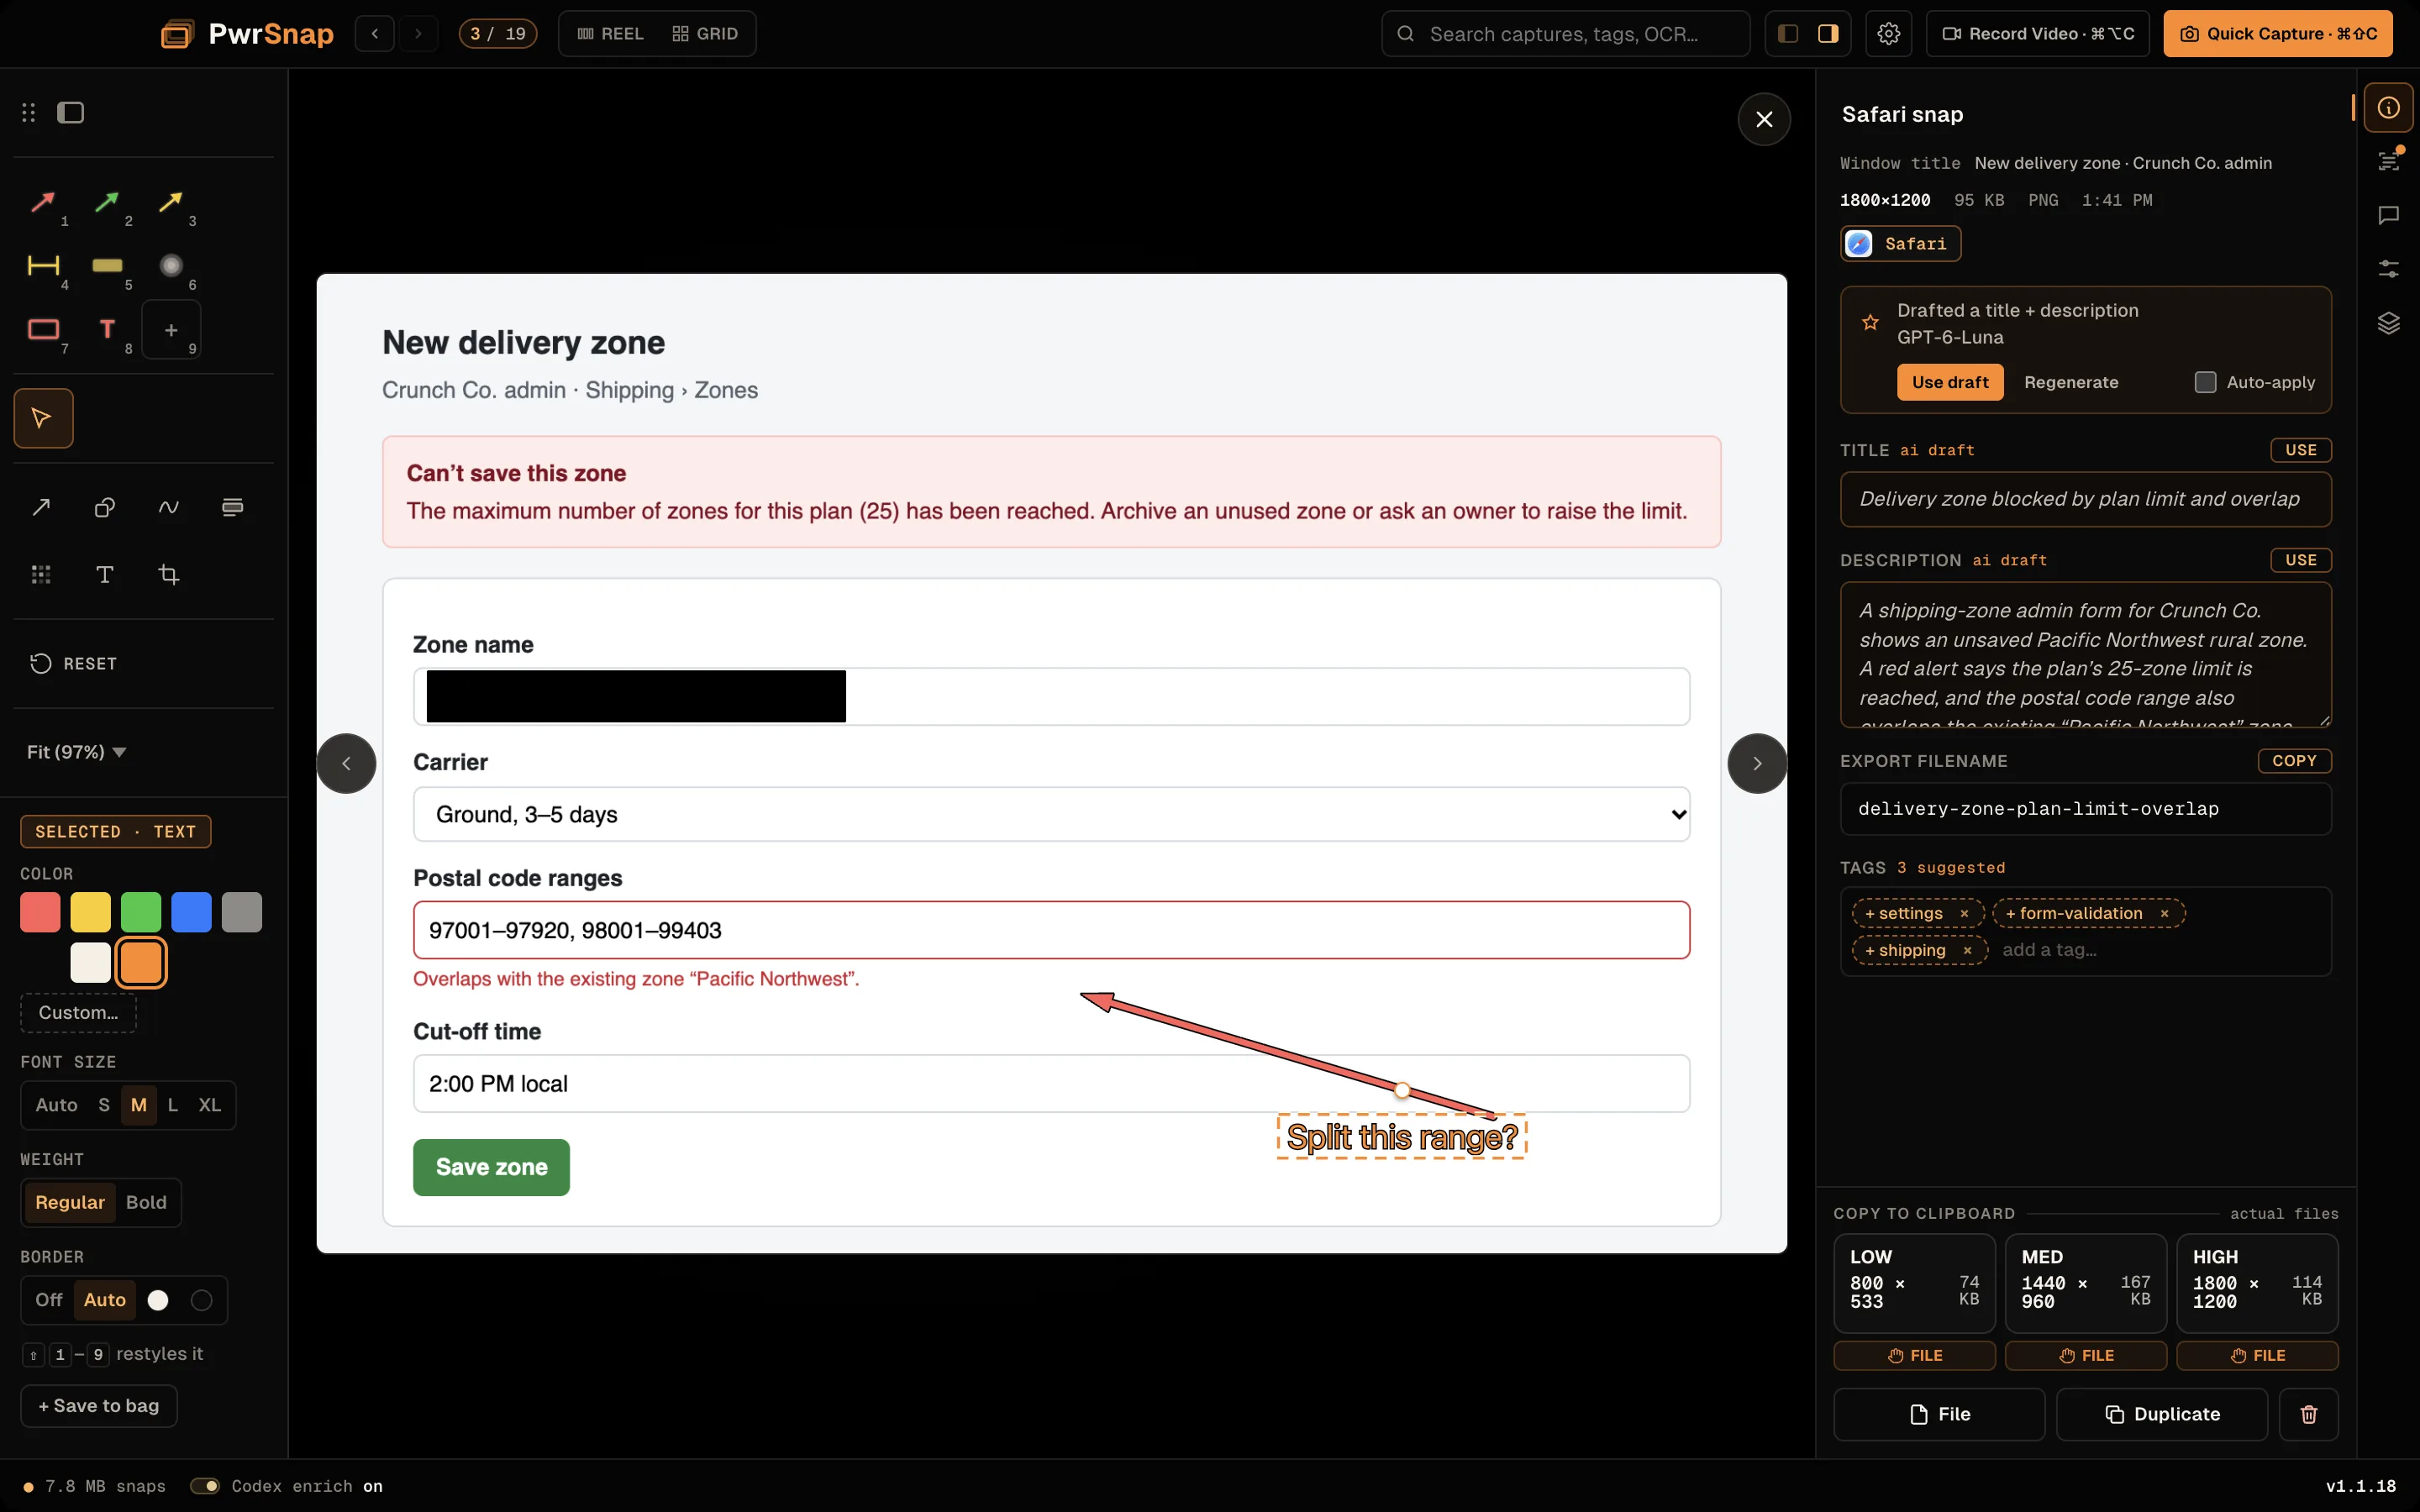
The left end of the toolbar holds the tool bag: nine saved, complete tool styles on keys 1 to 9. It comes filled with red, green, and yellow arrows, a yellow range arrow (a bar at both ends), a yellow highlight, a blur, a red rectangle, and red text, with slot 9 left empty.
- 1–9 (or a click) arms a slot: its tool becomes active with that exact style, and the next drag draws with it.
- Shift+1–Shift+9 (or a Shift-click) restyles the selection from the slot: whatever the slot says that the selected layer can carry, it takes. A green arrow slot turns a selected red box green and leaves it a box.
- + Save to bag in the property bar saves the current style into a slot.
Toolbar position
The toolbar floats at the bottom of the stage by default. Drag it by its grip, or use the dock button beside the grip, to choose Floating, Dock top, Dock bottom, Dock left, or Dock right. Docked left or right, the toolbar and its property bar become a column beside the canvas.
Layers
The Layers tab lists every layer of the capture, top-to-bottom = front-to-back: the source image, each annotation (with an icon for the tool that drew it), any pasted images, and the captured cursor if you have cursor capture on. Per layer: a grip to drag-reorder, an eye to show or hide, a chevron that expands its properties inline (the same controls as the property bar), and delete. Pasted images also get Reset to original position & size. The source image can’t be deleted.
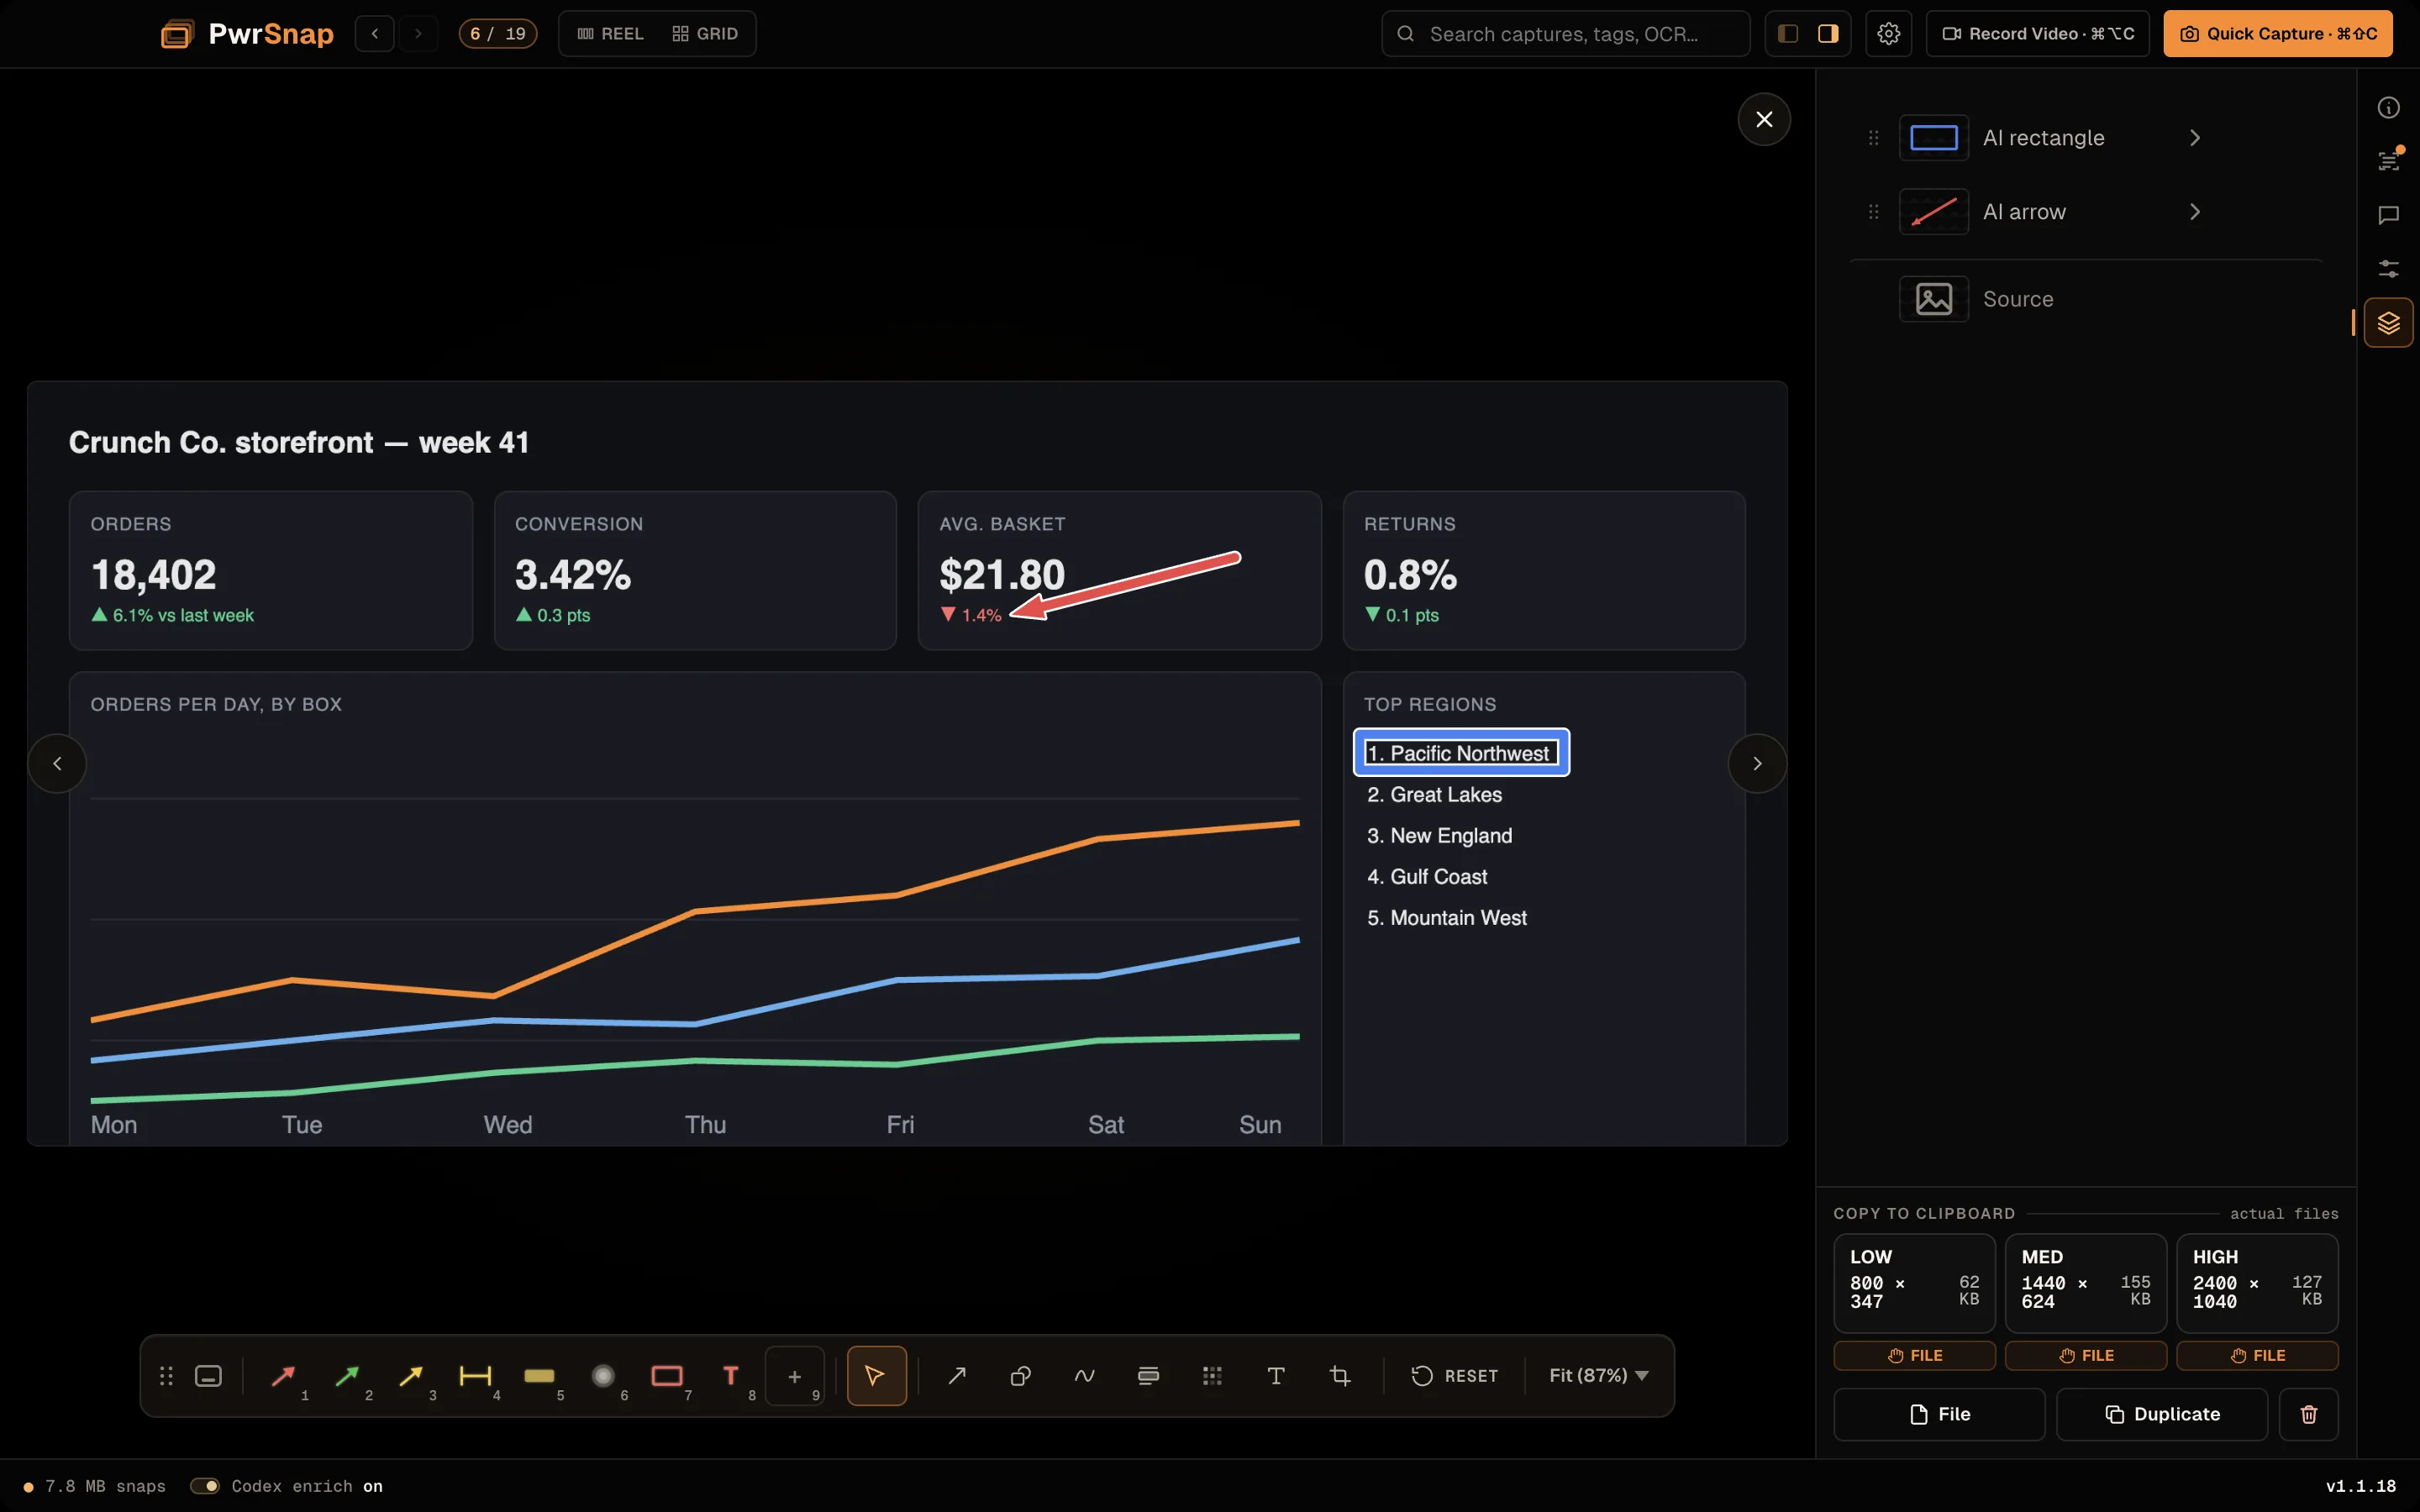
Edits reflect live in both directions — change something on the canvas and the panel updates, and vice versa.
The crop row is special: its remove button reads Remove crop (restore full image) and is a true uncrop — it restores the full image and leaves every other annotation where it was.
Auto sizing
Arrows, shapes, Draw strokes, and text come out sized to the picture. PwrSnap picks a stroke weight and text size that suit what you’re annotating, so an arrow on a big Retina screenshot doesn’t land as a hairline and an arrow on a small capture doesn’t come out cartoon-thick. Sizes are worked out from the original capture, so cropping doesn’t change them. Auto is the default; S / M / L / XL in the property bar picks a rung yourself.
Duplicates
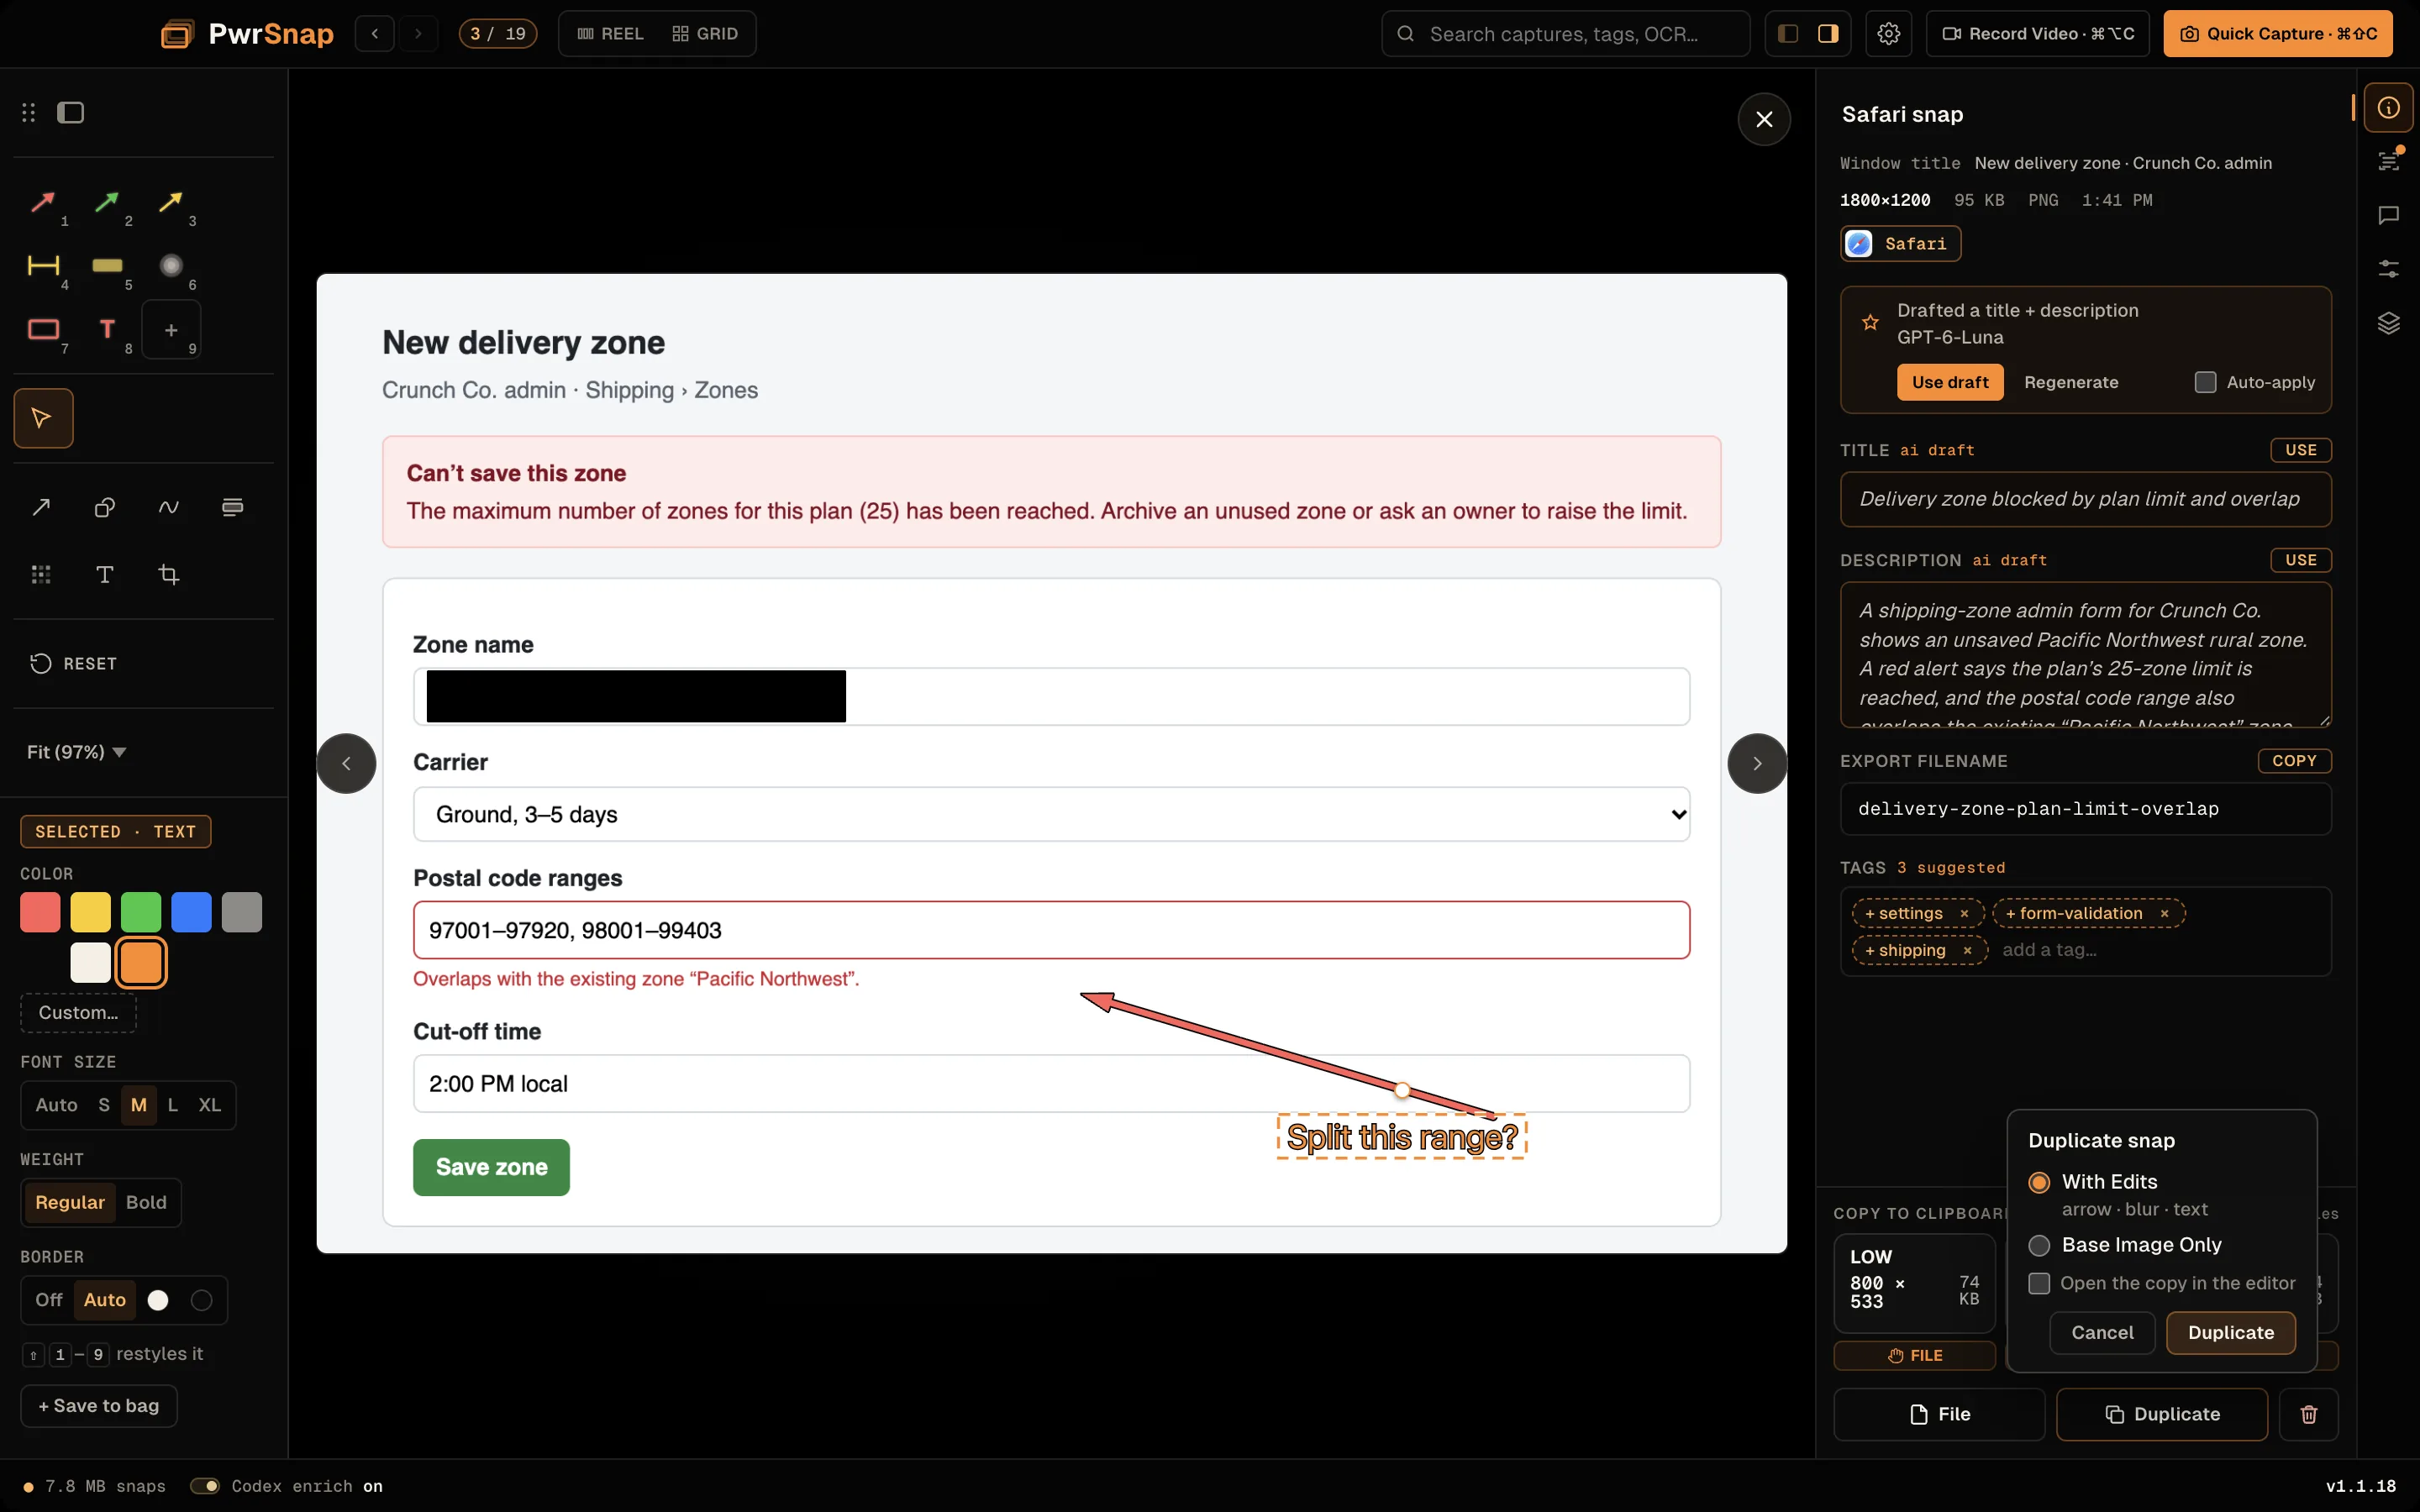
Duplicate in the rail’s footer, Command+Shift+D, or File ▸ Duplicate Snap makes a copy of the selected capture. A capture with no edits just copies. One with edits asks once:
- With Edits — the copy carries your annotations (the chooser names them, e.g. arrow · blur · text).
- Base Image Only — the original picture, no annotations. (For a video, Full Recording.)
The chooser remembers your answer, so the shortcut and the menu follow it after that. Tick Open the copy in the editor — or use File ▸ Edit a Copy — to go straight into editing the copy and leave the original alone.
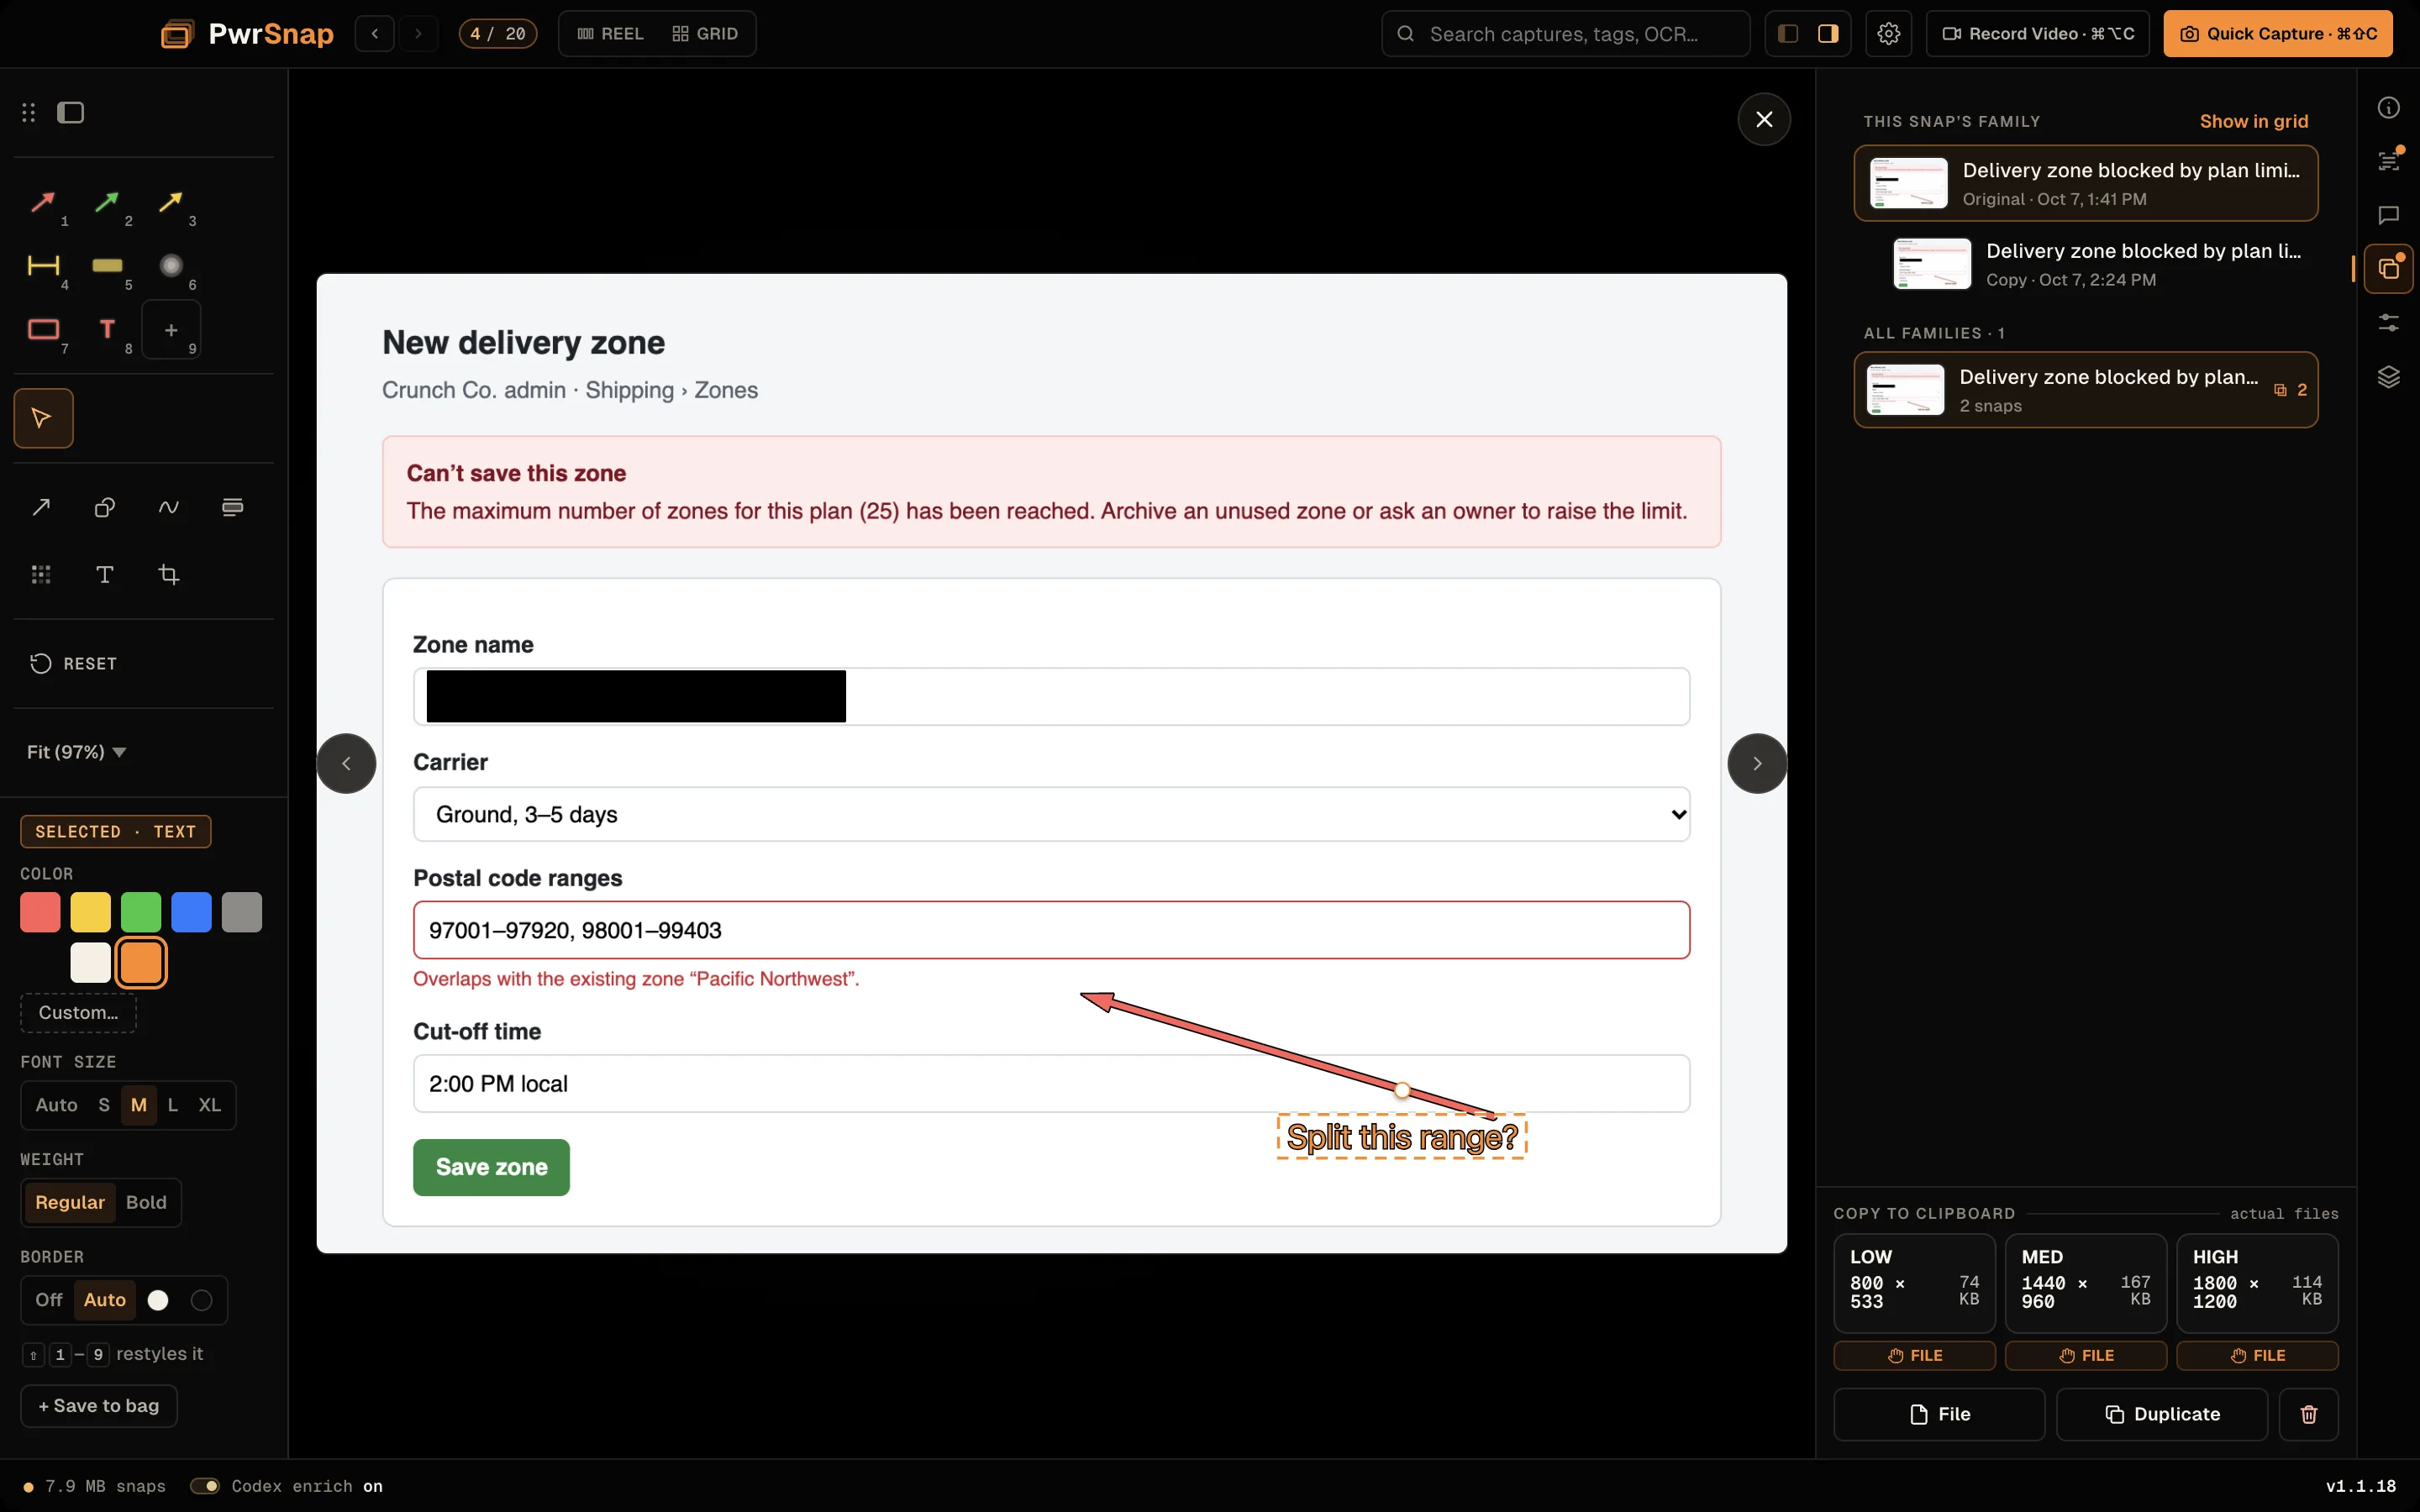
Every copy joins its original’s family. The Family tab in the right rail shows This snap’s family — the original first, each copy indented under the capture it was copied from — with Show in grid to filter the grid to just that family. Below it, All families lists every family in the Library.
Video viewer
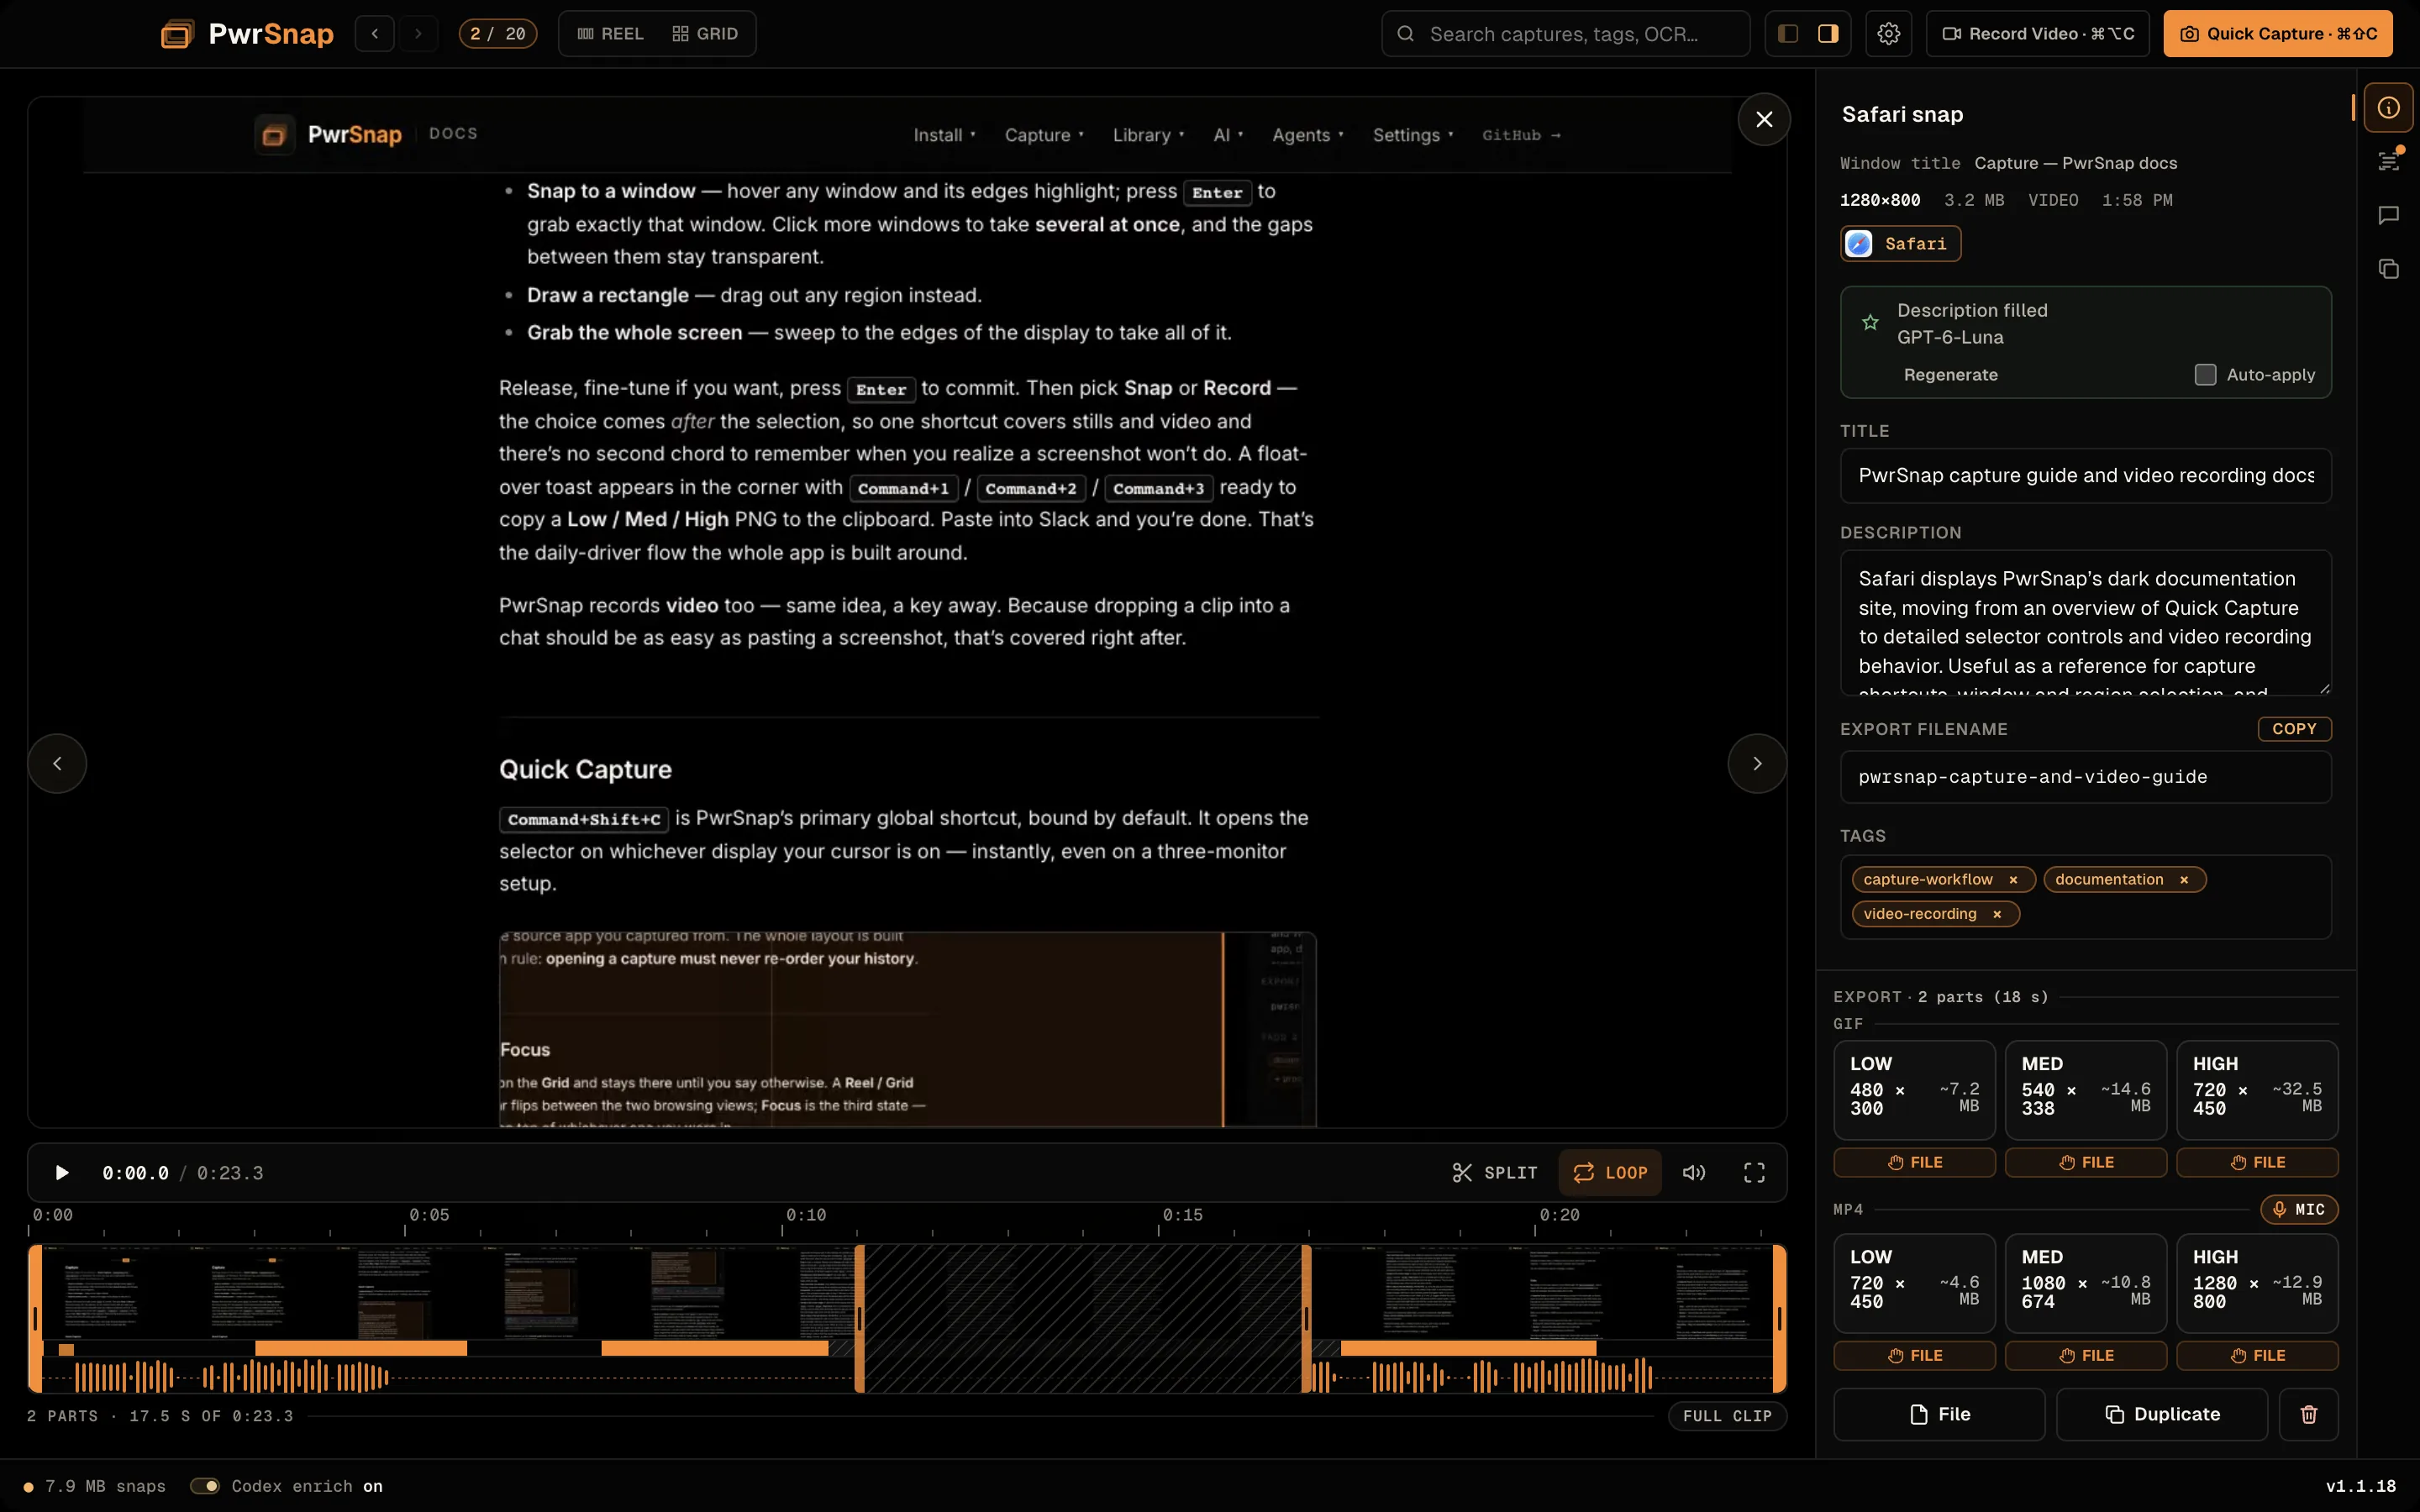
Select a video capture and the stage becomes a real viewer. A transport bar under it carries play/pause, the time readout, Split, Loop, volume, and fullscreen. Under that, the timeline: a filmstrip of sampled frames, an activity lane showing where something on screen changed, and a waveform so you can see where the talking is. Ticks, a playhead, and draggable in / out handles sit on top.
| Key | What it does |
|---|---|
| Space | Play / pause |
| J / K / L | Shuttle back / pause / shuttle forward — press again to ladder 1× → 2× → 4× → 8× |
| Left / Right | Step one frame |
| Shift+Left / Shift+Right | Step one second |
| I / O | Set the trim in / out point at the playhead |
| S | Split at the playhead |
| X | Cut the part under the playhead (press again to keep it) |
| Home / End | Jump to the start / end |
Splits and cuts. S (or Split) drops a split marker at the playhead; drag it to move it, double-click it to remove it. X, or the Cut chip that appears when you hover a part, cuts that part out — it shows hatched in place, so the lanes keep lining up with the recording — and Keep puts it back. Drag the two edges of a cut together to close it into a split again. Command+Z undoes any of it.
Cut idle cuts every stretch where nothing on screen changed for three seconds or more, keeping half a second either side so the edit doesn’t jump straight from one change into the next. Hover the chip first to see what it would remove.
The trim and cuts are the export. Whatever you set here is saved with the capture, and every copy, drag, and export — from the float-over, the tray, or the Library — renders those parts. The readout says how many parts and how much time you’re keeping, and Full Clip resets the trim. The recording on disk is never touched.
Left and Right step frames instead of moving to the previous / next capture while the viewer has focus. Focus mode hands the video keyboard focus for you; Reel mode doesn’t, so its arrow keys keep walking the filmstrip until you click into the video.
Your originals stay untouched
Every annotation you add — arrows, highlights, blurs, text, strokes — is stored separately from the original screenshot. The original picture is never modified. What you see in the editor is the original with your edits drawn on top, composited fresh every time you copy, drag, or export.
- Undo any single annotation without losing the rest. Delete a stray arrow from a three-hour-old capture without disturbing the highlights you added at the same time.
- AI’s edits are reversible. When the Library chat changes the canvas, its annotations are ordinary layers you can undo, hide, or delete. The suggested title, description, and tags are suggestions — change or clear any of them.
- Roll back to original at any time. Reset on the toolbar removes every annotation (it asks for a second click first), and you have the original screenshot exactly as captured.
.pwrsnap bundles in Documents
Each capture lives as a single .pwrsnap file inside
~/Documents/PwrSnap/. A bundle holds the original picture (or
video), every annotation you’ve added, and a pre-baked thumbnail.
The filename is human-readable, not a random ID:
2026-05-26 14-32-08 — VS Code — useStorageSnapshot.pwrsnap mixes
the local-time timestamp with the source app and the AI’s suggested
title (when it has one). Files sort right in Finder and read right
in any cloud-sync UI. You can switch the timestamp to UTC in
Settings → Storage & retention.
Two things you get in the Finder (macOS only):
- Quick Look (Space) shows a real preview — the bundled
thumbnail renders without PwrSnap running, so a
.pwrsnapfile behaves like an image preview anywhere in macOS. - Double-click opens it in PwrSnap, straight into the editor.
About backing them up. The bundles are ordinary files — copy them, back up the folder, keep it on a synced drive. What they aren’t is the whole picture: PwrSnap keeps a local index of your captures (that’s what makes search, facets, and tags fast), and it does not rescan the folder for new bundles on launch.
Bringing a bundle over from another machine works. Open a
.pwrsnap written by another install and it lands in the Library as
a first-class capture, with its edit history intact — the arrows,
blurs, and crops are still separate, still undoable, still removable
one at a time.
So: back up the folder for the raw files, and use Library ▸ Export Library… when you want a copy you can actually restore — see Export.
The captures folder is ~/Documents/PwrSnap/, or ~/PwrSnap/ if
macOS denied access to Documents. There’s no folder picker — see
Settings → Storage & retention.
New from Clipboard
Already have an image on your clipboard from somewhere else — a screenshot taken with macOS’s own Command+Shift+4, an image copied from a browser? File ▸ New ▸ Paste from Clipboard drops it into the Library as a fresh capture, ready to annotate. It behaves exactly like a capture you took with the global shortcut: it gets a bundle, runs through AI enrichment, and so on.
Tags
Tags are first-class. Two kinds:
- Your tags — anything you type, with auto-complete from tags you already use.
- Suggested tags — up to four per capture, picked from what’s visible in the picture when AI enrichment runs. Accept the ones that fit, dismiss the rest.
Tags live in the right rail and in the float-over, and accepted tags are part of what search matches.
Filtering by the app you captured from doesn’t need a tag — it’s a sidebar facet built from what PwrSnap recorded at capture time.
Video export presets
Every video capture has a 6-card export grid — GIF in Low / Med / High, MP4 in Low / Med / High — identical in the Library rail, the tray popover for the last capture, and the float-over right after recording. One click on a card copies that rendition to the clipboard; drag the card out to drop the file into Slack, Finder, Mail, anywhere. Command+1 through Command+6 hit the six cards in order.
Every one of them respects the trim and cuts you set. The first render of each preset is cached, so the second click is instant, and a long render reports its progress while it works.
Audio in MP4s. When a take has audio, the MP4 row carries a Mic and/or System toggle for each track it recorded. Switch one off and MP4 exports leave that track out — from every card, the Command+4–Command+6 shortcuts, and drags alike. The choice sticks across captures, so a mic you left on by accident gets turned off once. GIFs never carry audio.
Image exports work the same way (Low / Med / High cards), and every
exported file gets a meaningful name: the AI-suggested filename
when there is one, falling back to the source app, so you paste
checkout-error-dialog-med.png into a thread instead of a timestamp.
Drag-out
Dragging a capture out of PwrSnap into Slack, Microsoft Teams, Discord, Finder, or Mail drops it as a real file. It works from:
- the Low / Med / High copy cards and their FILE chips, wherever they appear — the grid’s floating copy palette, the detail rail, the tray, and the float-over
- the detail-rail preview of the selected capture
- the cart’s ZIP cards, for a whole set at once
The grid thumbnail tile itself isn’t draggable — select it and drag from the copy palette that appears beside it.
Trash
Deleting a capture moves it to the Trash (in the sidebar) rather than removing it — and the whole flow is built to be regret-proof:
- Every delete asks for a confirmation first, with a “don’t ask again” option. You can turn the confirmation back on in Settings → Storage & retention.
- Deleting the capture you’re editing advances to the next one instead of dumping you on an empty view.
- A Moved to Trash toast with Undo appears, and Command+Z restores the last trashed capture too. A bulk trash undoes as one step.
Restore anything from the Trash later, or delete it permanently. Trashed captures are removed automatically after 30 days — the Trash banner says so, and offers Empty Trash if you’d rather not wait.
Export
Library ▸ Export Library… in the app menu asks for a folder and writes a complete, restorable copy: the index, every capture bundle, and the render cache, with a manifest. It’s the one operation that gets you a backup you can bring back, rather than a pile of loose files.
Encrypted secrets — API keys, encrypted with a key the operating system holds for PwrSnap — are deliberately not exported. They’re bound to the machine and wouldn’t restore anywhere else anyway.
Bundles in ~/Documents/PwrSnap/ are already files you can copy
anywhere, so for ad-hoc backups you can also just copy the folder —
with the caveat in .pwrsnap bundles
that the folder alone doesn’t carry the index.
Keyboard
| Key | What it does |
|---|---|
| Command+F | Focus the search box |
| Escape | Close Focus, or collapse the right rail in the grid |
| Return | Edit the selected grid tile |
| Left / Right | Move the grid selection one tile; previous / next capture in Reel and Focus |
| Up / Down | Move the grid selection one row |
| Page Up / Page Down | Move the grid selection one page |
| Command+1 / Command+2 / Command+3 | Copy the selected image at Low / Med / High |
| Command+Shift+D | Duplicate the selected capture |
| Command+B / Command+Option+B | Toggle the left / right sidebar |
| Command+Z | Undo a move to Trash |
| Command+[ / Command+] | Previous / next capture (Reel only) |
The video viewer and the editor have their own keys, listed above; the editor’s tools are in Tools.
Not yet
Honest gaps:
- Resume drafts on quit mid-annotation — if you force-quit while drawing, the half-finished overlay is lost.
- Numbered-step annotations — the callout badges you’d number 1, 2, 3 across a screenshot don’t exist yet.