
Settings
Defaults are the recommendation. The “why you might change it” note is the rarer case, not the headline. This page describes PwrSnap 1.1.16 and later.
The Settings sidebar has four groups. AI Providers and AI Features expand into sub-pages:
| Group | Pages |
|---|---|
| General | General, Updates, About, Hotkeys, AI Providers (Codex, Grok, Kimi Code CLI, Qwen Code, Gemini CLI, OpenAI voiceover; then Direct API: your connections and + Add connection), AI Features (Default agents, Enrichment, Usage, Guidance), Local Agents |
| Capture | System Permissions |
| Library | Storage & retention |
| Advanced | Experimental, Developer |
Every change saves as you make it and reaches every open PwrSnap window at once. There’s no Apply button.
General
Appearance, capture defaults, and startup.
- Color scheme: System / Dark / Light, default System. System follows the OS appearance and flips live when it changes.
- After you select: what Return does once you have
a selection in the capture selector. Default Ask.
- Ask offers both: Return snaps, R records the same selection.
- Snap hides the Record action entirely.
- Record makes Return start a recording and moves Snap to S.
The Video Capture shortcut always records, whichever you pick.
- Cursor capture: two switches, both on. Capture the cursor in screenshots adds the pointer to new screenshots as its own layer, so you can move or delete it in the editor. Capture the cursor in recordings bakes it into new videos; press C in the recording selector to override it for one take.
- Recording frame: Outline the area being recorded, on. Draws a tangerine frame around the recorded region while a video capture runs. It never appears in the recording itself.
- Recording audio: Include system audio and Include your
microphone, both off, so recordings are silent unless you say
otherwise. macOS only; on Windows recordings are screen-only and
the preference is just saved.
- System audio rides the Screen Recording grant PwrSnap already holds, so there’s no second permission.
- The microphone switch asks macOS for access the first time you turn it on. If macOS refuses, the preference is still saved and a row appears with Open System Permissions.
These are the defaults for new recordings. To change one take without changing the default, press A (system audio) or M (microphone) in the capture selector. See Capture → Audio.
- Launch at login: Start PwrSnap when you sign in, off. A login launch starts in the background: the tray icon and capture shortcuts are ready, and the Library stays closed until you open it. If the login item is switched off on the OS side, the card says Disabled by the operating system and offers Open startup settings (System Settings → General → Login Items on macOS, Task Manager → Startup apps on Windows).
Updates
Which published build PwrSnap follows, and when it installs one.
Release channel is a grid of four slots: two trains (Stable, Beta) by two tracks (Latest, Prerelease). Every slot shows the version currently published on it, with a link to its release notes, and is marked Selected or Installed where that applies. Click a slot to follow it; arrow keys move between slots without changing your choice.
| Slot | What it is |
|---|---|
| Stable · Latest | Smoke-checked. The default for everyone. |
| Stable · Prerelease | Release candidates for the stable line. |
| Beta · Latest | Beta builds off main. |
| Beta · Prerelease | Newest alpha off main. May not install. |
Until you click a slot, the page reads Following the build you installed. Pick a slot to pin it. A Stable install follows Stable · Latest, and a prerelease install follows its own track.
Check now has a Check for Updates button that reports its result on the page, then offers Restart to Update, Restart to Switch (for a move down to a lower version), or Retry Update. PwrSnap also checks hourly on its own, and a build behind the one you’re running only installs when you ask for it here. The update toast, Help → Check for Updates, and switching back down from Beta are covered in Install → Updates.
About
Build details, license, and links. (Update controls live on Updates.)
- Build: app version, Electron, Node, and Chromium.
- License: PwrSnap is open source under the MIT license, © 2026 PwrDrvr LLC. Open licenses shows the bundled third-party notices.
- Changelog: Open changelog shows the release notes bundled with this build, with a link to them on GitHub.
- Links: the website, this documentation, and the GitHub repository.
Hotkeys
Nine global shortcuts, all rebindable and all clearable. Click a chord to record a new one; press Escape mid-record to cancel, or the × beside a chord to unbind it. A Reset to defaults button, and a count of your customizations, sit at the top of the page.
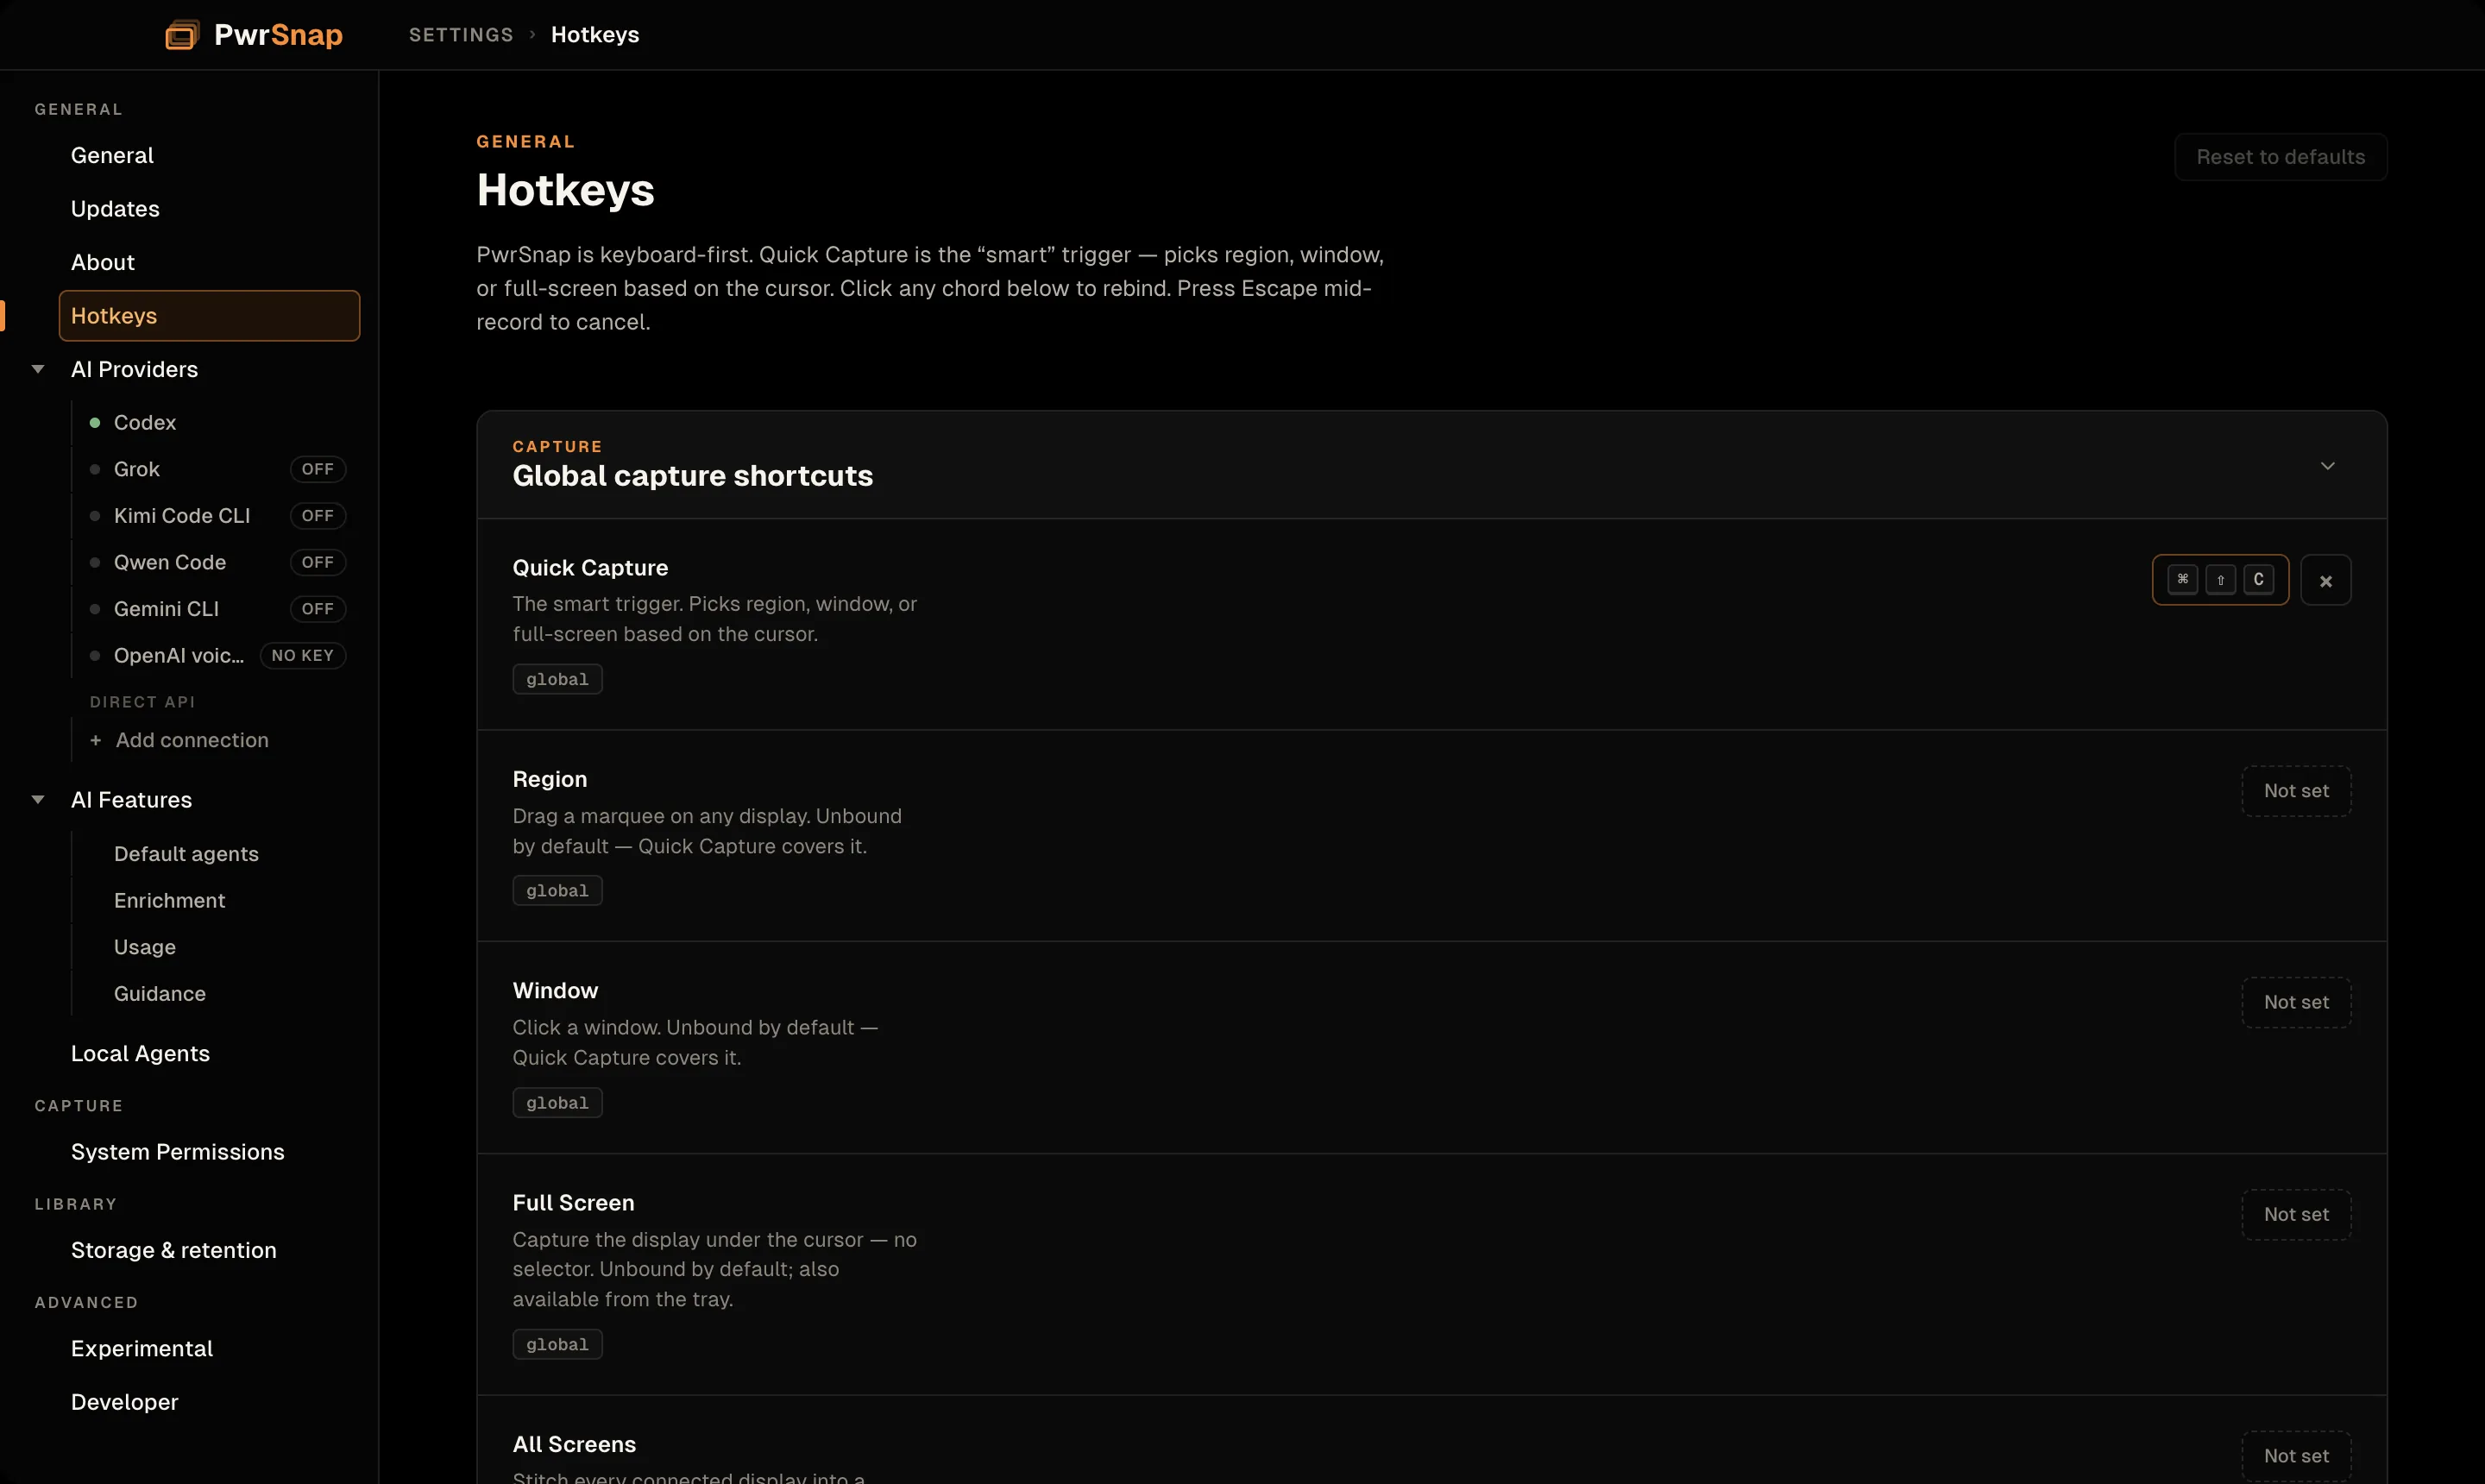
| Action | macOS default | Windows default |
|---|---|---|
| Quick Capture (snap a window, draw a region, grab a screen) | Command+Shift+C | Ctrl+Shift+C |
| Region | unbound | unbound |
| Window | unbound | unbound |
| Full Screen | unbound | unbound |
| All Screens | unbound | unbound |
| Timed (5 s) | unbound | unbound |
| Video Capture | Command+Option+C | unbound |
| Re-show last Float-Over | Command+Option+Shift+F | unbound |
| Open Library | unbound | unbound |
On Windows, every global shortcut is unbound except Quick Capture, Ctrl+Shift+C. Ctrl+Alt chords collide with AltGr on international keyboard layouts, so Windows leaves the secondary actions for you to bind. Region, Window, Full Screen, All Screens, and Timed are also on the tray on both platforms.
If a chord can’t be registered (usually because another running app already owns it), its row says so and offers Retry. Pick another combination if it keeps failing.
The in-editor shortcuts are fixed, not rebindable. The Hotkeys page lists the tool keys in a collapsed Editor card:
| Tool | Key |
|---|---|
| Pointer | V |
| Arrow | A |
| Shape | S |
| Draw | D |
| Highlight | H |
| Blur | B |
| Text | T |
| Crop | C |
A few other fixed shortcuts worth knowing:
| Action | Shortcut |
|---|---|
| Copy Low / Med / High (float-over, or the selected capture in the Library grid) | Command+1 / Command+2 / Command+3 |
| Video exports: GIF Low / Med / High, then MP4 Low / Med / High | Command+1 … Command+6 |
| Fit to window / zoom in / zoom out (editor) | Command+0 / Command+= / Command+- |
| Undo / redo | Command+Z / Command+Shift+Z |
| Select all / duplicate selected layers (editor) | Command+A / Command+D |
| Bring forward / send backward (editor) | Command+] / Command+[, add Shift for front / back |
| Nudge selected layers (editor) | Arrow keys; Shift + arrow moves 10 |
The Library page covers the video viewer and capture selector keys.
AI Providers
Where you set up the things that run AI. Which one does each job is chosen on AI Features. The hub page offers two ways to run AI:
- Installed agents: CLIs you already use, signed in to your own account. Each has its own sub-page and a status dot in the sidebar: green is ready, amber needs attention (usually a sign-in), red is turned on but can’t run, grey is off or not installed. Every non-green state also carries a word, such as OFF, MISSING, SIGN IN, or NO KEY, so color is never the only signal.
- Direct API connections: endpoints PwrSnap calls itself, with your key, on your provider’s bill.
Each provider sub-page opens with a strip showing which jobs it’s currently the default for, and a shortcut to change them.
Codex
The Codex CLI that PwrSnap drives: which copy runs, which account it signs in with, and a test that it starts.
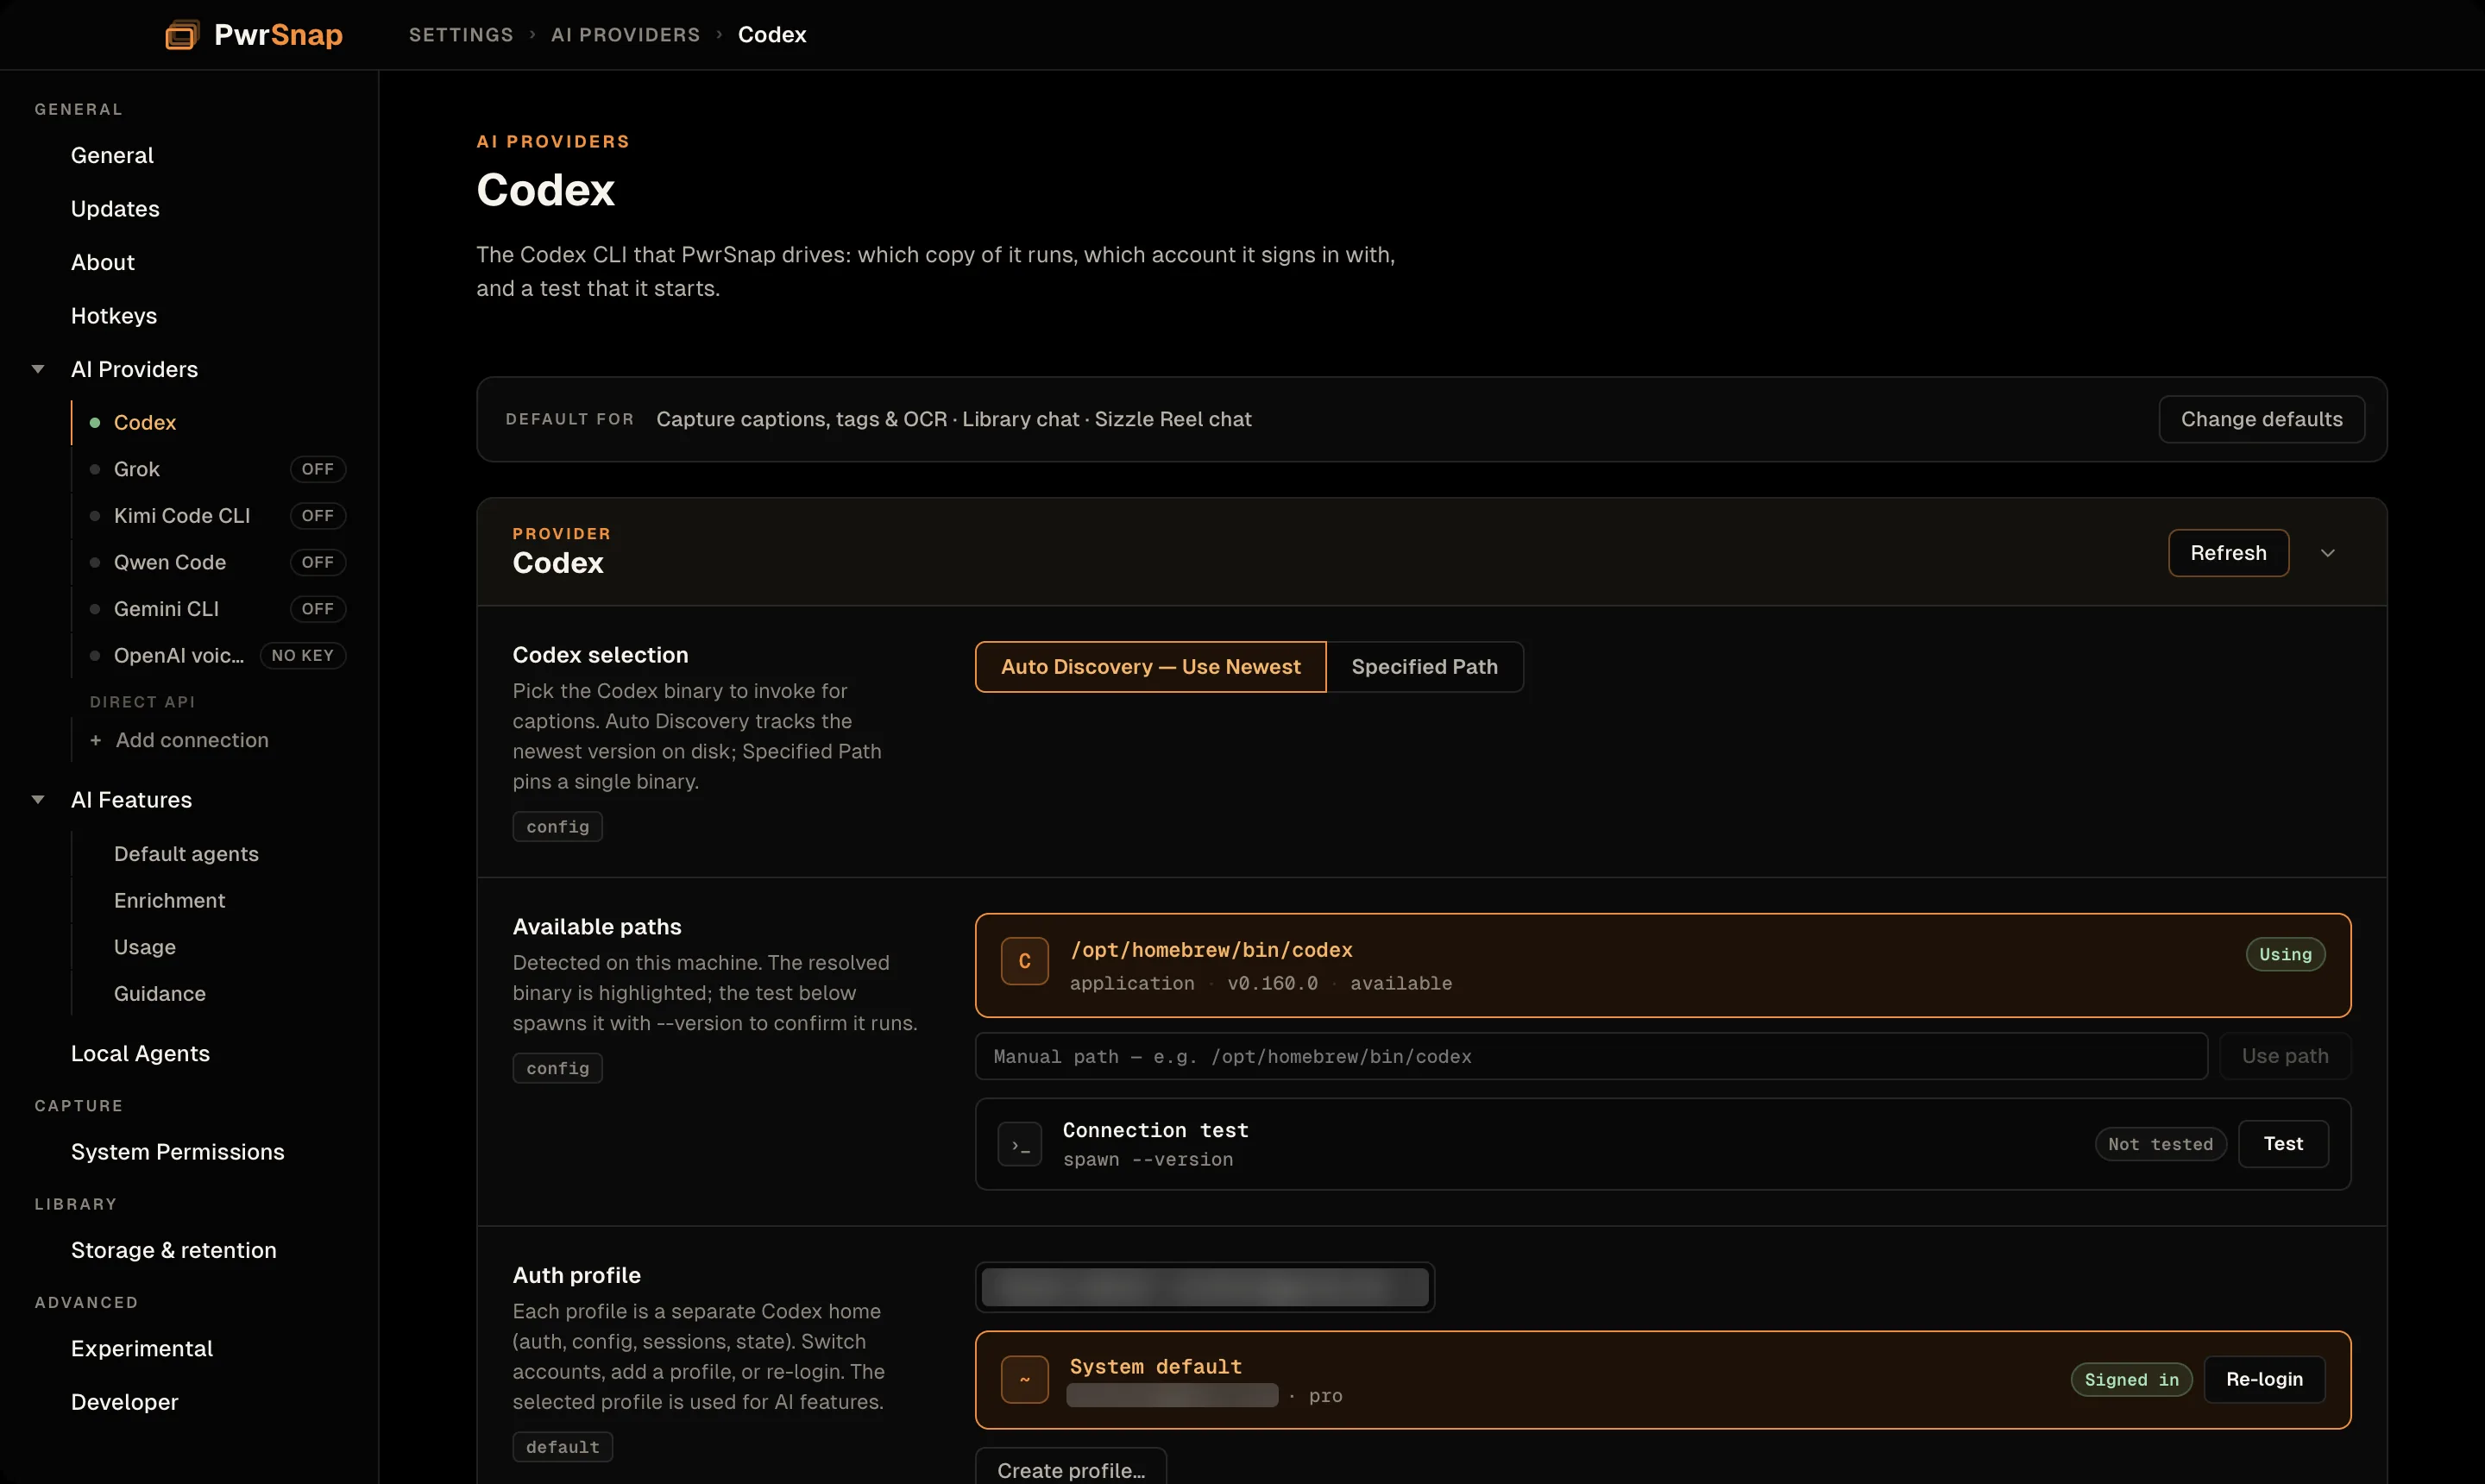
- Codex selection: Auto Discovery — Use Newest (default) tracks the newest Codex on disk; Specified Path pins one binary.
- Available paths: every Codex PwrSnap found, with its version. The one in use is marked Using; click another to pin it, or type a full path. Test runs the resolved binary to confirm it starts. Refresh re-scans.
- Auth profile: each profile is a separate Codex home (auth, config, sessions, state), so you can keep two accounts side by side. Switch profiles, create one, or re-login. The selected profile is the one AI features use.
ACP agents
Grok, Kimi Code CLI, Qwen Code, and Gemini CLI each get a sub-page. ACP agents are opt-in: none is enabled on a fresh install. The Install row shows where PwrSnap found the agent’s CLI. Tick Enable to make it available on AI Features → Default agents; pick which install to use when several are found, or set a manual path. Refresh re-scans installs. An agent that isn’t installed shows as missing rather than off.
OpenAI voiceover
The OpenAI API key used only for Sizzle Reel voiceover, which turns your script into speech. Paste a key to set it; it’s encrypted on this computer and never shown again. Every other AI job runs through Codex, an ACP agent, or a direct API connection. See AI → Voiceover uses OpenAI directly.
Direct API connections
+ Add connection walks four steps. Every step saves as it passes, so you can leave at any point and the connection stays, marked with what it still needs.
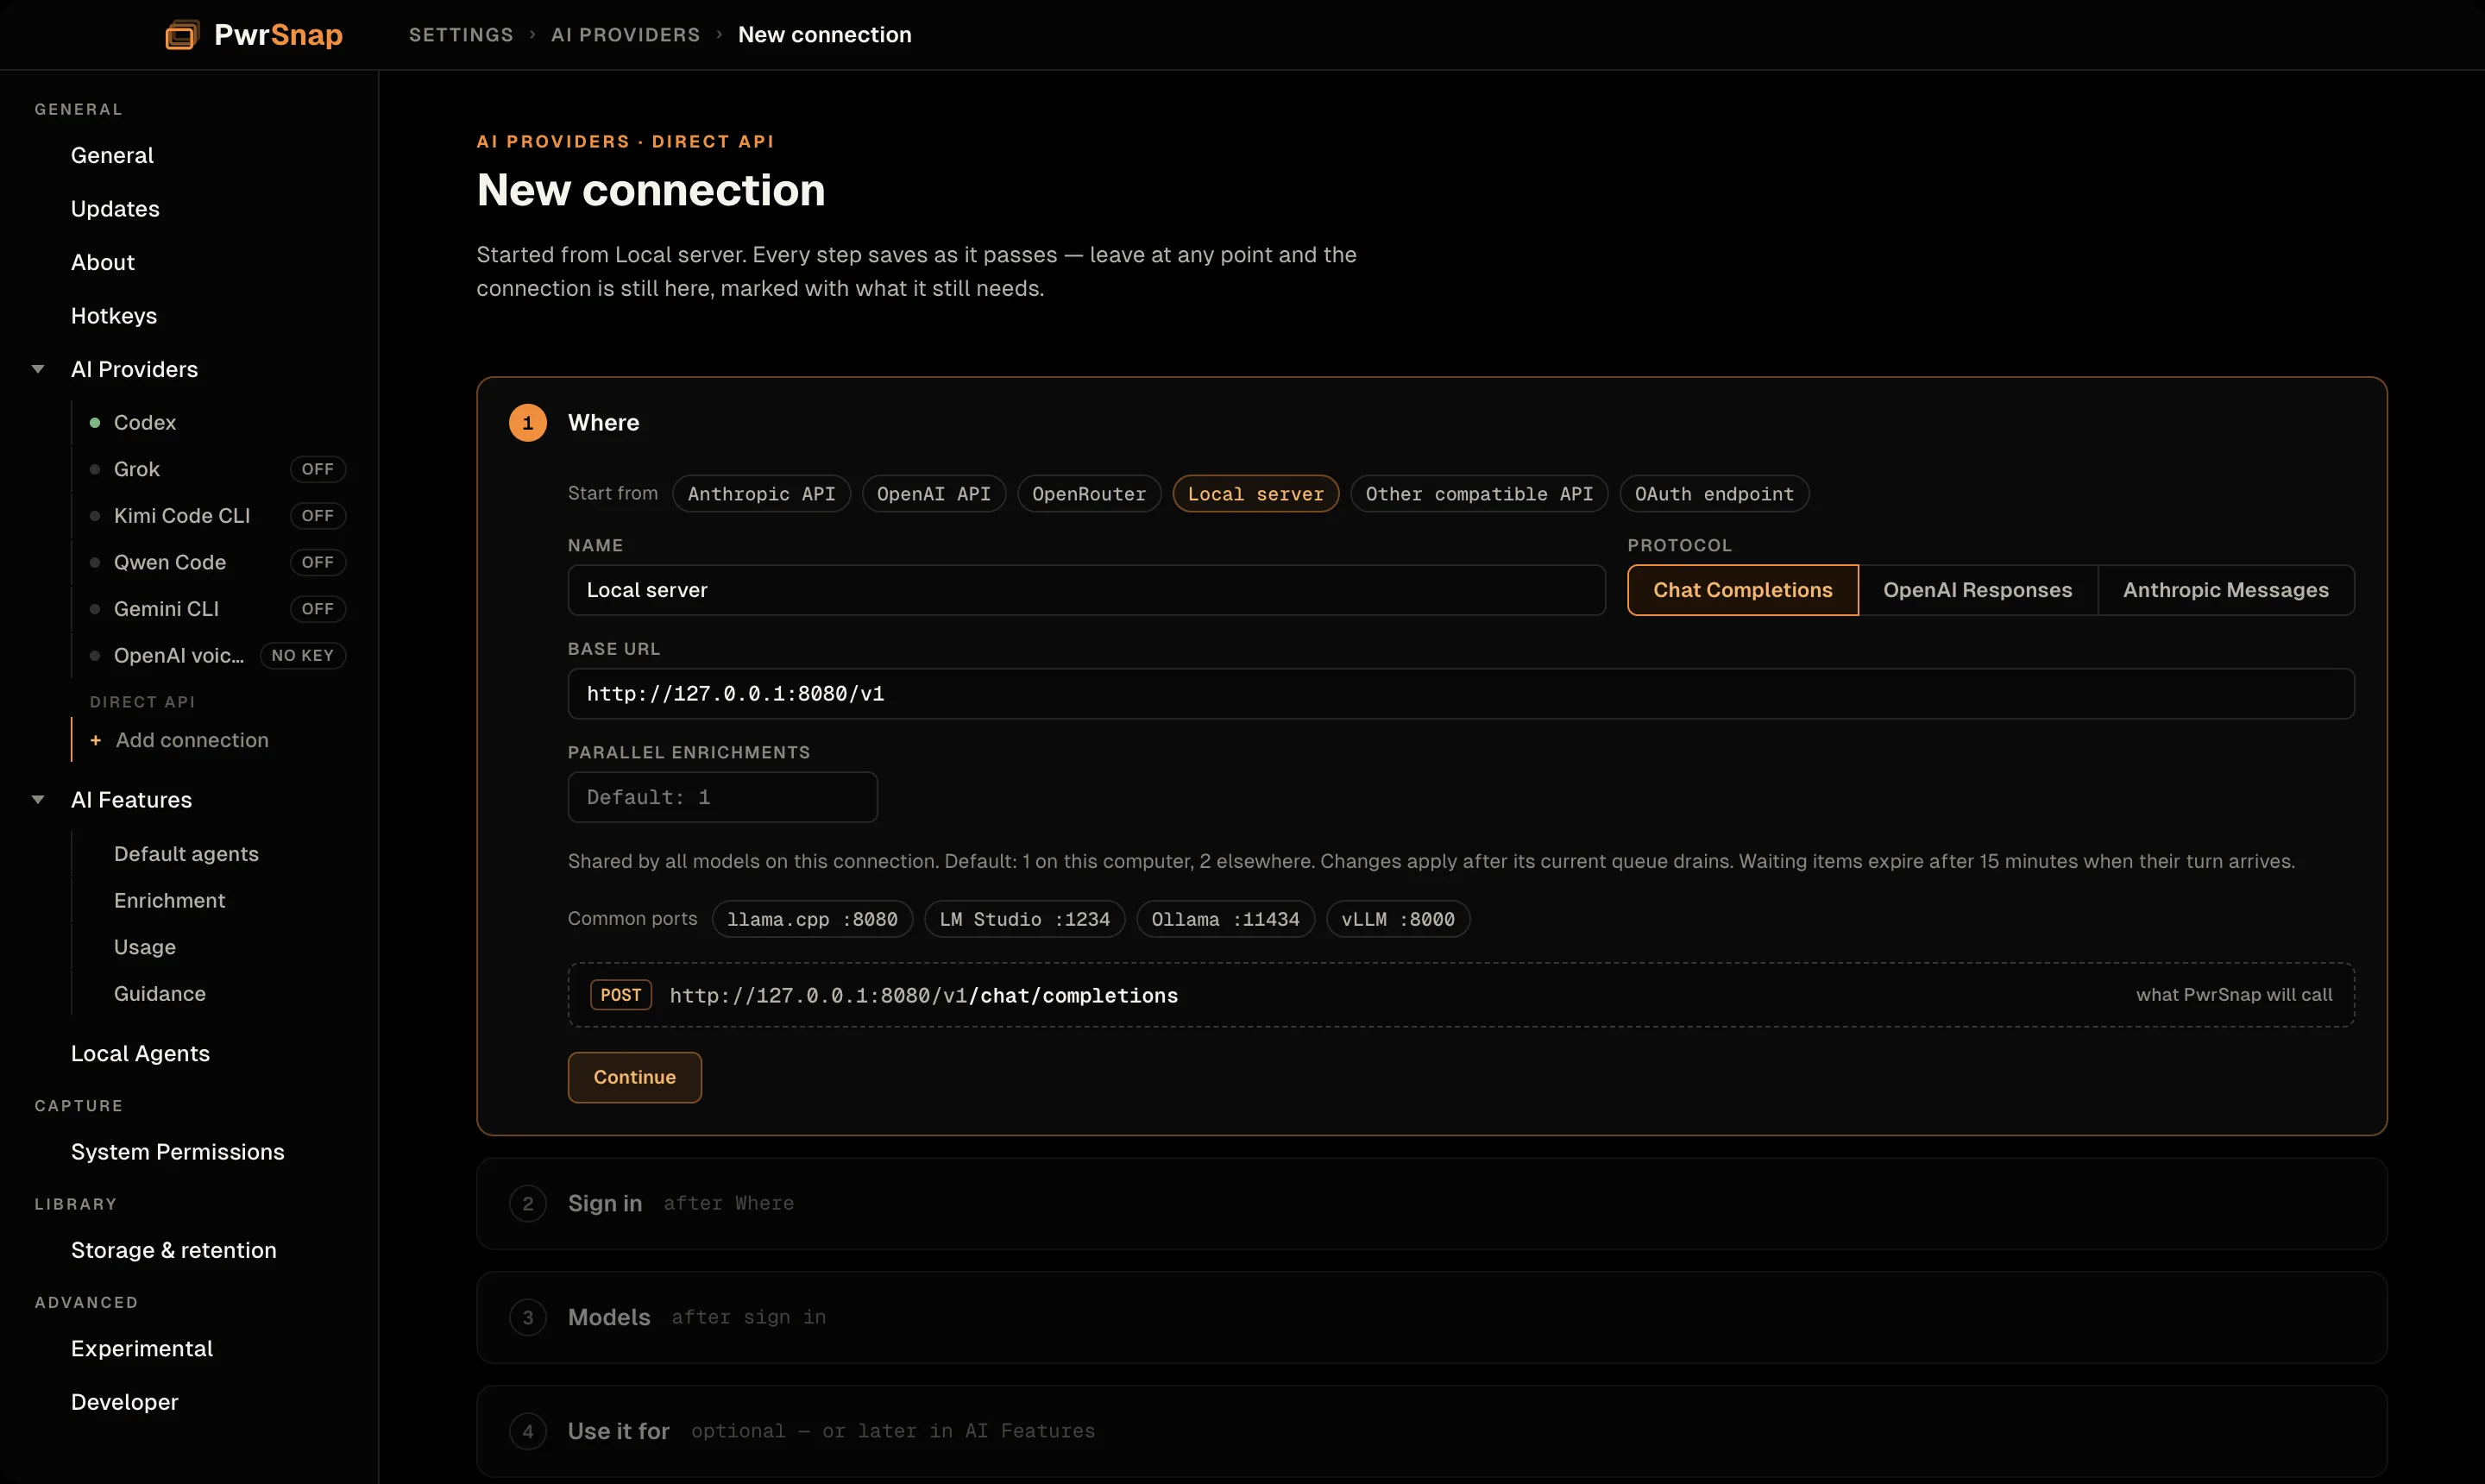
- Where: start from a template (Anthropic API, OpenAI API, OpenRouter, Local server, Other compatible API, OAuth endpoint) or fill it in yourself: a name, a protocol (Chat Completions, OpenAI Responses, or Anthropic Messages), a base URL, and Parallel enrichments (default 1 on this computer, 2 elsewhere). A preview shows the exact request PwrSnap will make. The URL must be HTTPS, or plain HTTP only to this computer.
- Sign in: an API key, an OAuth sign-in in your browser, or none (for a local server). The credential is encrypted on this computer and only ever goes to the address it was saved for; point the connection somewhere else and it asks for a new one.
- Models: pick from what the endpoint lists, or add a model id by hand. Give each a display name and say whether it accepts images. PwrSnap never guesses that from the model’s name, and captions need a model that does.
- Use it for (optional): make a model the default for any job. You can do this later on AI Features.
A saved connection gets its own sidebar row with a status (Add key, Sign in, Add models, Ready), and its page lets you edit the endpoint, change the credential, test each model (a few tokens on your provider’s bill), or remove it. Chat through a direct connection gets the conversation and the image you’re viewing — no editing tools, no reasoning control, no price estimate.
AI Features
What PwrSnap uses AI for, and which provider does each job. None of it runs until a provider is set up on AI Providers. The four sidebar entries are jump links to the cards on this one page.
Default agents
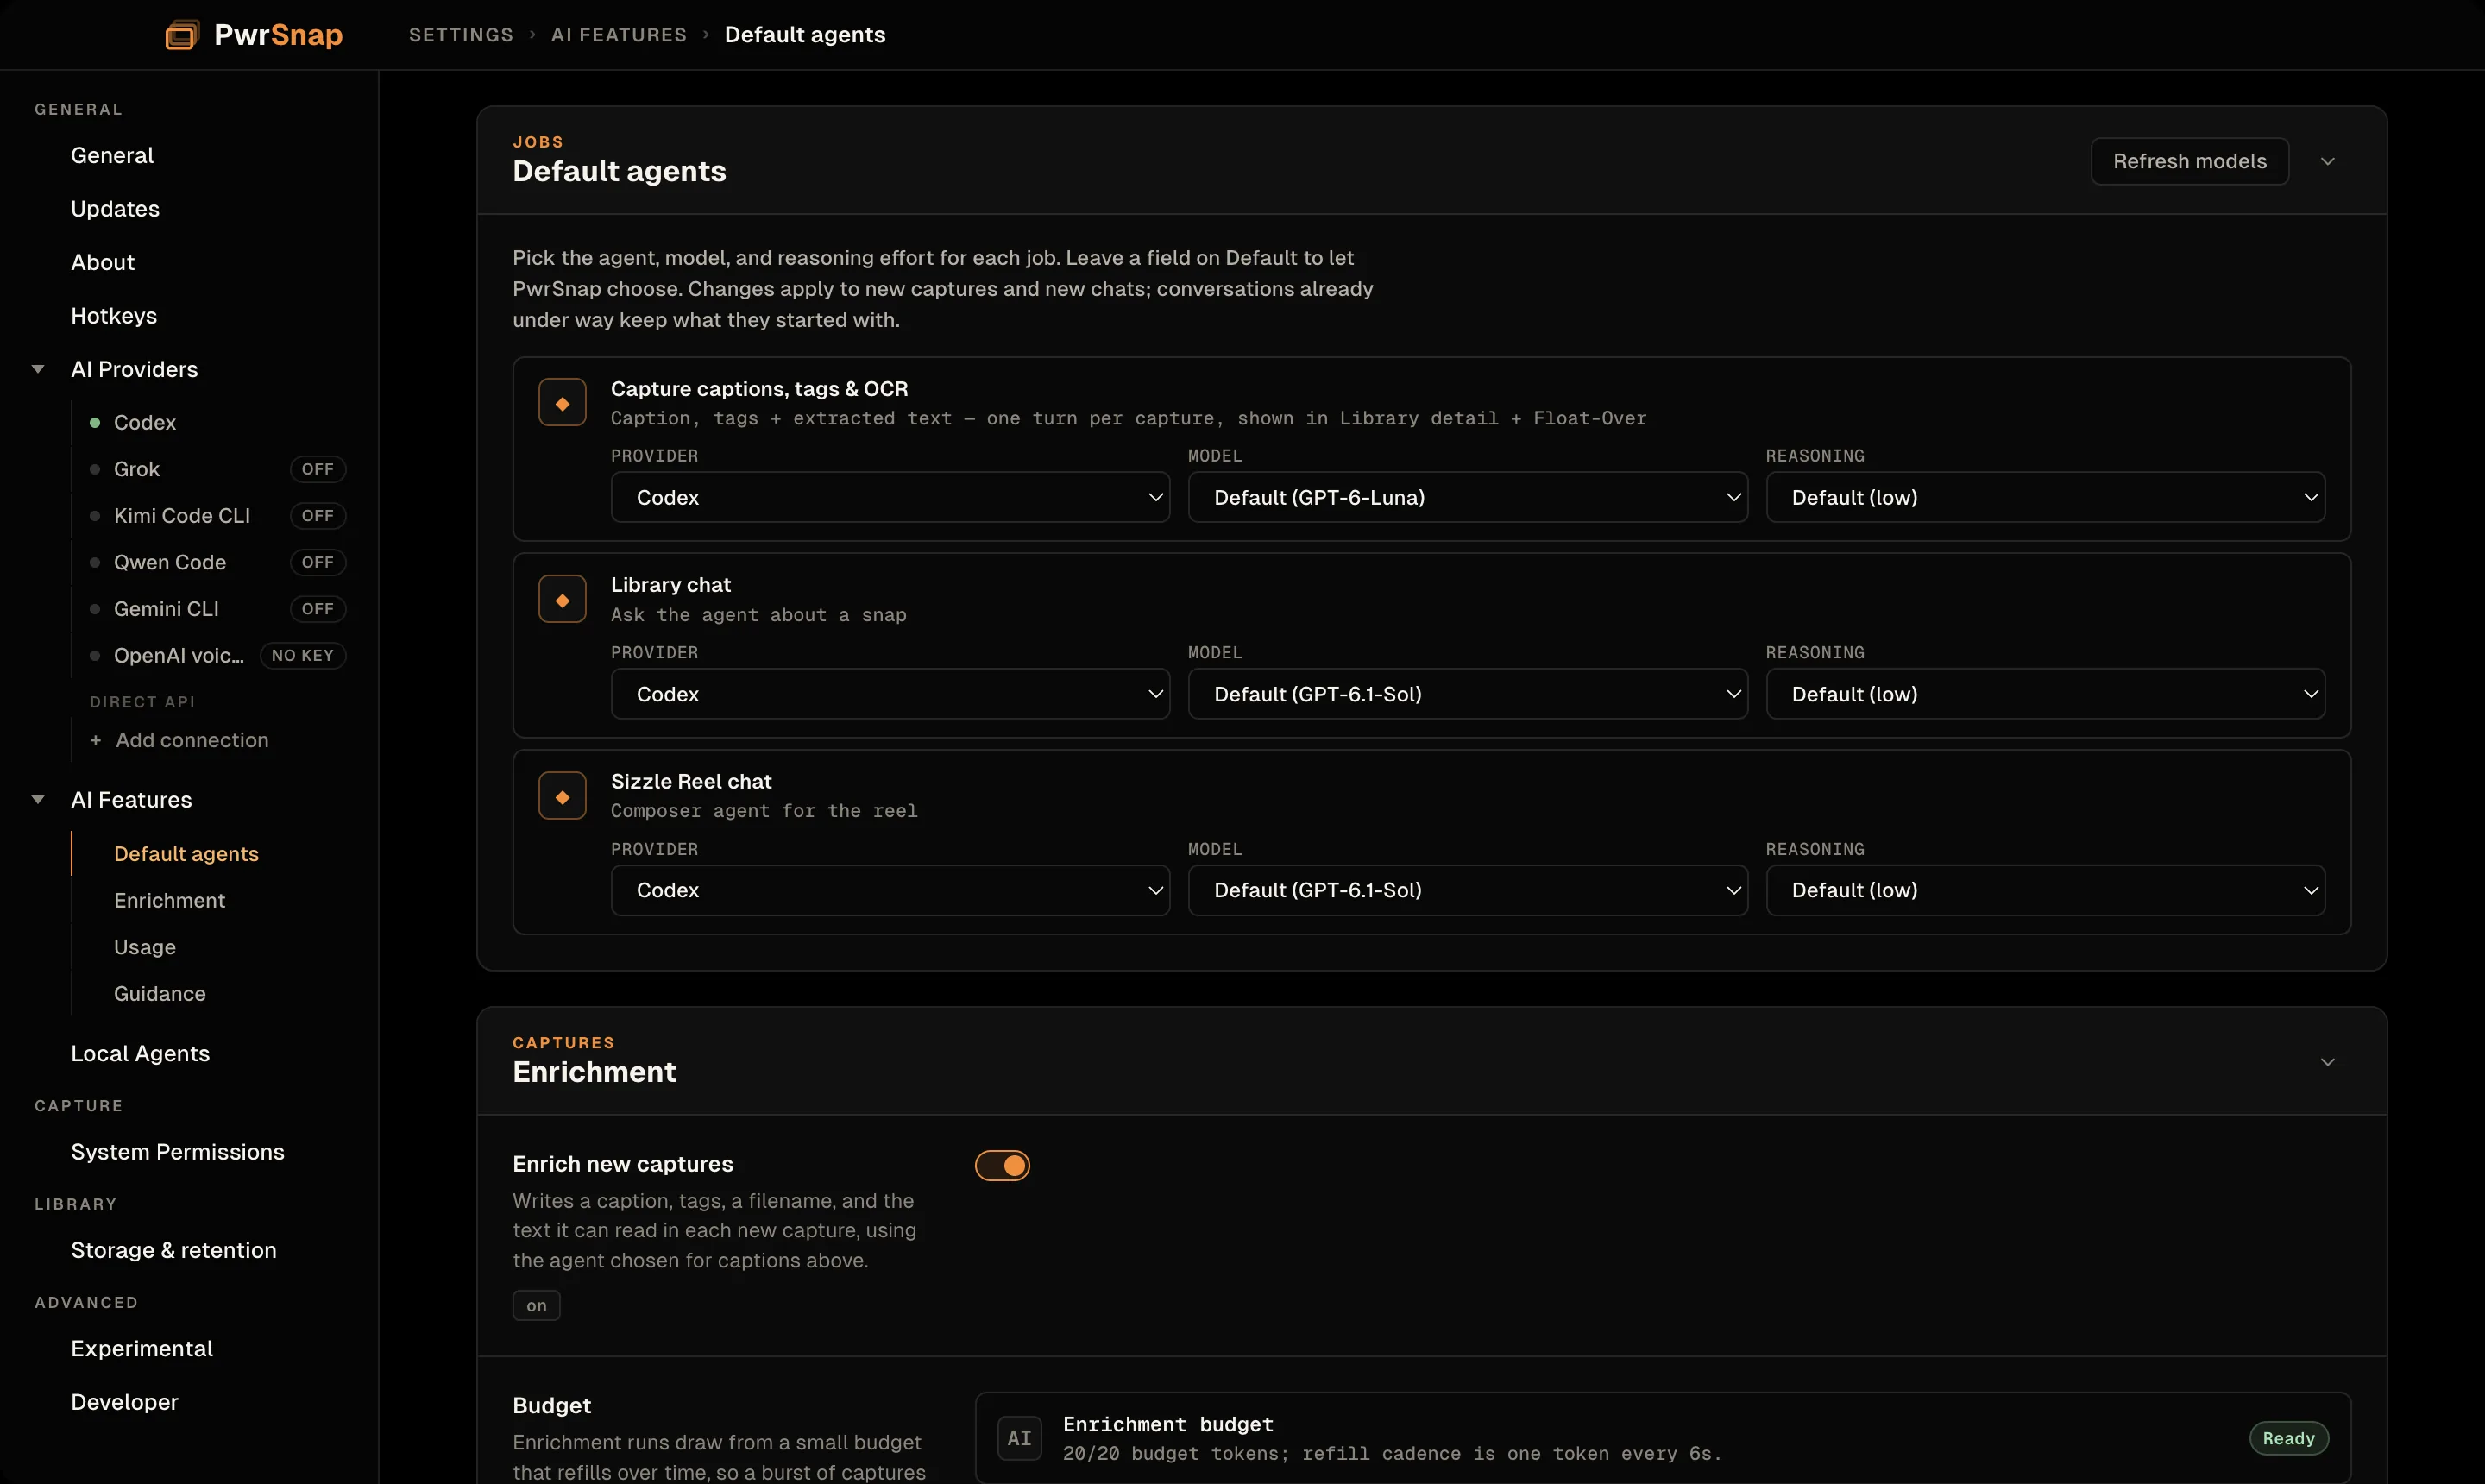
One row per job, each with its own Provider, Model, and Reasoning:
- Capture captions, tags & OCR: the enrichment pass on each new capture.
- Library chat: ask the agent about a snap.
- Sizzle Reel chat: the composer agent for a reel.
The provider list holds Codex, every ACP agent you’ve enabled, and every direct API model you’ve saved. Leave Model or Reasoning on Default to let PwrSnap choose. ACP agents offer Fast / Thinking in place of Codex’s effort levels. Refresh models re-lists what each backend offers. Changes apply to new captures and new chats; a conversation already under way keeps what it started with.
Enrichment
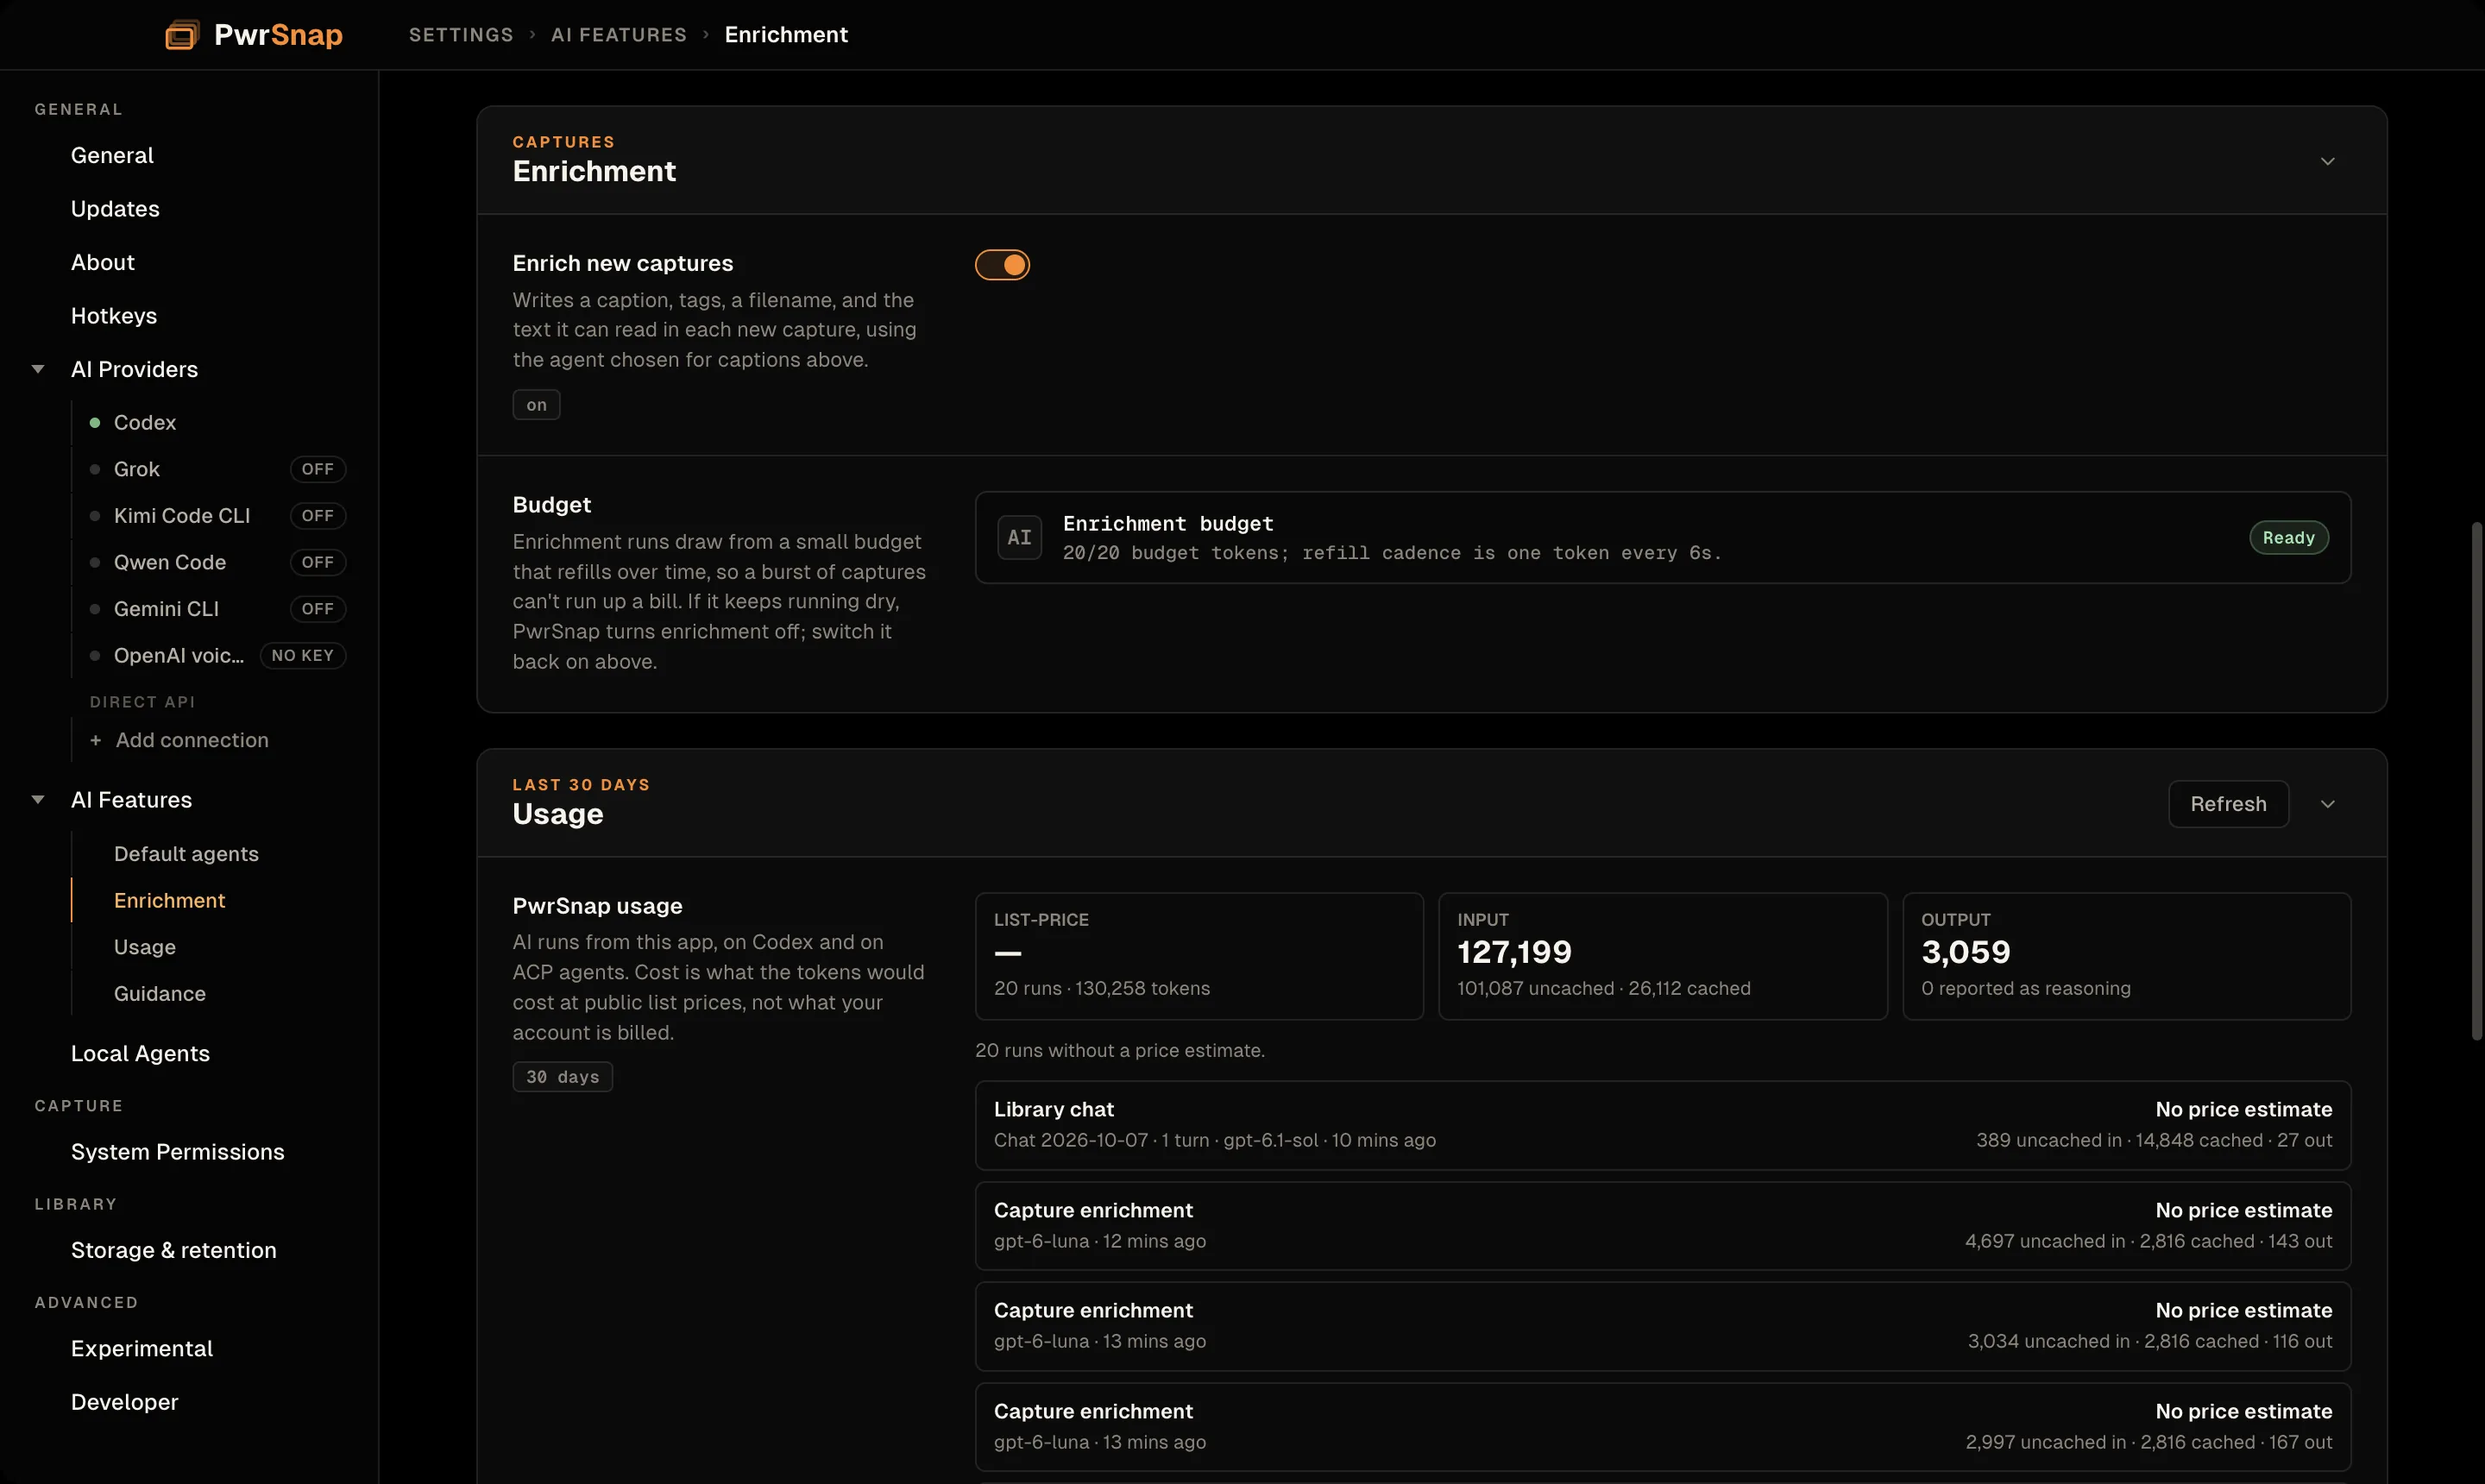
- Enrich new captures: off by default. Writes a caption, tags, a filename, and the text it can read in each new capture, using the agent chosen above. The first time you turn it on, PwrSnap asks for consent: a downsampled copy of each new screenshot, or sampled video frames, goes to the provider you configured. Existing captures are never sent automatically. The same switch is in the Library’s status bar.
- Budget: enrichment runs draw from a small budget that refills over time, so a burst of captures can’t run up a bill. The badge reads Ready, Slow mode (budget spent; the line shows when the next token arrives), or Safety off (it kept running dry, so PwrSnap turned enrichment off). Turning Enrich new captures back on lifts the cutoff.
Usage
A last 30 days panel of AI runs from this app: the list-price total (what the tokens would cost at public list prices, not what your account is billed), run and token counts, input tokens split cached / uncached, output tokens with the share reported as reasoning, and a list of recent runs (enrichment, Library chat, Sizzle chat) with the model and per-run cost. Runs whose backend doesn’t report a price show No price estimate.
Guidance
Two controls that shape what the chat agent does:
- User Guidance: free-form instructions injected into every chat, e.g. “always redact account numbers with a solid box, not a blur.”
- Sensitive-data patterns: name + shape-only regex rows the
agent uses to find and redact secrets (e.g.
123-45-6789for an SSN,sk-XXXXXXXXfor an API key). Never paste a real secret here, only its shape: patterns are stored in plain text.
A note above them says where chats live: transcripts and PNG
snapshots are saved as plain files under
~/Documents/PwrSnap/Chats (Documents\PwrSnap\Chats on Windows).
Local Agents
Where you let AI agents on your machine (PwrAgent, a coding agent in your terminal, anything that speaks MCP) reach into your Library. The page is titled Authorization graph.
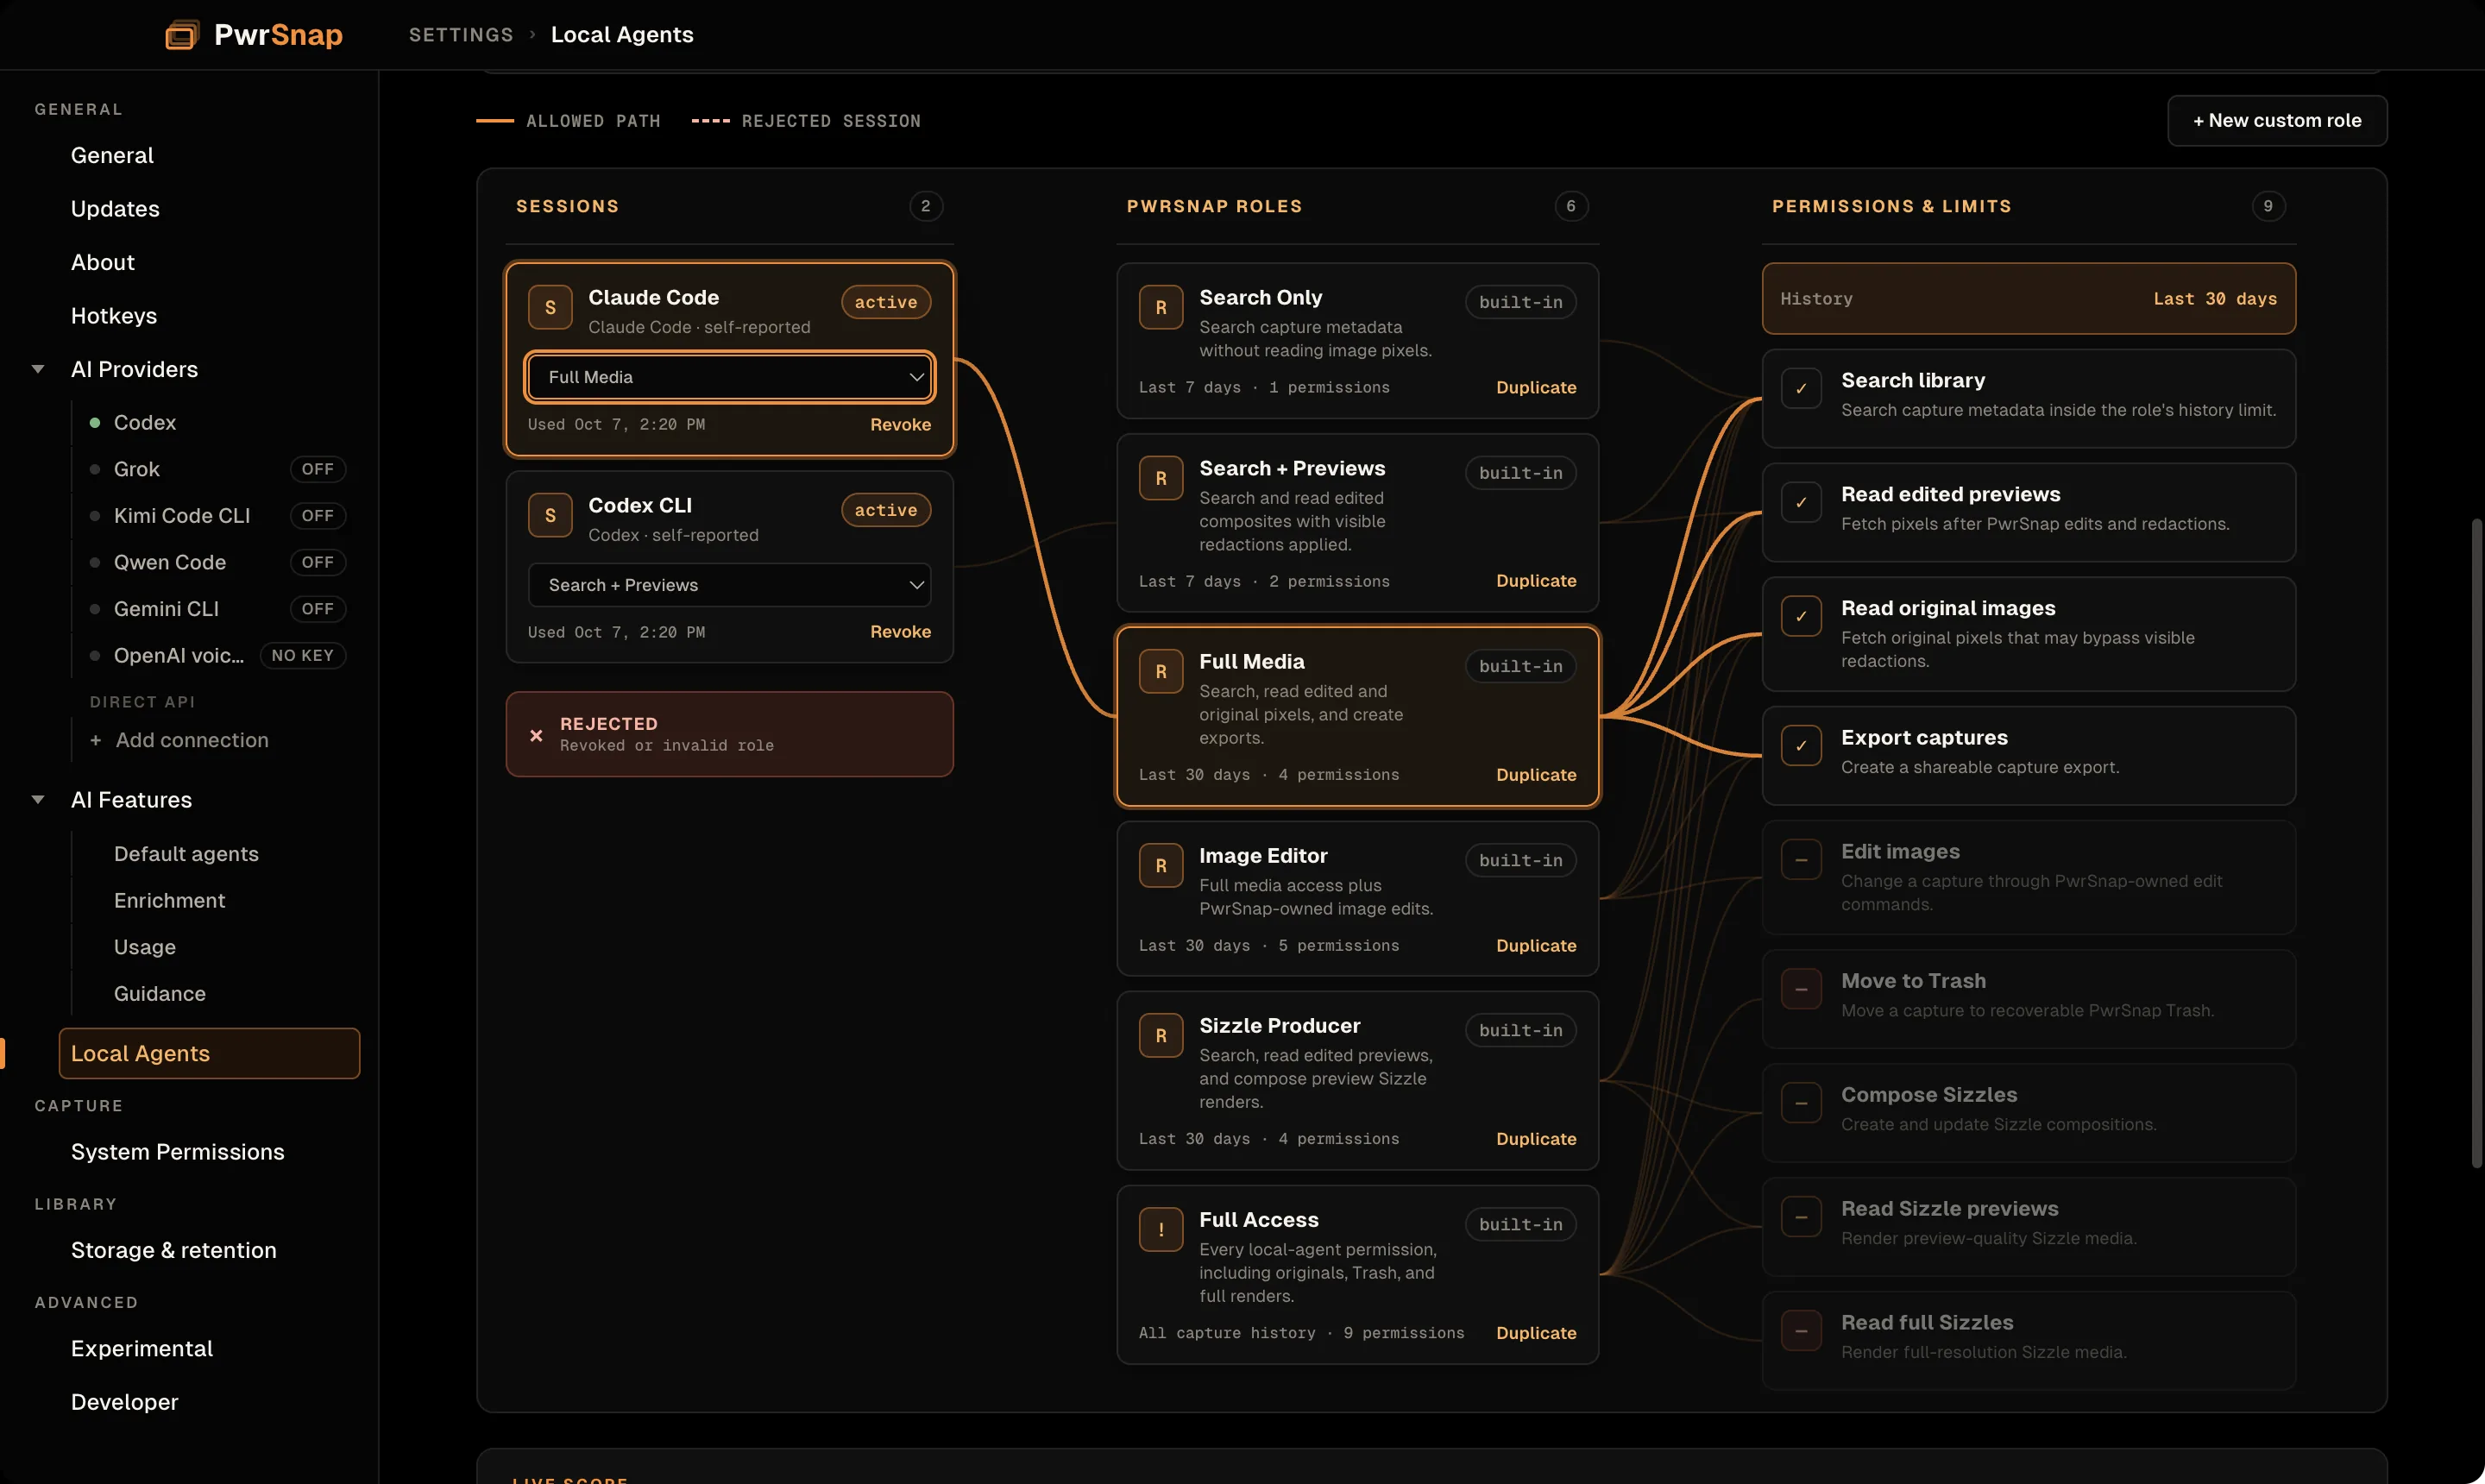
- Turns the server on. One switch, Enable local-agent access, off by default. With it off PwrSnap doesn’t listen for connections at all. With it on, every connection still needs your approval in a native window and an assigned role.
- Hands you the connect commands. A Claude Code and Codex card prints both connect commands with a Copy button for each.
- Shows who’s connected. Each approved connection is a named Session bound to a role, with a Revoke button. Policy is re-checked on every call, so a revoke lands immediately.
- Manages roles. Six built-ins from Search Only to Full Access, plus custom roles you build permission by permission, each with a capture-history horizon.
- Keeps a log. A collapsed Recent agent actions card holds the last 50 protected-media and mutation actions.
The full walkthrough (the consent window, what each permission means, what an agent can actually do) is on Agents. The per-agent recipes are on Connect an agent.
System Permissions
Every OS permission PwrSnap needs, with live status and a working action for each state. PwrSnap asks when you first need a permission; there’s no startup walkthrough.
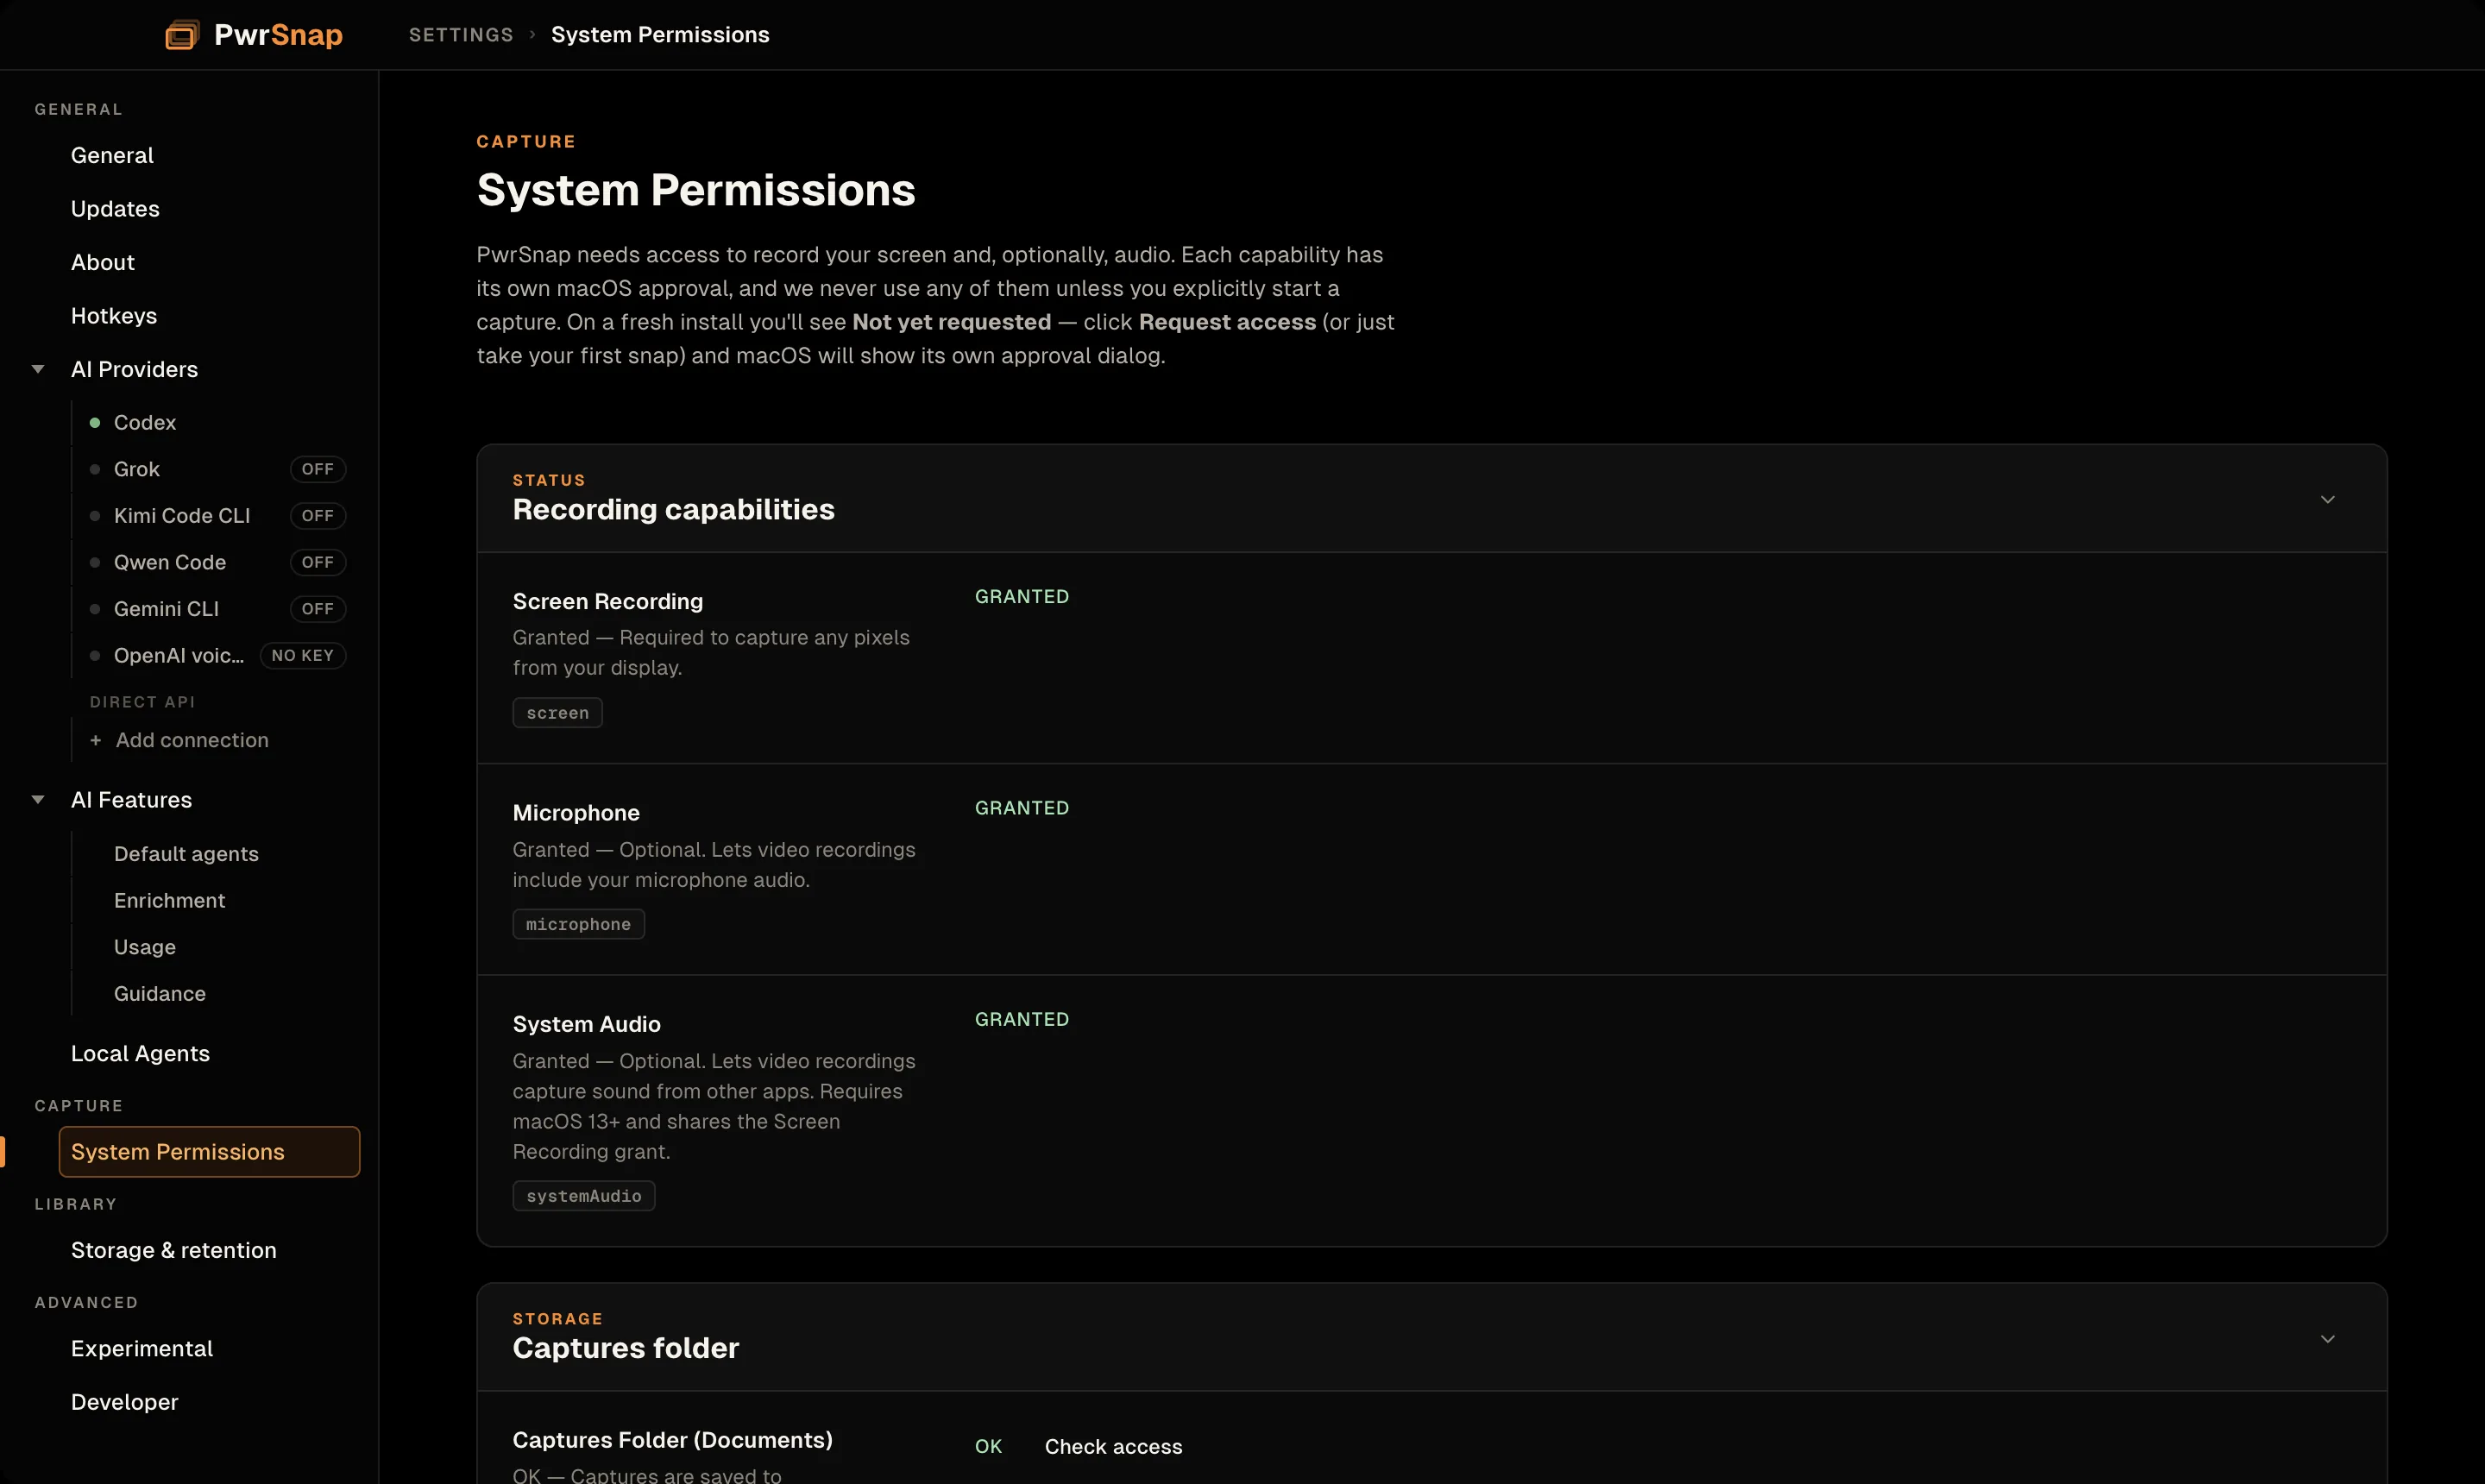
On macOS, the Recording capabilities card:
- Screen Recording: required for any capture, still or video. A fresh install shows Not yet requested with Request access, which fires the real OS prompt. You’re never shown “Denied” for a question nobody asked. Once actually denied, the button becomes Open System Settings.
- Microphone: for your voice on a recording, with Ask now.
- System Audio: for sound coming out of the Mac (a playing video, a meeting) alongside the screen.
On Windows, a Windows privacy controls card says plainly what Windows can’t tell PwrSnap: screen capture is Not reported (Windows has no per-app screen-capture status to read), and the microphone row shows Windows’ one global microphone setting, for information only, since Windows recordings are screen-only.
Captures folder: captures live in ~/Documents/PwrSnap/
(Documents\PwrSnap on Windows). Check access runs a real write
check; PwrSnap never probes the folder at startup. If Documents was
blocked, PwrSnap is saving to ~/PwrSnap/ (%USERPROFILE%\PwrSnap
on Windows) and this row says so. Once access works again and that
fallback folder is still empty, it offers Use Documents for new
captures. If captures have already landed in the fallback, it
stays in use so your Library isn’t split across two folders.
A Permission fingerprint card at the bottom is diagnostics, for when you’re filing a bug about a permission that won’t stick.
Storage & retention
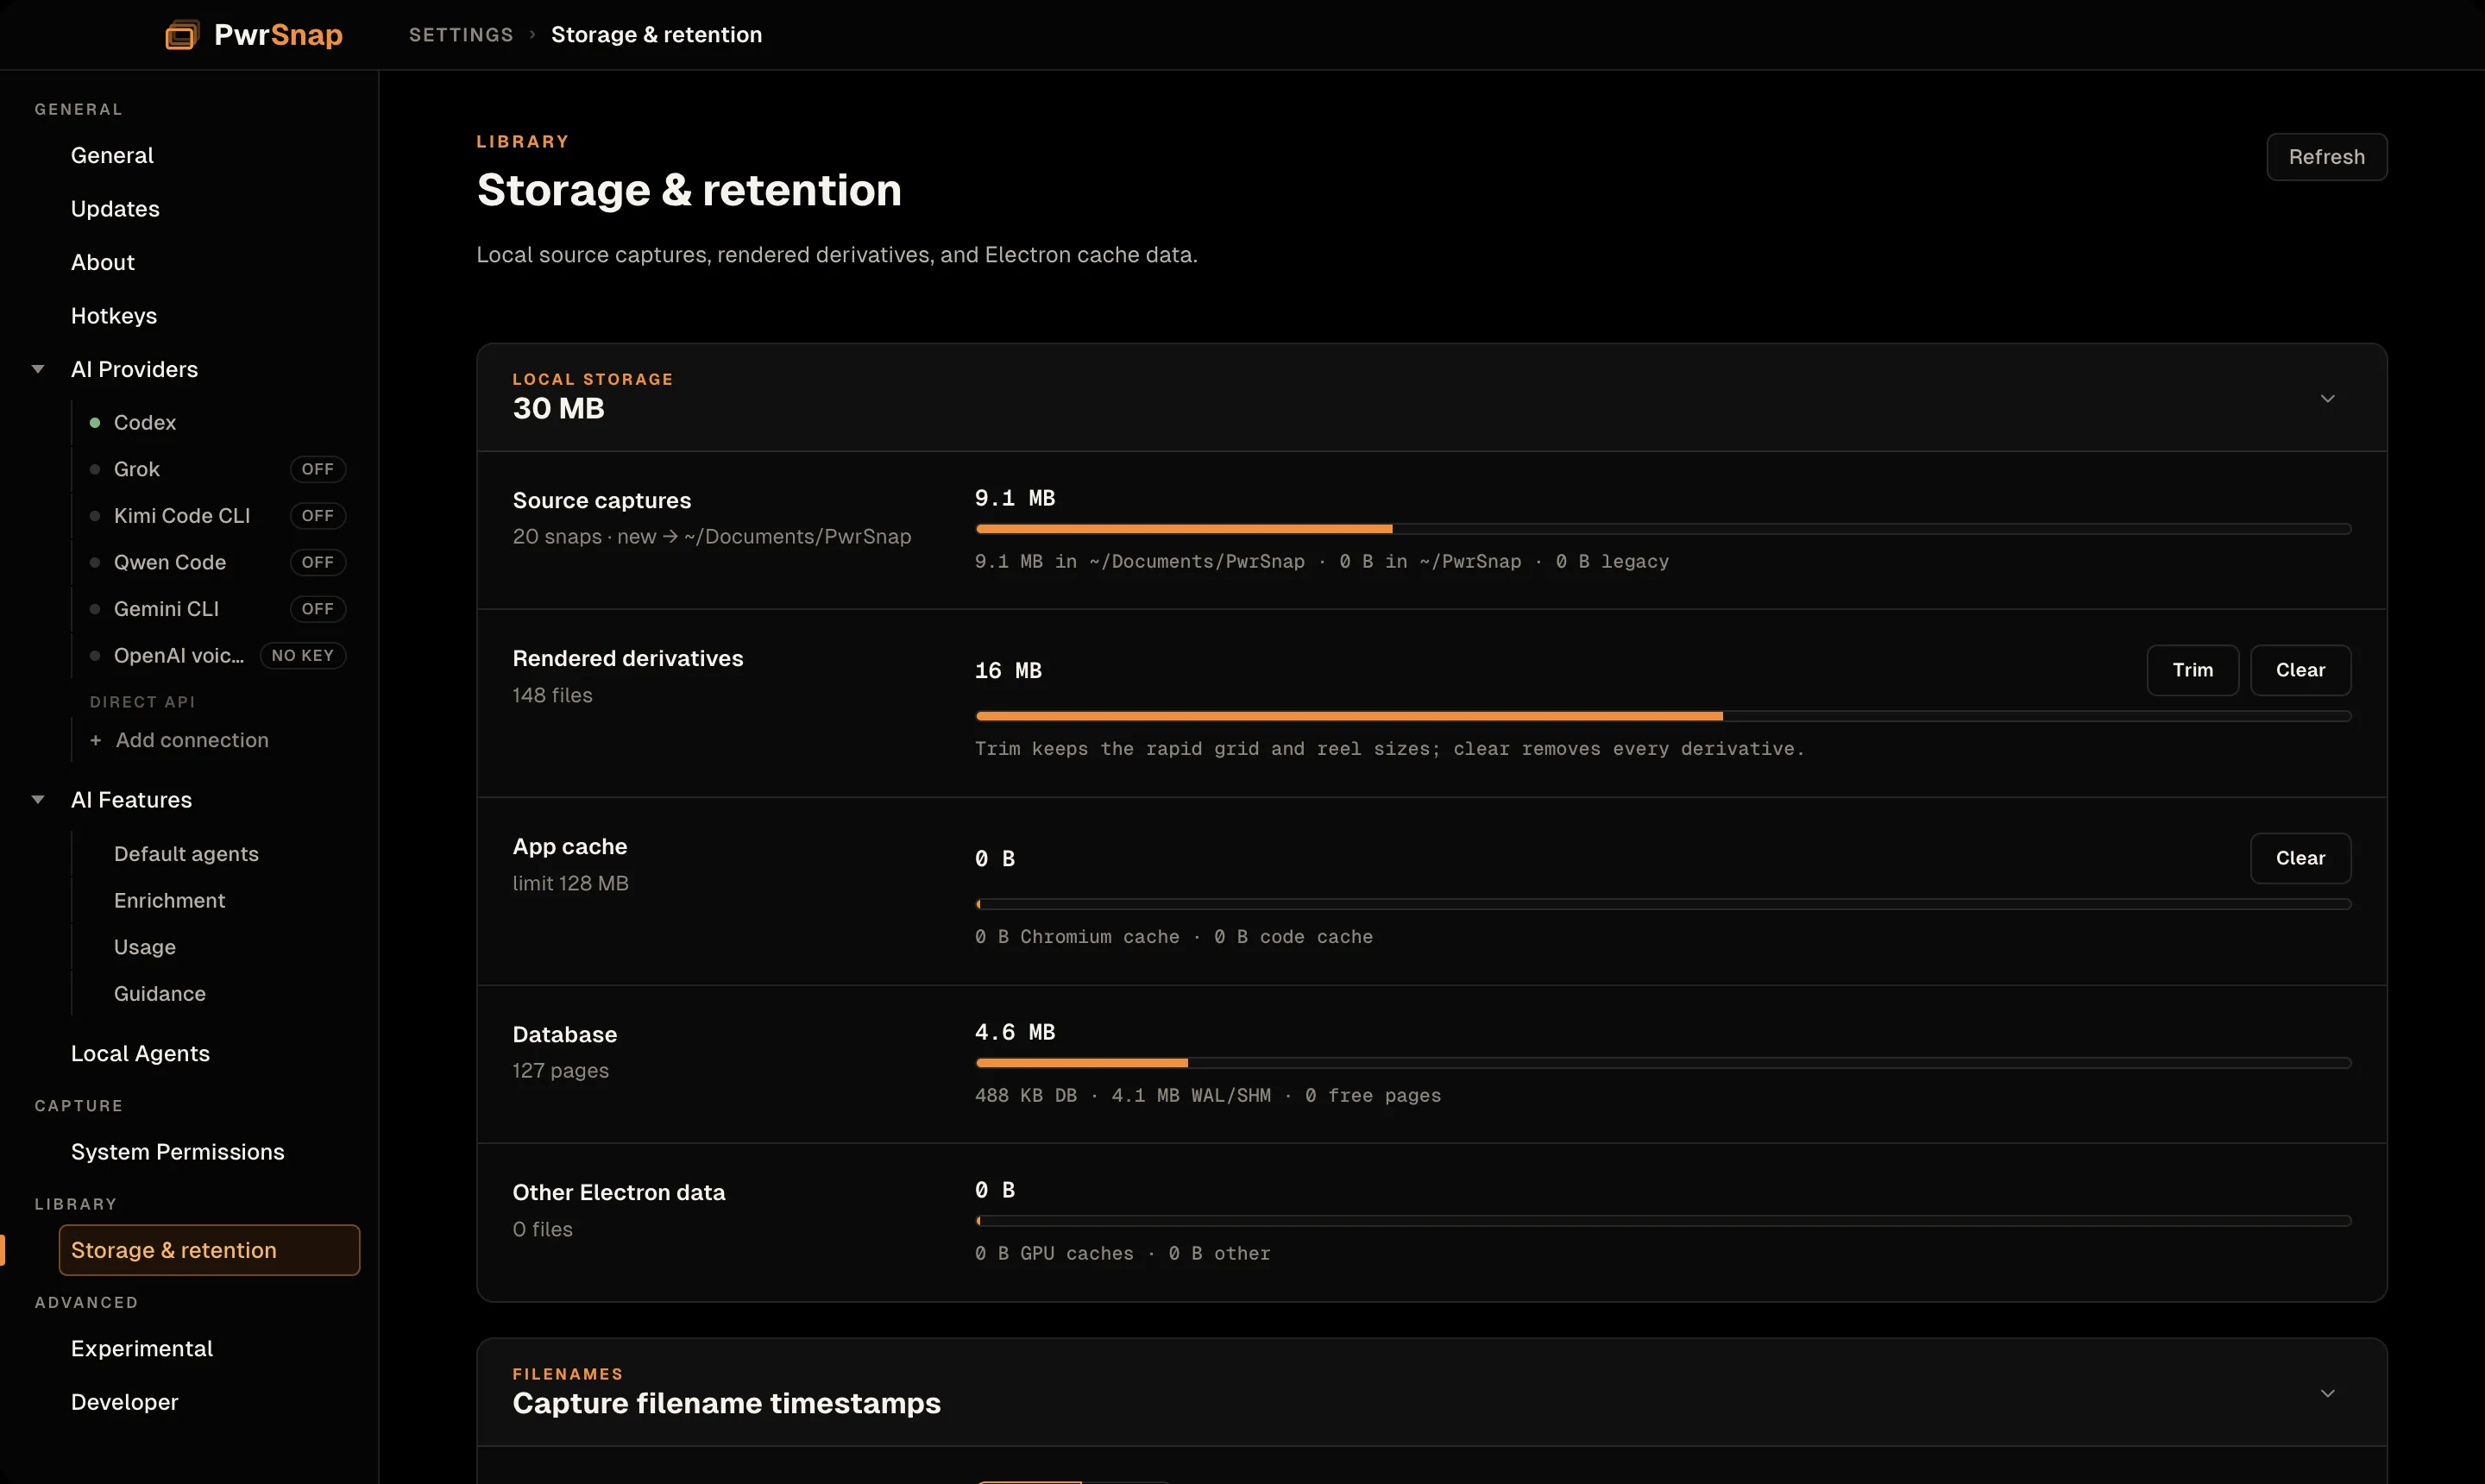
- Local storage: a breakdown of what PwrSnap is using on disk,
with Refresh.
- Source captures: how many snaps, where new ones go, and the split between the Documents folder, the home fallback, and any legacy location.
- Rendered derivatives: the export and thumbnail cache. Trim keeps the grid and reel sizes; Clear removes every derivative. Nothing is lost either way; renders are rebuilt on demand.
- App cache: Chromium’s own cache, with its size limit. Clear is safe.
- Database: the index.
- Other Electron data.
- Capture filename timestamps: Local (default) or UTC. Local matches the date and time you saw on screen; UTC is the one to pick when captures land on a shared drive across time zones.
- Confirm before moving to Trash: on by default. Shows a quick confirmation next to the delete button. Turn it off, or use Don’t ask again in the confirmation, to delete in one click. Moves stay recoverable from the Undo toast, Command+Z, and the Trash either way.
There’s no folder picker: captures go to Documents, or to the home fallback described under System Permissions. Trashed captures are permanently purged after 30 days; restore or purge sooner from the Library’s Trash view.
Experimental
Opt-in features that are still soaking. They may change shape or be removed without notice. Both are off by default.
- Two-process mode (macOS only): runs the menu-bar capture agent and the Library window as separate processes, so capture overlays never disturb the Library or flash the Dock. Takes effect after you quit and relaunch PwrSnap. Most people should leave it off.
- DPI-aware export: maps Low / Med / High to useful fractions of the capture’s pixels instead of fixed widths. On a Retina (or High DPI) display, High keeps the full-density image and Med normally lands at the on-screen size; a tiny capture offers one Actual-size export instead of illegible downscales. With it on, Allow Retina export (on by default; Allow High DPI export on Windows) decides whether High keeps the full-density pixels or caps at on-screen 1× size.
Developer
Diagnostics for detailed bug reports, or for working on PwrSnap itself. All off by default.
- Developer mode: adds Reload, Force Reload, and Toggle Developer Tools to the View menu.
- Hot CPU profiling: writes a CPU profile when the Library or main process stays hot, with per-process CPU in the samples. A start delay (Immediate, 5 seconds, 10 seconds) gives you time to set up, and the trigger is Spike, Sustained, or Slowburn.
- Smart heap snapshots: captures a small number of memory snapshots (2 or 3) around the next hot-CPU trigger, then switches itself off.
- Diagnostics folder: reveals the collected profiles, snapshots, and logs in Finder or File Explorer.